Version 1.11 – November 2025
- Fixed a typo and added a clarification sentence to the section dealing with Kustom Jobs
Version 1.1 – October 2025
- Spear clarifications added
- Blunderbuss clarification added
- Updated Flak armour to version used by other faction packs
- Tidied up equipment lists and armoury to be more consistent with other factions and still limit equipment to certain warrior types e.g. Snots
- Added optional vehicle capacities appendix
- Replaced Bosses weapons with Rebel Grot Weapons
- Replaced Gunz with Grot Gunz
- Used term Fixed Weapon alongside describing Big Gunz and Linked Weapons
- Glossary capitalisation overhaul
- Fixed missing Fire Twice rule for catapults
Version 1.0 - May 2023
- A roll of 6 is now an auto fail when attempting to lie to the Kommittee - to avoid stat freak Grots gaming the system.
- Rebel Grots now add a D6 and add the Kommittee modifier when generating income. This rectifies an oversight in the original rule book, and has been approved by Gav Thorpe.
- Grot Cuttas now move 2D6+6 when the wind is from the side, and 2D6+3 when from behind. This is the reverse of the original method, but is more reflective of sailing physics, and gives the Cuttas a small boost in average speed overall.
Changes from Gorkamorka Rulebooks rules
- Lying to the GRC patched
- Slight buff to income
- Cutta movement modified slightly
Introduction
This is the Rebel Grot Faction Pack. It’s designed to work in conjunction with the other GCE rulebooks so you’ll want to grab copies of those too (Core Rules, Campaign Book, Scenario Book).
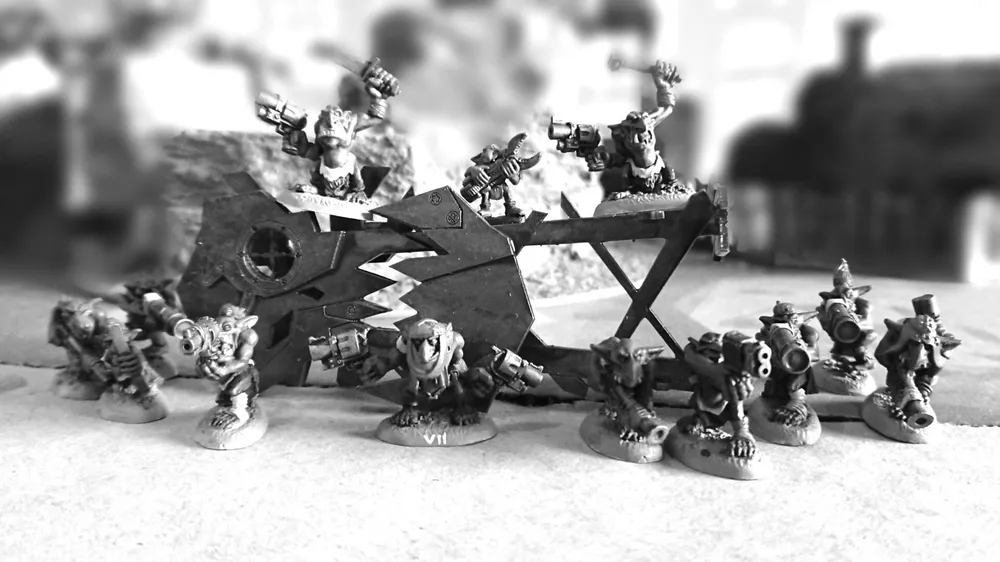
Rebel Grots
In every Ork society, there are Grots. Grots, or Gretchin in the parlance of the Imperium, are significantly smaller than their hulking Orkish brethren, though still tough and wiry by human standards. They also tend to be significantly less keen on an equal fight than Orks, though they still enjoy a scrap where they feel things will go their way or if there is loot in the offing. As might makes right in Ork society, this means that there is a very defined hierarchy amongst them, and Grots are firmly below even the weediest Ork yoof. Inevitably the Grots end up doing the dirty jobs that Orks feel beneath them, such as fetchin’ and carryin’, cleanin’, gatherin’, passin’ the numba’ three spanna, or pretty much anything an Ork may demand with a swift clip under the ear of the nearest Grot.
Orks are generally not actively cruel, at least by their standards, to Grots, and indeed Orks sometimes take a paternalistic shine to favoured Grots. However, they are certainly largely indifferent to both the efforts Grots make to keep the wheels of society turning and the frequent deaths and injuries of Grots in said wheels: Crushed under the buggy after the Orks were done changing tyres, swallowed by Gnasher Squigs while mucking out the pens, sucked into the gubbins when a Mek absentmindedly forgot they were cleaning the cogs.
On the whole, Grots accept this as the natural order of things, and take solace in the fact that they can lord it in turn over the animalistic Snotlings, the smallest of the Ork subspecies. Presumably the Snotlings feel they can look down on Squigs, and Squig’s thoughts on the matter of egalitarianism in Ork society have not yet been recorded. However, this (semi) comfortable order of things has not always been the case in Mektown under the towering shadow of Gorkamorka.
Tags for Grots!
Following the first burning of Gorkamorka in the big skism, the Meks instituted a system of “Tags” that acted as tickets for a place on the new, bigga, betta Gorkamorka for da “Big Day” when it would eventually lift the Orks back into space and on their way to the WAAAGH. Despite the central role of Grots in society, and the fact that the Meks would inevitably need a legion of Grots to actually get Gorkamorka running when the time came, Grots were excluded from the Tag system. No matter how hard they slaved, Grots simply weren’t given even the hope of getting aboard. This caused a huge stir in the Grot community as word spread like metaphorical wildfire. Soon actual fires were springing up in workshops and poorly spelled slogans were appearing around the bazaars and on the walls outside slopshops. Fractious Grots were soon slapped into their places by the Meks, but for every Grot hung up by their thumbs, two new knots of turmoil would spring up.
Da Gazillion Grot Gatherin’
As the Meks continued their crackdown, Orkish society slowly ground to a halt as Grots everywhere downed tools and started gathering in increasingly noisy and confident mobs. As the day went on, these groups filtered their way through the alleys and streets, flowing ever towards the towering strukture of the recently renamed “Gorkamorka”. As the individual mobs met they merged and grew louder, and soon the whole settlement shook to the sound of stomping Grot feet and echoed to their chants: “We’ze all Green!”, “Tags for Grots” and “Equal Rides!”. The march of the Grots, later remembered amongst the faithful as the Gazillion Grot Gatherin’, finally got the Meks to sit up and take notice. The chanting sea of Grots, cobbled together banners waving, entirely filled the dusty roads, squares and courtyards around Gorkamorka. The march stopped just short of a bemused line of Meks blocking the path up into the boarding ramps and gantries surrounding Gorkamorka. Grunts and shoving followed as a few ‘representatives’ were elbowed forward from the crowd of Grots, and a hastily scrawled Grotifesto shoved into their hands. This was proffered forward to the Meks, and they in turn craned forward, brows knitted with cerebral effort. Utter silence hung over Mektown for what seemed forever as the Meks read the list of demands, their lips silently moving along. Finished, the Meks sat back sternly. Their eyes met, and smirks slowly appeared, guffaws started, and in seconds they were leaning on each other in uproarious laughter. This was a slight misreading of the mood, and when a flailing arm knocked the Grotifesto into the dust an enraged shriek rose from the mob and it surged forward over the Meks, ripping them apart in a frenzied green wave!
Da Mean Streetz
As the Grots rampaged the onlooking Spannas and Meks started to fight back. Things quickly degenerated into a running battle as the hard pressed and surprised Orks pulled out their shootas in an effort to slow the oncoming tide of Grots. Sheer numbers kept the Rebel Grots on the offensive initially and dozens of Orks were pulled down, and an enterprising Grot even managed to set the flag of Da Rebellion flying high over Mektown on the structure of Gorkamorka. As they recovered from their surprise the brawn and superior weaponry of the Meks began to tell. Being on the whole a traditional lot, the Ork mobs that had gathered to watch the show also started to wade into the scrap themselves to “put dez Grots back in dere place”. Soon all of Mektown was one riotous battle, with Grots fleeing where they could or going down in “heroic” last stands against furious Ork mobs where they could not. As night fell all resistance collapsed and herds of Grots were rounded up by the light of burning buildings and those that refused to surrender were hunted down without mercy.
Da Grotz are Revoltin!
Following the crushing of their nascent rebellion the Grots largely fell back into line and, with typically short memories, the Orks shrugged and moved on with the business of getting the WAAAGH back on track, relying as heavily as ever on the sweat of their Grots. However, for many Grots, the world had changed forever. They’d seen what they were capable of, and they didn’t forget the feeling of the Orkish boot on their throats (and fingers, nose, etc.!). Many hundreds or even thousands of Grots had escaped into the desert during the battle, disappearing into the wastes on foot or on stolen rides. While most of these were rounded up in the coming days, many pushed on, on down Da Skid to its furthest reaches in what became known as “Da Long March”. Gradually the lack of supplies, dust storms, sand scorpions and nameless horrors of the wastes wore their numbers down, until only a core of the most hardened and fanatical remained. Finally the self appointed leaders of the Rebels declared their march over, and set about erecting the “HQ” of the newly appointed Gretchin Revolushunary Kommittee; a new glorious dawn for oppressed Grots everywhere!
Meanwhile, back in Mektown, the Grots were firmly back under the lash (or at least back of the hand) of their Orkish masters. However, of those who remained some still refused to give up and began to foment change in more subtle ways. The first clandestine meetings of revolutionary cells were held behind drawn curtains, with codewords and furtively passed notes. Secret presses went into action, and small copies of the Grotifesto began appearing on cheap fungus paper, quickly becoming known as “Da Little Green Book”. Despite the threat of a “good thumping” if caught in possession of such tracts by any Ork patient enough to read, these spread widely through Mektown and turned many a disgruntled Grot into a full on rebel with a cause. These secret Mektown rebels or “filth columnists” as the Meks refer to them, are vital to the Gretchin Revolushunary Kommittee. They help slip supplies, ammunition and new recruits out of the town and into the hands of waiting rebels under cover of darkness, or via “underground railroads” secretly dug beneath various workshops near the Mektown walls.

Many years have passed since the original rebellion, and the Rebel Grots have grown to be a serious thorn in the side of Mektown. Many an Ork mob has lost scrap, vehicles, and boyz to sudden raids by Grot mobs, often sweeping down out of the dune seas to attack isolated groups and disappearing again on the wind before resistance can be mustered. Bits and pieces go missing in Mektown constantly, and although most are usually found again under the table where they rolled, this doesn’t stop the Spannerz from blaming “doze thievin’ rebel grots”.
The Gretchin Revolushunary Kommittee continues its plans for “da big day” when they will show Mektown once and for all that Grots deserve a spot on Gorkamorka. This shadowy Kommittee orchestrates raids, decides on “stratagi” and distributes the loot amongst the Rebels. It is always evolving as quietly violent internal politics amongst the leaders of the rebellion play out. This leads to changes of tactics by the Rebels from time to time, particularly as the nominal figurehead of the Rebellion and Chairgrot of the Kommittee, Da Red Gobbo, changes their hat (and height and voice) suspiciously often. Similarly, over time various splinter groups of Da Rebellion have formed. While they nominally all want the same thing, disagreements have arisen over exactly how to achieve this. These sometimes even come to blows, and the fractious relationship between subgroups such as the Grot’s Front of da Skid and the Skid Grot’s Front (splitters!) is legendary.
No matter who is in charge though, Orks out in the wastes will always be looking over their shoulders and keeping a sharp ear out, as they never know when the squeak of poorly oiled cranks and high pitched battlecries will herald the Rebellion coming for them!
Creating a Mob
When recruiting your Rebel Grot Mob there are a number of Warrior (using the term loosely) types available. We’re going to go through them below before tackling the nitty gritty of hiring, statlines, special rules and so on.
Da Head Honcho
Da Boss, da Big Cheese, da…biggest. The Head Honcho has a vision of a better place for Gretchin in Orkish society and the muscle to convince other grots to follow along. (Slightly) bigger and burlier than most grots, they’re the one who has to face up to the Kommittee and will go to great lengths to make the mob look good. Every Rebel Grot Mob is led by a Head Honcho.
Da Banna Wava
Every revolushun needs a symbol, ideally one that you can wave at the end of a long pole. The Banna Wava carries a big banner, flag, orkish skull, or similar totem for the mob to rally around in their fight for ‘da cause’. Most mobs will have a Banna Wava if they really believe they’re fighting the good fight.
Grots
Da common clay of da revolushun, diamonds in da rough, salt of da erf. You know, Grots. These are regular Gretchin who’ve run from the boot of their Orkish oppressors and are looking for ways to strike back. While they’ll never match up to an Ork, they make up for a lack of bulk with cunnin and numbers. They’ve been doing this for a while and will make up the majority of any Rebel Grot Mob.
Snots
Even a Grot needs someone to look down on. Snots are the smallest (non-squig) members of the Orkish ecosystem aside from the animalistic Snotlings. Snots are proto-grots who’ve only recently emerged from the wastes and have been swept up by the Rebel Grots before they could gravitate to regular Orkish society. Given time, and a bit of luck, they’ll toughen up to become full members of a Rebel Grot Mob.
Vehicles
Due to their outcast nature, Rebel Grot Mobs don’t have access to the mechanical expertise or “standardised” vehicles that Meks and Spannas bring to regular Ork mobs. Despite their enthusiasm, or even apprenticeships with proper Meks, Grots simply don’t have the aptitude to keep gas engines running for long. Instead, they cobble together a bewildering array of vehicles from lashed together scrap, old rope and fabric and captured or abandoned Ork chassis. Their vehicles fall into two main categories - light sail powered “cuttas” and larger “big luggas” powered by good old fashioned elbow grease.
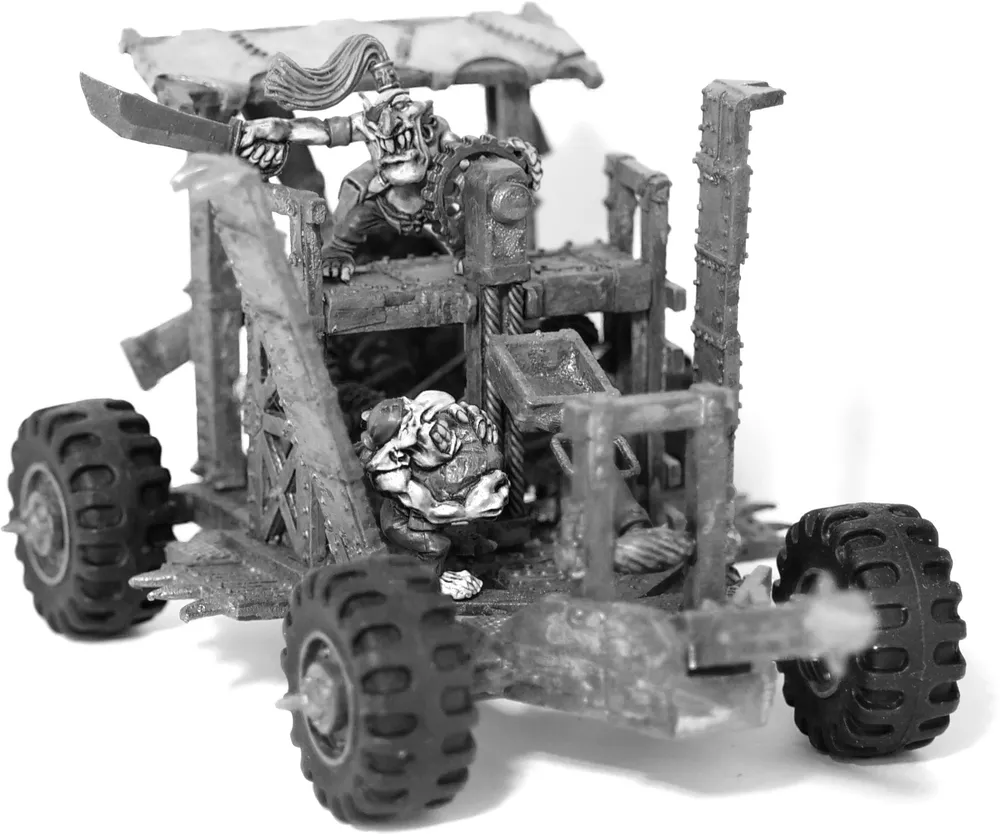
Big Luggas
These are the Rebel Grots' main vehicles, and can often be big enough to carry whole mobs. They derive their power from the crew aboard via a range of ingenious and undoubtedly dangerous means, including pedals, pumps, and cranks turning huge fans, belts, shafts or even the wheels directly. This means in practice that the more crew set to work powering the Lugga, the faster it will (generally) go. These are also the only Grot vehicles sturdy enough to have Fixed Weapons mounted on them and are generally used to chase down Ork vehicles and overwhelm them with a green tide in daring boarding actions. In game terms they should be modelled to physically accommodate a good number of the models in the mob. Whilst a bigger vehicle might sound like a good idea in theory, you’ll find that they’re a lot harder to steer around obstacles - and template weapons affect them much more.
Cuttas
These are lightly built runabouts, powered by large sails and thus dependent on wind strength and direction for getting around the battlefield. They’re too light to mount fixed weapons but are quite nippy and useful for running down Orks on foot or snapping up scrap. They can be modelled to fit any number of crew, but as above, larger vehicles will be increasingly unwieldy and lightly built Cuttas with lots of crew will make prime targets.
Recruiting Your Rebel Grot Mob
When recruiting your Rebel Grot Mob there are specific requirements and limitations on the structure of your mob. First the requirements:
- Your Mob requires 1 Head Honcho - your leader.
- You must have at least 5 Warriors, including your Head Honcho.
- You need enough vehicles to transport your mob.
There are then some options:
-
You may include Snots. The Snots may not outnumber the other members in your Mob (e.g. 1 Head Honcho, 1 Banna Wava, 6 Grots, and 8 Snots would be valid - but not 9)
-
You may take a maximum of 1 Banna Wava
Each vehicle must also have an assigned Driver and Gunner (where applicable). This assignment cannot be changed without engaging in a Bar Brawl (detailed in the ‘A Radical Life’ section below). Drivers and Gunners do not have to be Grots - the roles are normally held by Grots but if your mob is a bit weird that’s okay.
If any of your Big Luggas have a Fixed Weapon it must be mounted facing one of the four quadrants (front, back or sides) It is fixed in place during battles but may be re-mounted to face a different quadrant during the pre- or post-battle sequence. 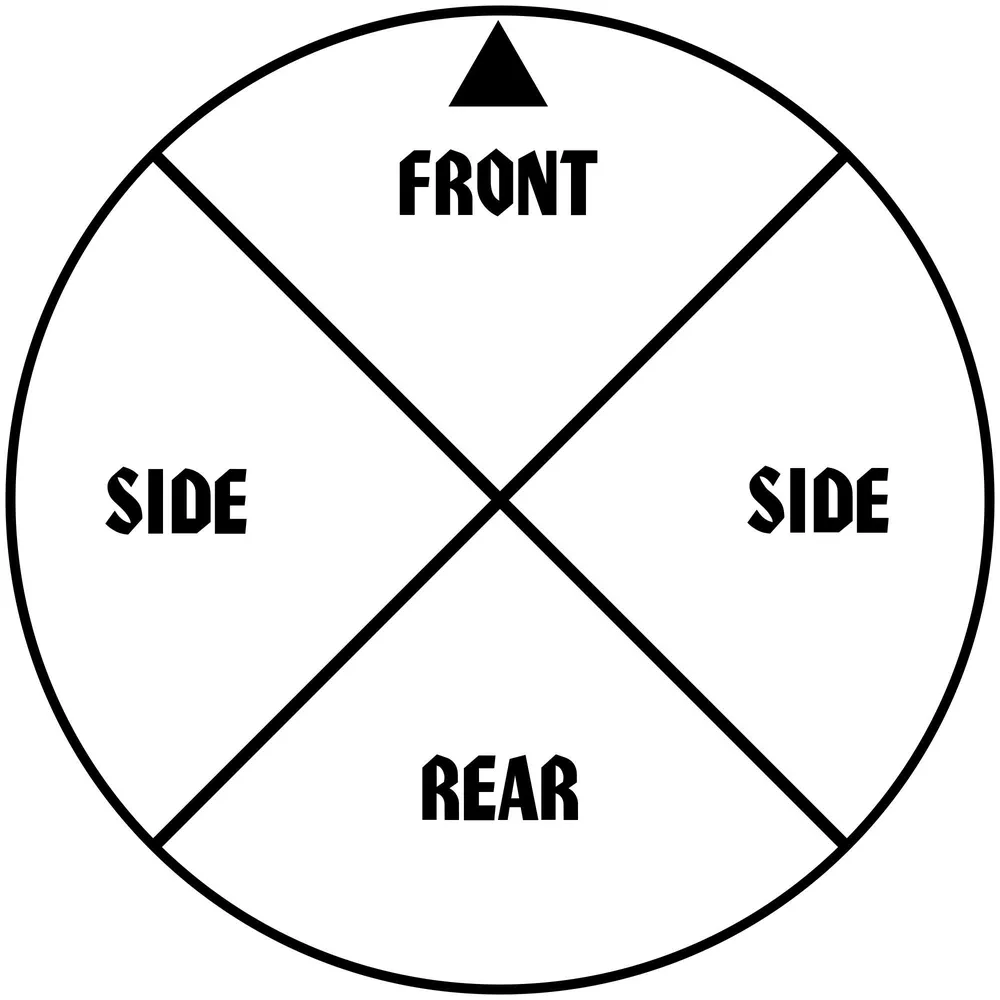
Statlines and Costs
Head Honcho - 6 teef
| M |
WS |
BS |
S |
T |
W |
I |
A |
Ld |
|---|---|---|---|---|---|---|---|---|
| 4 |
3 |
4 |
3 |
3 |
1 |
3 |
1 |
5 (6) |
Leadership: Whilst they're nominally in charge of the Mob they don't properly receive full Head Honcho status until they've successfully struck a blow against the oppressor! Once they win a battle they will automatically gain 1 point of Leadership (but may never exceed the stat cap of 7).
Equipment: Hand-to-Hand, Grot Gunz, Rebel Grot Gunz, Stikkbombz, and Armour
Banna Wava - 4 teef
| M |
WS |
BS |
S |
T |
W |
I |
A |
Ld |
|---|---|---|---|---|---|---|---|---|
| 4 |
3 |
3 |
3 |
3 |
1 |
3 |
1 |
5 |
Bottle Tests: When the Rebel Grot Mob makes a bottle test, if the Banna Wava is on the table and not Down, the test may be made on 3D6 and the two lower scores used.
Equipment: Hand-to-Hand, Grot Gunz, Rebel Grot Gunz, Stikkbombz, and Armour
Grots - 2 teef
| M |
WS |
BS |
S |
T |
W |
I |
A |
Ld |
|---|---|---|---|---|---|---|---|---|
| 4 |
2 |
3 |
3 |
3 |
1 |
2 |
1 |
5 |
Equipment: Hand-to-Hand, Grot Gunz, Stikkbombz, and Armour
Snots - 1 toof
| M |
WS |
BS |
S |
T |
W |
I |
A |
Ld |
|---|---|---|---|---|---|---|---|---|
| 4 |
2 |
2 |
2 |
2 (3) |
1 |
2 |
1 |
4 |
Toughness: Snots start out quite squishy but soon toughen up. Once they gain enough experience to become Grots (21 experience points) they automatically gain 1 point of Toughness (in addition to any other advances). You do not need to update their cost when this happens.

Equipment: Snots Weapons
Equipment Lists
Each Warrior type has their equipment restrictions listed above. As Rebel Grots aren’t as burly as propa Orks, or even Diggaz, the following limits apply:
- One Gun (assuming the Warrior is allowed to carry a weapon from that list).
- Up to a total of two weapons chosen from the Hand-to-Hand, and Stikkbombz categories. For example a model may carry a slugga and a stikkbomb, or two stikkbombz, but not a choppa, slugga and stikkbomb.
The full rules for weapons and equipment listed below can be found in the armoury appendix of this document.
Hand-to-Hand
- Knives or Knuckles - free
- Chain or Flail - 1 toof
- Club or Choppa - 1 toof
- Spear - 1 toof
- Slugga - 2 teef
- Six-Shoota - 2 teef
Snots Weapons
- Knives and Knuckles - free
- Chain and Flails - 1 toof
- Club or Choppa - 1 toof
- Spear - 1 toof
- Blunderbuss - 1 toof
- Bow - 1 roof
- Crossbow - 1 toof
- Catapult - 1 toof
Grot Gunz
- Blunderbuss - 1 toof
- Bow - 1 roof
- Crossbow - 1 toof
- Catapult - 1 toof
Rebel Grot ### Gunz
- Shoota - 2 teef
- Kannon - 3 teef
Stikkbombz
- Frag - 3 teef
- Krak - 5 teef
Armour
- Shield - 1 toof
- Studded armour - 1 toof
- Flak armour - 2 teef
Vehicles
As described in the previous section Rebel Grot Vehicles are available in two roles:
| Cost |
Armament |
Vehicle Size |
Notes |
|
|---|---|---|---|---|
| Big Lugga |
15 teef |
1 Big Gun or 1 Linked Gun |
Big |
Special movement rules |
| Cuttas |
5 teef |
None |
Small |
Special movement rules |
Fixed Weapons
Big Gunz
- Splattapult - 8 Teef
Linked Weapons
If you don’t want a Splattapult, or you can’t afford one, you can opt for a Linked Weapon. Choose from the Gunz list and pay for two of the same kind. The Linked Weapon’s profile will be that of the Gun with the additional bonus of 1 Sustained Fire Dice (SFD). The two Gunz cannot be separated - they’re now one weapon for all intents and purposes. Just like a Big Gun they cannot be wielded by a Warrior on foot. Note you cannot Kustomize a Linked Gun once it has been 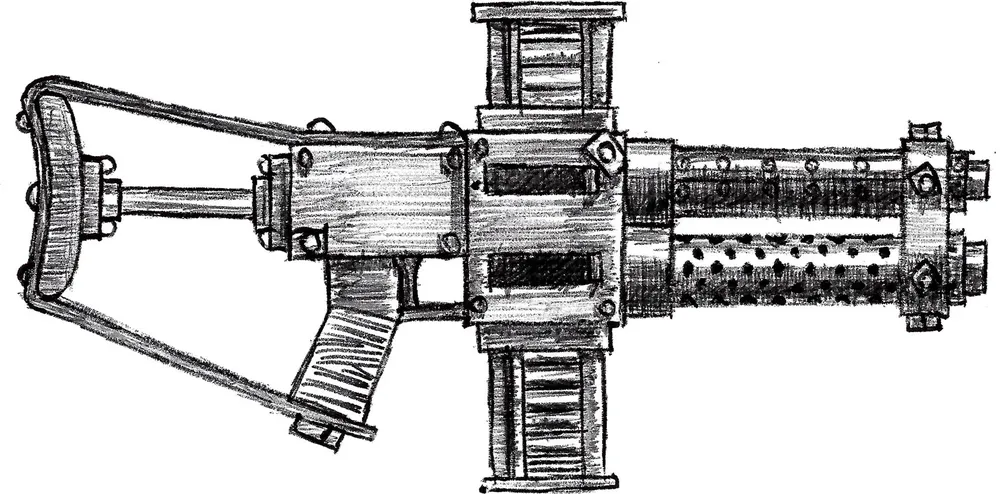
mounted on a Vehicle!
Gubbinz
Rebel Grot vehicles can be fitted with a variety of Gubbinz. These can be fitted between games (after your first game). Just pay the relevant cost and the lads back at the Revolushunary HQ will fit them.
Cuttas are flimsy and light and cannot mount as many Gubbinz as larger vehicles. They may not be made extra spiky, have a reinforced ram or wrecking ball but may otherwise have any of the Gubbinz listed below. Big Luggas may fit any of the Gubbinz listed below. Note that no Rebel Grot vehicles may mount a big grabber; these vehicles just aren’t sturdy enough to go latching onto speeding trukks! The Gubbinz rules are described in the Appendix of this pack.
- Boarding plank - 3 teef
- Extra armour plates - 4 teef each
- Reinforced ram - 5 teef (not Cuttas)
- Spikes - 5 teef
- Extra spikes - 10 teef (not Cuttas)
- Wrecker ball - 10 teef (not Cuttas)
- Loadsa Ammo - ¼ Weapon Cost (Rounding Up, not Cuttas)
Special Rules
Rebel Grots are subject to a number of special rules to reflect their squishier and generally less resilient nature, as well as the tough circumstances involved with operating outside the usual Ork economy and the ‘speshul tactics’ adopted to overcome their burlier foes! All Rebel Grots, from the meanest Head Honcho to the runtiest Snot, are subject to the following special rules.
Pinning
Grots just aren’t as able (or willing!) to shrug off incoming rounds as Orks. Their natural instincts for self preservation will kick in and they’ll often find themselves hitting the deck when things start to whiz past their ears. All Rebel Grots are subject to Pinning, and the associated rules for escaping from and recovering from Pinning, as described in the GCE Core Rules.
Never Enuff Ammo
Without easy access to the Meks and other Orkish infrastructure, the revolushun is perpetually short of ammo and other supplies. This means a Rebel Grot Mob is more likely to run out of ammo at inconvenient times than other mobs. All members of a Rebel Grot Mob must take an Ammo Test on the roll of a natural 1 or 6 to hit when shooting.
Boarders away!
Their slight stature means that Rebel Grots must adopt “innovative” tactics when fighting against their larger brethren or other species. In practice this usually means simply overwhelming them with greater numbers, but Rebel Grots take this even further by actually undertaking “manoovers” between fights and rehearsing boarding actions from their Luggas and Cuttas. All this practice means that a Rebel Grot boarding an enemy vehicle may roll two dice for their Initiative Test and choose the lowest score.
Pilin’ On
In boarding actions Grots will gang up and all pile onto individual opponents, seeking to overwhelm them with a green tide of wildly swinging rebels. All members of Rebel Grot Mobs benefit from the Pilin’ On rule as described in the close combat section of the GCE Core Rules.
Grotty Teef
Because of their isolation from regular Ork society, Rebel Grots struggle to find good buyers and sellers for scrap and other goods and often have to do this via fences back in Mektown. They also don’t grow “propa Orky” teef themselves, and cannot skulk around the dok’z yellow bins to “find” spare teef. All this means that they are permanently short of teef. Whenever a Rebel Grot mob would have an income of “D6 teef” for some reason, such as for finding scrap, through skills or scenario special rules for example, it is instead treated as 1 toof. Multiple D6 teef, for example the 2D6 for a destroyed vehicle, bring in 1 toof per D6. Additionally while the Gobsmacked Serious Injury result applies to Rebel Grots, the mob inflicting the injury do not gain any teef as a result…no-one wants Grot teef!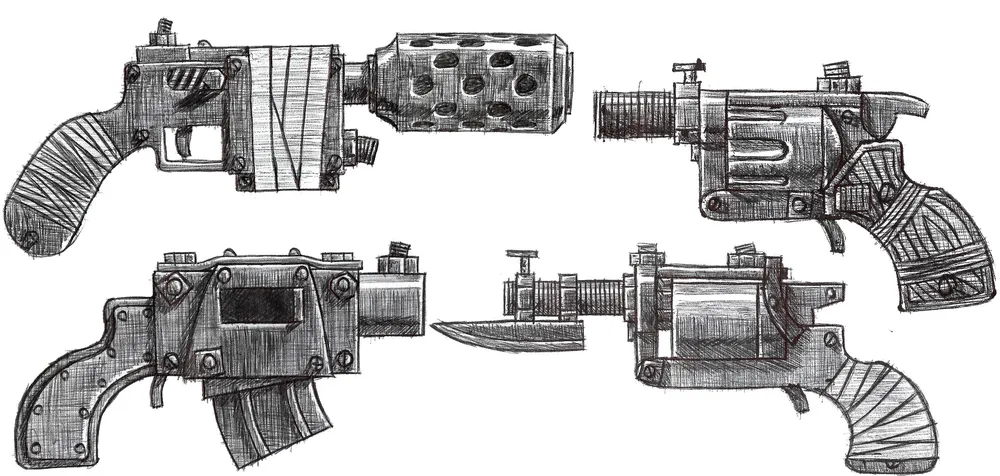
Scenario Selection
An ever growing selection of scenarios can be found in the GCE Scenario Book. GCE does not take a prescriptive approach to scenario selection, leaving it instead up to the players to decide on their scenarios based on their campaign progression, or simply what the players would prefer to try! That said, by their nature the Rebel Grots tend to swoop out of the desert and strike at unsuspecting Ork mobs, and disappear again before stiffer resistance can arrive. This means that typically Rebel Grots should act as the attackers in most scenarios where this makes sense thematically. They don’t get it all their own way of course, and some scenarios (such as Scenario 10: Gotcha!) are ideal ways to represent the Rebel Grots getting caught with their pants (loincloths?) down.
Rebel Grots Vehicle Special Rules
The unique motive sources of Rebel Grot Vehicles, either wind or sheer Grot muscle (!) power, means that a number of special rules, notably around movement, apply to them. Here we first deal with rules that apply to all Rebel Grot Vehicles, before moving onto specific rules for Big Lugga and Cutta movement and instructions on how to fill out datacards for both.
Rebel Grot Vehicles moving at speed
As with Ork vehicles moving under thruster power, there is an art to mounting, dismounting and firing at or from a careening Grot vehicle. Any Rebel Grot Vehicle that has moved more than 6" in its last move is treated as if it were a Vehicle using its thrusters for purposes such as mounting and dismounting, and firing at/from the vehicle, as described in the GCE Core Rules.
Rebel Grot Vehicles in Difficult Ground
Despite their lightweight nature, it is still tricky for Rebel Grot Vehicles to move across Difficult Ground without being shaken to bits. Every inch that a Rebel Grot Vehicle moves across Difficult Ground counts as 2”. This does not influence Slow Speed Manoeuvres.
Rebel Grot Vehicles in Races/Chases
Rebel Grot Vehicles take part in Races/Chases as normal, but must use the rules for determining distance moved and turning as described in the relevant Rebel Grot Vehicle movement section for their type.
Rebel Grot Vehicles Drivers
Rebel Grot Vehicles do not have a dedicated Driver hit location - the Driver is somewhere onboard amongst the crew like a good proletarian. For the purposes of hits if some circumstance would target the Driver location treat it as hitting the Crew location.
Big Lugga Movement
Big Luggas are the larger of the two Rebel Grot Vehicle types, and are treated as regular Big Vehicles as described in the GCE Core Rules with the exception of movement. Big Luggas are powered by their crew through a variety of creative and universally dangerous means. The more crew members assigned to powering the vehicle, the faster it will go (mostly!). When particular urgency is called for, the crew throw their backs into it with revolutionary vigour, boosting the Big Lugga to impressive speeds. This is not without its dangers however, and many a Grot has been sucked into the gubbins or thrown overboard by a spinning shaft in their enthusiasm to chase down the enemies of the revolushun.
Grot Power!
At the start of the Rebel Grot Big Lugga’s movement, the player must first declare how many of its crew are being allocated to powering the Big Lugga. Any crew on board that are not Pinned or Down may power the Lugga, but will be unable to perform any other action including Moving, Shooting or fighting in Hand-to-Hand Combat during that turn. The exception to this is that crew powering the Big Lugga may defend in close combat, and take advantage of their Pilin’ On special rule, during Hand-to-Hand in the enemy’s turn. Crew not involved with powering the Big Lugga may perform actions as normal.
Once crew are assigned to powering the Big Lugga, the Rebel Grot player must declare whether it is using regular movement or its “attack speed”.
Big Lugga Regular Movement
Regular movement, or cruisin’, is the slower (and safer) of the Big Lugga’s movement options. For each crew member assigned to powering the Big Lugga it may move 1”. It may make up to two turns of up to 45o during regular movement in the same way as Vehicles under gas power as described in the GCE Core Rules.
Big Lugga Attack Speed
At the call of “full speed ahead!” the Big Lugga lurches forward as all the Grots bend to their cranks, oars, pedals, and treadmills with unbridled enthusiasm and creative cursing. The player rolls a number of D6 equal to the number of crew powering the Big Lugga and adds them together; this is the distance the Big Lugga must move. For each 1 rolled, roll another D6. On a 1-3 a crew member selected at random (including from those not powering the vehicle) is violently ejected from the Big Lugga by its acceleration or a whirring bit of gubbinz. The crew member is thrown D3” from the Big Lugga in a random direction and takes a S3 hit on a further D6 roll of 4+.
Once any crew have been ejected, the Big Lugga must move its total number of inches forward, or until it is involved in a Ram, Collision, or Crash that forces it to stop, as described in the GCE Core Rules, or is otherwise Immobilised.
At attack speed the Big Lugga is very difficult to manoeuvre! It may attempt to make any number of turns of up to 45o but the Driver must pass a Leadership Test before each attempt to turn. On a failed Leadership Test the Big Lugga must move D3+3” straight ahead (if it has sufficient movement remaining) before attempting another turn. After a successful turn the Big Lugga may not attempt another until it has moved D3+3” straight ahead.
Big Lugga Slow Speed Manoeuvres
Big Luggas cannot reverse like a regular vehicle, the limited imagination of Rebel Grot engineering just won’t allow it! Instead, the numerous and enthusiastic crew take advantage of the (relatively) lightweight of the Big Lugga to directly grot-handle it into a new direction as needed. Instead of moving at regular or attack speed, crew that are not Pinned or Down may be assigned to rotate the Big Lugga. It may be turned up to 45o for each two crew members assigned. Any crew busy turning the Vehicle may do nothing else this turn, and the Big Lugga counts as having moved this turn.
Cutta Movement
Rebel Grot Cuttas are the smaller of the two Rebel Grot vehicle types. They are treated as regular vehicles except for their unique movement, and in the instance of Ramming, Collisions, or Crashes, where they are treated as a Small Vehicle (see GCE Core Rules). Rebel Grot Cuttas are powered by the wind, via large sails, and are thus dependent on the vagaries of the weather to get around. In practice this means the direction and strength of the wind during a game will have a big bearing on how quickly the Cuttas will be moving.
Wind strength and direction
At the start of any game involving Rebel Grot Cuttas the players must determine the wind direction and strength. This is done before any models are placed on the board. Roll a scatter dice to determine which edge the wind is blowing from. After models are deployed, but before the first turn, roll a D6 to determine the wind strength.
| Wind Strength Table |
|
|---|---|
| D6 Roll |
Wind Strength |
| 1 |
Dead calm!
Deduct 2” from all Cutta movement rates made at this wind speed |
| 2-5 |
Juz right!
No modifiers apply to Cutta movement at this wind speed |
| 6 |
Blowin’ a gale!
Roll an extra D6 for Cutta movement and apply a further -1 modifier to all turning attempts made at this wind speed. |
Sailing a Rebel Grot Cutta
The maximum distance moved each turn by a Rebel Grot Cutta will depend on both the strength of the wind and the Cutta’s facing relative to the wind direction, as well as fluctuate depending on local variations in wind speed, the terrain and crew skill! At the start of the Cutta’s movement, determine the Cutta’s heading relative to the wind, using the diagrams below.
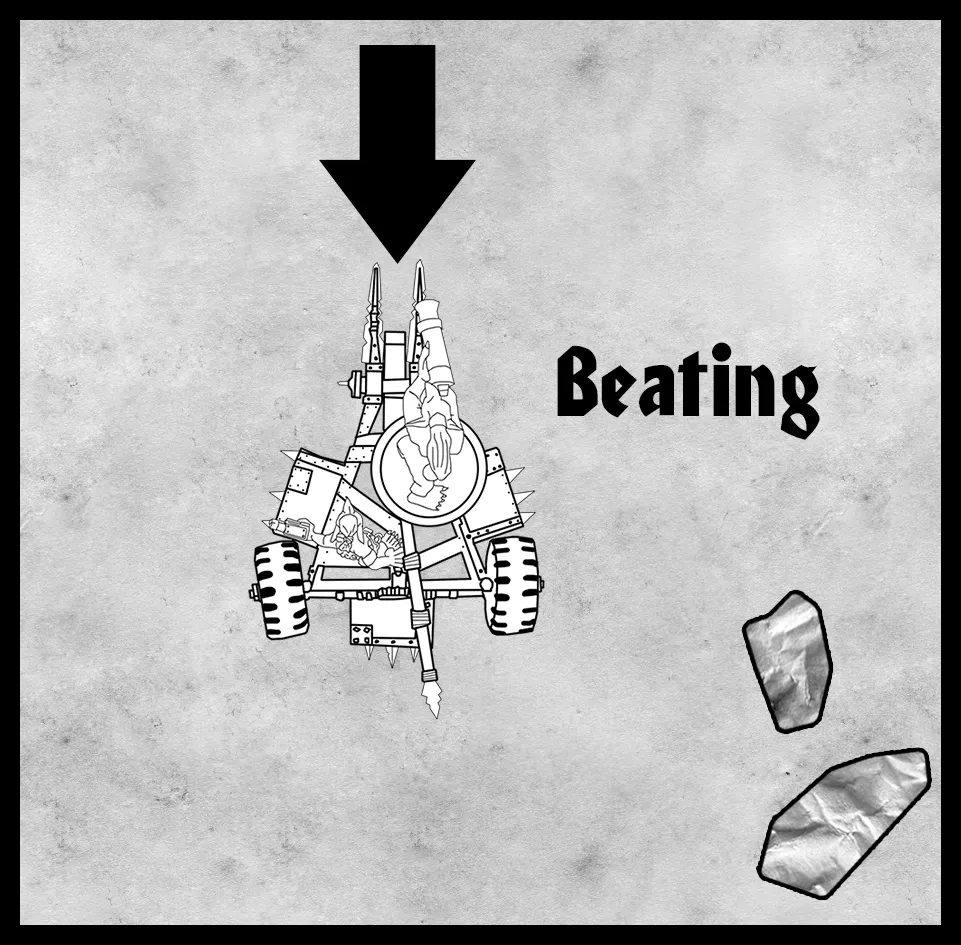
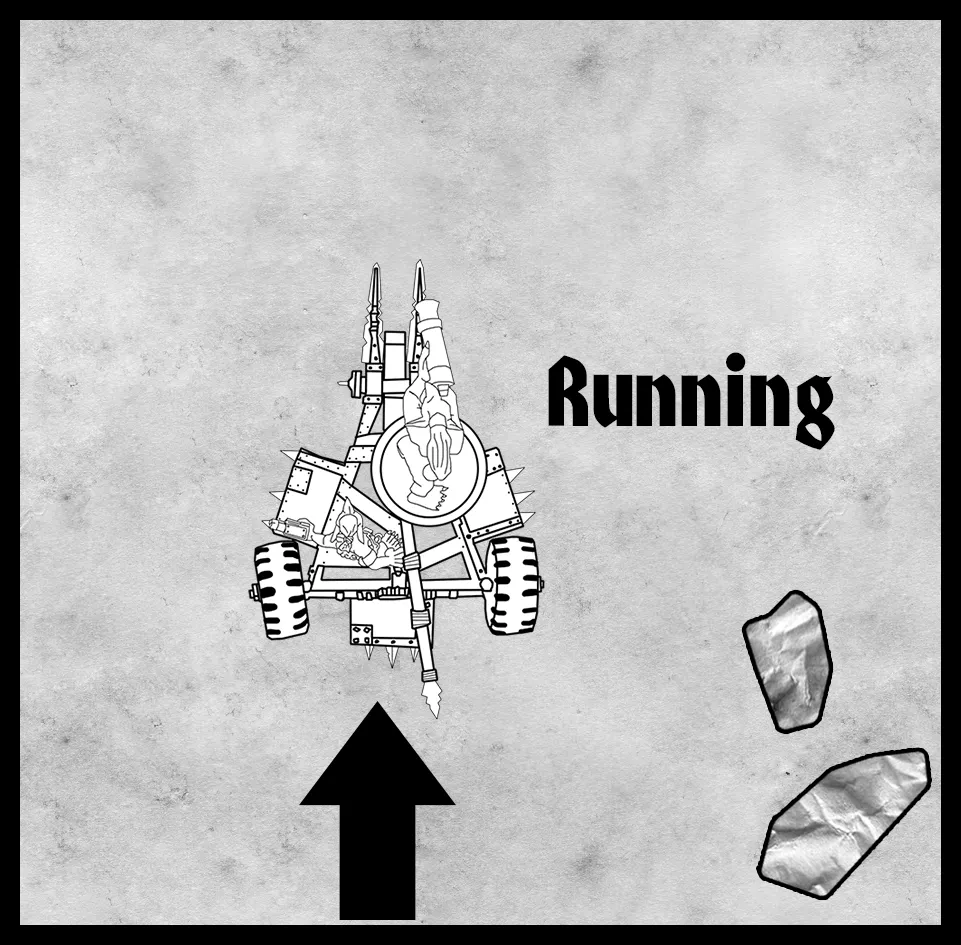

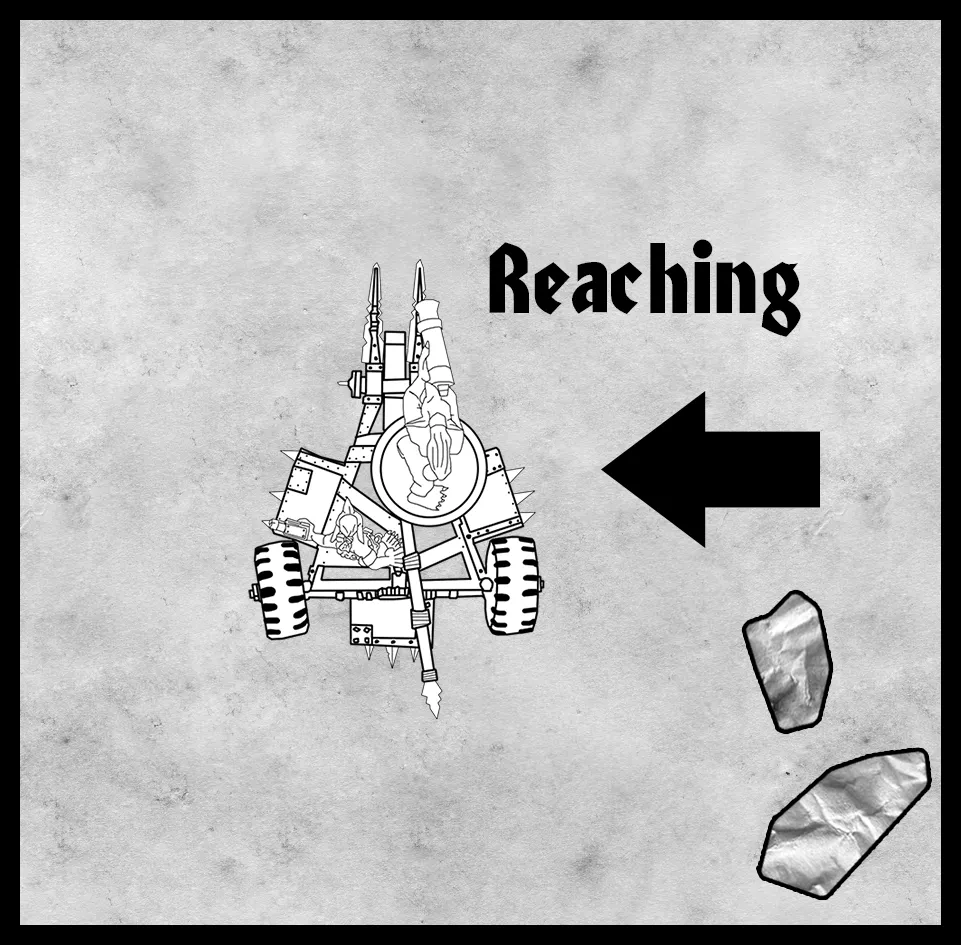
Then roll for the Cutta’s maximum speed based on its heading, remembering to modify the result based on the wind strength table above.
| Heading |
Maximum speed |
|---|---|
| Beating (wind from the front) |
2D6 - 3” (Treat negative results as zero) |
| Reaching (wind from the side) |
2D6+6” |
| Running (wind from behind) |
2D6+3” |
A Rebel Grot Cutta may turn once up to 45o at any time during its movement at no risk. Subsequent turns of up to 45o may be made, but each turn then requires a Leadership Test. If a test is failed the Cutta must move straight forward D3+3” before trying again. If a double one is rolled in the Leadership Test then something has gone horribly wro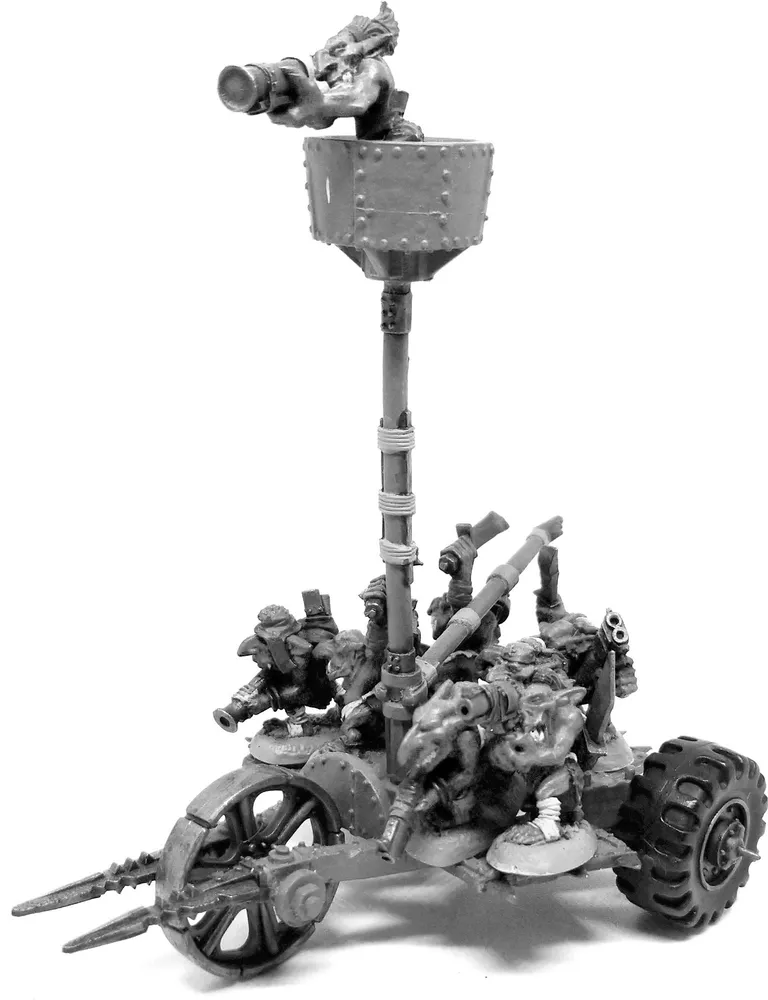
ng and the Cutta capsizes! Perhaps a timid Grot failed to hike out far enough, or da tilla came off in the skippa’s hand. In any event the Cutta takes D3 Damage as if it had been involved in a front Crash, as detailed in the GCE Core Rules, and is Immobilised on a D6 roll of 4+.
Cutta Slow Speed Manoeuvres
It’s quite tricky to sail backwards, so rather than try, the Rebel Grots can simply leap out and Grothandle the Cutta onto a new heading. Instead of moving, Crew that are not Pinned or Down may be assigned to rotate the Cutta. It may be turned up to 45o for each crew member assigned. Any Crew busy turning the vehicle may do nothing else this turn, and the Cutta counts as having moved this turn.
Filling Out a GCE Vehicle Datacard
Rebel Grots have two vehicle datacards to choose from: Big Luggas and Cuttas.
The cards can look a bit daunting to start with but you’ll soon get used to them. They contain all the information specific to your vehicle that you should ever need. We’ll cover filling it in momentarily but first let’s have a quick tour of the Big Lugga datacard.
Starting fr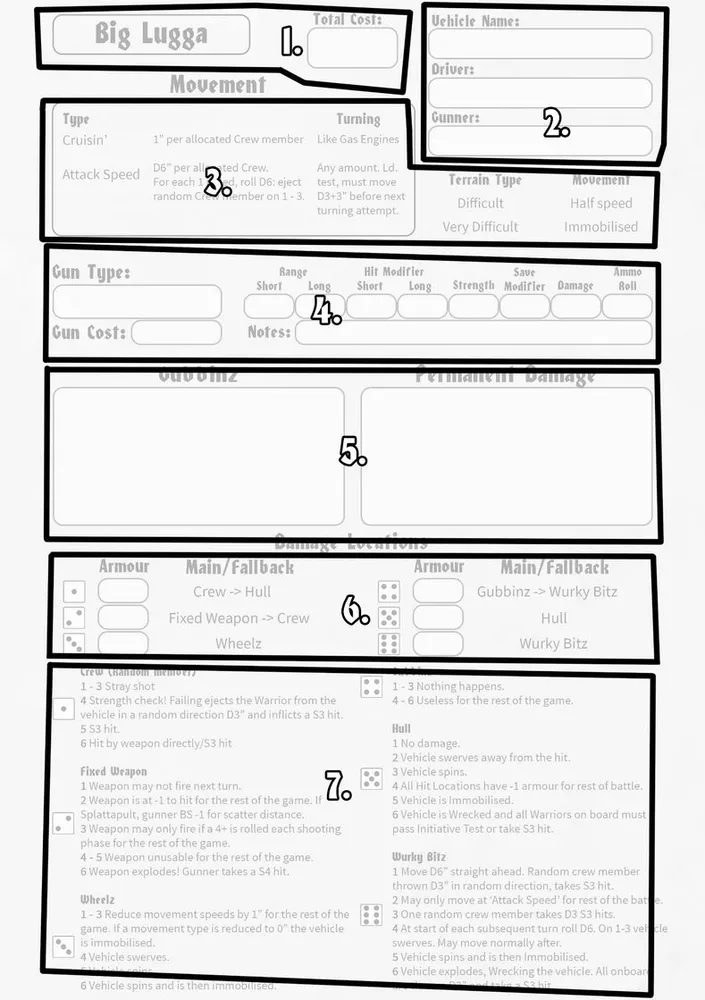
om the top we have the Vehicle type (1). The card type is “Rebel Grot Big Lugga” and there’s also a big box for the total cost of the vehicle.
Details of the Driver, Gunner, and of course her name are next (2). There’s details of how her Movement works (3) and her Fixed Weapon profile (4), note that Rebel Grot Cuttas don’t get a Fixed Weapon.
Beneath that there’s room for details of Gubbinz that have been fitted and Permanent Damage the vehicle has suffered (5).
Then there’s the Damage Locations with blank boxes for Armour Values (6), including details for which location will be affected if the original one isn’t applicable (e.g. if the Fixed Weapon has exploded!).
Lastly we have the damage tables (7). When the armour is pierced (e.g. by a successful ram) these are the tables you should roll on.
To fill one of these in you’ll need to apply the decisions you made earlier. Pick whether you’re dealing with a Rebel Grot Big Lugga or a Rebel Grot Cutta and grab the relevant card.
For a Rebel Grot Big Lugga, nominate a Driver and Gunner (if there is a Fixed Weapon). For a Rebel Grot Cutta there’s no Gunner to worry about.
Next if your vehicle has a Fixed Weapon fill in its characteristics (see the appendix of this pack for the details). Lastly you’ll need the Armour Values:
| Big Lugga |
|||
|---|---|---|---|
| Armour Value |
Location |
Armour Value |
Location |
| 7 |
Crew |
8 |
Wheels |
| 8 |
Fixed Weapon |
8 |
Hull |
| 8 |
Gubbinz |
9 |
Worky Bitz |
Cuttas are much more lightly built!
| Cutta |
|||
|---|---|---|---|
| Armour Value |
Location |
Armour Value |
Location |
| 7 |
Crew |
7 |
Wheels |
| 7 |
Hull |
6 |
Sail |
| 7 |
Gubbinz |
6 |
Sail |
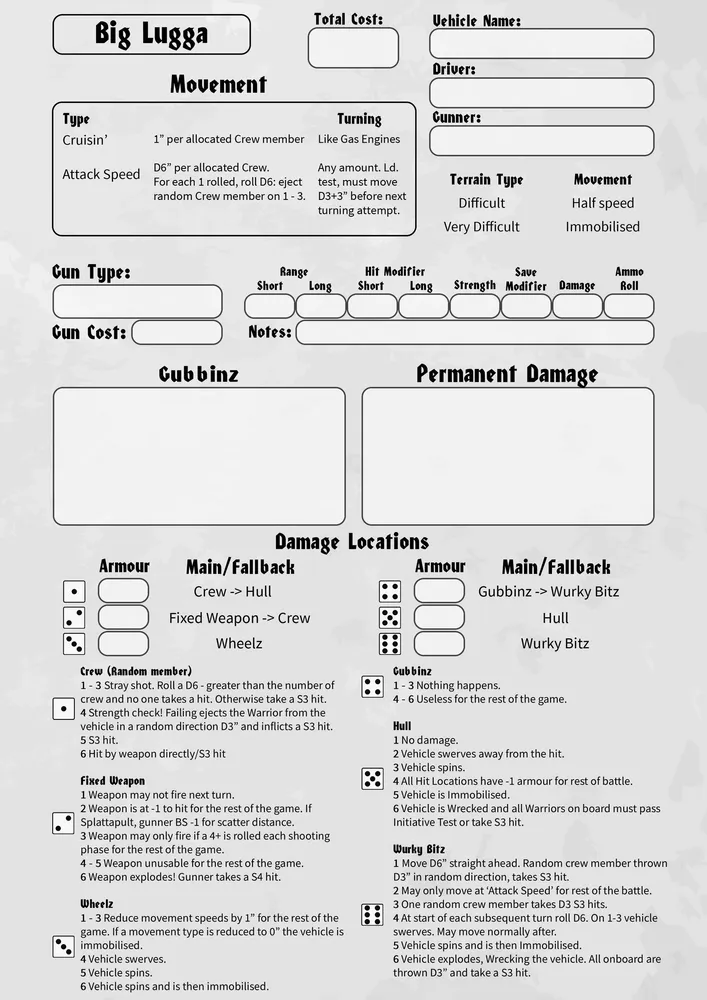
Big Lugga datacard
Cutta datacard

The cutta hurtled down Da Skid and the dust from the two wheels still barely touching the ground was whipped away by the wind roaring past Nikkit’s ears.
“Oi, Nikkit! Pull dat jib sheet willya?” piped the Skippa from the back of the cutta, or ‘stern’ as he insisted Nikkit call it. “Nar you snot, dat'z da kicka!...No, uvva one!…Yeah, dat'z it!” Nikkit scowled and hauled on a rope picked at random from the tangle on the mast and deck of the cutta. The front sail snapped tight and the cutta lurched ever more steeply to one side while the manic hiss of the desert blurring by went up to new levels of urgency.
“Aaah, dis is the life innit Nikkit” yelled da Skippa in his ear yet again, leaning even further out over the sand flying by below to balance the cutta, his gnarled, bare feet firmly wedged under a length of squig leather strap on the floor.
Nikkit winced and gritted his teeth for the tenth time today. This whizzing around the desert on ‘trial runs’ wasn’t his idea of revolushun, and this rickety assembly of spars and cloth wasn’t his idea of a propa set of wheels either. He might have thrown off ‘da boot of da orkish oppressas’ those weeks before when he ran from Mektown, but he did miss the roar of a good orky gas engine. He glanced back; a beatific grin spread further across the Skippa’s face as he clutched yet another rope tightly and deftly tweaked the steery bit with his other hand. Nikkit swore that all da Skippa wanted was to sail the dunes forever. He never mentioned ‘throwing off da shakals of da Meks’ or ‘equal rides for all greens’. He probably didn’t even know what a Tag was!
That was the problem wasn’t it; all da Skippa ever wanted was ‘annuva knot out of da boat’, whatever that meant. There were enough knots in the boat for zog’s sake, why didn’t he just chuck a few out? Not Nikkit though. No, Nikkit burned with zeal for ‘da cause’, nurtured over years of mucking out the squig pits and a thousand clips around the ear. He’d escaped and now he was going places! Right to da top! But he wasn’t going to get there as crew on this zoggin cutta. Not as crew…but what if he had is own cutta? What if he had this cutta? He’d been watching the Skippa for weeks. ‘Nuffin to it,’ he thought, ‘it’s just pullin’ a few ropes and pointin’ da tilla where you didn’t want to go werentit?’
He saw it now: Adding a big red star to the sail and leading the charge against the orkish oppressors! Catchin da head honcho’s eye! Mentioned in dispatches to Da Committee! This was his start! Nikkit’s watering eyes slid to the taut squig leather strap on the floor and he fingered the handle of his stikka as a plan grew in his head. But then he felt what passes for a grot’s conscience, mostly fear of reprisals, nagging. Da Skippa wasn’t bad to him after all, and he did seem liked by the rest of the mob. Then again though, ‘tragic accident’ and ‘lack of revolushnary ferva’ could take you a long way in the Gretchin Rebellion. Nikkit wavered back and forward, oblivious to the sand and rocks roaring by.
“Aaah, innit grand? Dis is da life!”, intoned da Skippa again, snapping Nikkit back to reality, and then over its edge. With a screech he flashed his stikka out and slashed down at the strap over the Skippa’s feet. The strap parted and, with just enough time for a shocked and wounded look, the Skippa disappeared over the edge in a tumbling ball of dust and tangled limbs. The rope the Skippa had been holding flew free and at once the mainsail banged loose and slammed to one side as the tilla flopped over and jammed to the other.
“Vivaaaiiiieeeeee!”, was all Nikkit had time for as the ‘Freedum III’ pitched forward sickeningly and speared its sharpened bows deep into the dunes, launching its rear end and sole terrified occupant high into the dusty air above Da Skid.
Experience and Skills
This section deals only with the additional information needed for Rebel Grot Mobs. For a full explanation of how Warrior advances and experience work see the Experience section of the GCE Campaign Book.
Starting Experience
Rebel Grot Mob members start with the following amount of experience points:
| Type of Warrior |
Starting Experience Points |
|---|---|
| Snots |
0 |
| Grots |
20 + D6 |
| Banna Wava |
40 + D6 |
| Head Honcho |
60 + D6 |
Experience Table
A Rebel Grot Mob gain advances at the following thresholds:
| Exp. Points |
Title |
Notes |
|---|---|---|
| 0-5 |
Snot |
Snots start at this level. |
| 6-10 |
Snot |
|
| 11-20 |
Snot |
|
| 21-30 |
Grot |
Grots start at this level. Snots that reach this level become Grots
and add +1 to their Toughness. |
| 31-40 |
Grot |
|
| 41-50 |
Rebel Grot |
Banna Wavas start at this level |
| 51-60 |
Rebel Grot |
|
| 61-80 |
Revolutionary |
Head Honchos start at this level. |
| 81-100 |
Revolutionary |
|
| 101-120 |
Revolutionary |
|
| 121-140 |
Revolutionary |
|
| 141-160 |
Revolutionary |
|
| 161-180 |
Revolutionary |
|
| 181-200 |
Revolutionary |
|
| 201-240 |
Extremist |
|
| 241-280 |
Extremist |
|
| 281-320 |
Extremist |
|
| 321-360 |
Extremist |
|
| 361-400 |
Extremist |
|
| 401+ |
Kommittee Member |
No further advance rolls happen after this point. |
Maximum Statistics values
As described in the GCE Campaign Book here are the characteristic caps for Rebel Grots. Note that free range Grots living life outside of the oppression of Orkish overseers can grow considerably stronger and braver than their more cowed brethren in Ork mobs:
| M |
WS |
BS |
S |
T |
W |
I |
A |
Ld |
|
|---|---|---|---|---|---|---|---|---|---|
| Rebel Grots |
4 |
4 |
5 |
3 |
4 |
2 |
6 |
2 |
7 |
If your Warrior rolls a characteristic increase that would take them above the cap for that stat then increase the other characteristic in that bracket instead. If both are at their cap then pick any other characteristic that hasn’t reached the cap yet and increase it by one instead. If every stat is maxed out then generate a skill advance from a relevant table (equivalent to a result of 3-4 or 10-11 on the Advance Table).
Skill Availability
When rolling a Know-wots advance Rebel Grot Mobs have the following skills available to them:
| Rebel Grot Mobs |
|||||||
|---|---|---|---|---|---|---|---|
| Muscle |
Ferocity |
Driving |
Cunnin’ |
Dakka |
Odd |
Boardin’ |
|
| Head Honcho |
✘ |
✔ |
✔ |
✔ |
✔ |
✔ |
✔ |
| Banna Wava |
✘ |
✔ |
✔ |
✔ |
✘ |
✘ |
✔ |
| Rebel Grots |
✘ |
✘ |
✘ |
✔ |
✘ |
✘ |
✔ |
| Snots |
✘ |
✘ |
✘ |
✔ |
✘ |
✘ |
✘ |
Rebel Grots, due to all their practice, get access to a new skill table: Boardin’ skills. Unless otherwise stated, this table is only available to Rebel Grot Mobs.
Boardin’ Skills
| Boardin’ Skills |
|
|---|---|
| D6 |
Skill |
| 1 |
Iron Fist Blessed with a vice-like grip, If a Warrior with this skill fails their Initiative test when boarding an enemy vehicle, they may re-roll one dice. |
| 2 |
With Me Lads! Waving their cutlass and swinging fearlessly on improbably placed ropes, this Warrior is an inspiration to others during boarding actions. If this Warrior successfully boards an enemy Vehicle from a friendly one, other members of the same mob on board the friendly Vehicle may add +1 to their Initiative when boarding the same enemy vehicle this turn. |
| 3 |
True Grit Pure tenacity means that it is almost impossible to toss this Warrior from a vehicle. If forced off a vehicle due to a lost Hand-to-Hand Combat, roll a D6. If this is less than the Warrior’s Strength, they remain on the vehicle. |
| 4 |
Surprise! Yer’ lookin’ a bit run down! If the Warrior successfully dodges a Vehicle attempting to run them over, they may elect to board the Vehicle rather than being moved aside. If they board the Vehicle, they count as Charging. |
| 5 |
Repel Boarders! Get…off…my…ride! If this Warrior fights an enemy boarder during the first turn they board, they gain +1 to their Weapon Skill. |
| 6 |
Yer’ Comin’ With Me! For the cause! At the start of any Hand-to-Hand Combat aboard a Vehicle, this Warrior may instead elect to fall off the vehicle as if they were beaten. The Warrior’s opponent must then roll a D6. If this is equal or greater than the opponent’s Strength, they also fall off as if they were beaten in Hand-to-Hand Combat. |
Nurturing the Rebellion
Rebel Grots aspire to a better life for all Gretchin and to some extent actually manage to achieve this amongst their various encampments and hideouts, with food and supplies generally being made available, each according to their needs! However, with such scarce resources overall, the Rebellion needs to make sure it rewards success and puts its limited finances to work where they will best aid the cause. In charge of all of this central planning is “Da Kommittee”. This shadowy cabal of the most senior leaders of the rebellion keep an eye on the various deeds of the Rebel Grot Mobs and assign tasks and “misshuns” to strike blows for Grots everywhere. Success will bring with it rewards and extra resources from Da Kommittee, so Head Honchos often find themselves…embellishing their victories and finding ways to cover up failures in their reports back to the Kommittee.
In game terms this means income works differently for Rebel Grot Mobs in comparison to the process outlined in the GCE Campaign Rules. Rebel Grot Mobs do not mine or otherwise work to provide income. Nor do they have to work out net profit after income based on mob size. Instead, teef are awarded by Da Kommittee based on their performance in their previous game.
Following a game and using the Kommittee Fundin’ Modifier table below, add up all the modifiers and add this to a D6 roll to establish the total number of teef added to the Rebel Grot Mob’s horde. The modifiers applied in the Kommittee Funds Modifier table can be altered through the act of lying to the Kommittee. Note that all modifiers, lies and consequences of lies (see below) are calculated to obtain a final modifier, before rolling the D6. If, after the roll and application of the final modifier the value is less than zero, this counts as zero.
| Kommittee Fundin’ Modifier Table |
|
|---|---|
| Winning/Losing |
|
| +X |
‘Ard Boyz bonus (see below for X) |
| -1 |
Lost last battle |
| -1 |
Lost last battle and Bottled Out |
| +1 |
Won last battle |
| +1 |
Won and enemy Bottled Out |
| Casualties |
|
| +1 |
For every 3 enemies taken out of action |
| -1 |
For every 5 of your Rebel Grots taken Out of Action |
| +1 |
Each enemy Vehicle Wrecked |
| -1 |
Each Rebel Grot Vehicle Wrecked |
| Scrap |
|
| +1 |
Each Scrap Counter captured by the Rebel Grots |
Lyin’
While the Kommittee may guide the strategy of the Rebel Grot Rebellion, they aren’t the ones out there fightin’ the good fight themselves. This means that when it comes to making their reports Head Honchos can find it tempting to exaggerate small things, such as the victorious nature of their rapid advance to the rear, the number of enemies of da people put down, or the amount of scrap recovered. While this has the potential to turn an ignoble defeat into a nice little earna, Da Kommittee, being very accomplished Grots, are also very accomplished at delivering and detecting lies. If they decide that a Head Honcho is “takin’ da mik” beyond the generous baseline expected of any Grot this may result in them penalising the Mob earnings, or even throwing the Head Honcho in “da hole” for a bit to reflect on their commitment to the cause...
A Head Honcho may choose to lie as many times as he wishes about any of the modifiers in the Kommittee Fundin’ Table. A lie consists of either saying a modifier that should apply doesn’t, or that a modifier that doesn’t apply does. For example, a Head Honcho who Bottled Out and lost could instead claim that they in fact won when the other side Bottled Out. This would consist of three lies: Claiming that they didn’t lose (and therefore won), claiming that they didn’t Bottle Out, and claiming that the other side did Bottle Out!
For each lie the Head Honcho must take an Initiative test (roll a D6, equal or under his Initiative is a success. A 6 is always a failure). Failure means he’s been caught out by the scrupulous cross examination of Da Kommittee (or they just saw him crossing his fingers behind his back). If the lie is undetected, apply the claimed modifier to the Kommittee Fundin’ Table. Lies detected by Da Kommittee may result in consequences! Consult the Lie Detector Table.
| Lie Detector Table |
|
|---|---|
| Number of Lies Detected |
Consequence |
| 1 |
Eyebrows are raised. The Kommittee Fundin’ Table modifier is applied, but is reduced by D3 teef as a warning. |
| 2 |
Your troofiness is questioned! Da Kommittee withholds all funding this time, zero teef! |
| 3+ |
Da troof charges interest! The Head Honcho is thrown in “da hole” to reflect on their future with the Gretchin revolution…he must miss the next game. |
‘Ard Boyz Bonus
As per the Campaign Rules taking on a more reputable Mob and winning gets the Mob an income bonus! However, due to the unique nature of Rebel Grot Mob income, the table is slightly different. Note that this is applied to the Kommittee Fundin’ Table and so is subject to penalties incurred by lying. Lyin’ about the ‘Ard Boyz Bonus is permitted, but each step of difference in mob rating counts as an additional lie.
| Difference in Mob Rating |
Bonus |
|---|---|
| 1-25 |
+1 |
| 26-50 |
+2 |
| 51-100 |
+3 |
| 101-150 |
+4 |
| 151+ |
+5 |
Scenario or Any Other Income
Scenarios and the GCE Campaign Book often include additional ways for mobs to earn income (e.g. the Gobsmacked Serious Injury, Destroyed Vehicles etc.). When the game ends you should immediately figure out how much income your Mob has earnt from the scenario’s income section or elsewhere, remembering that any income listed as “D6 teef” is instead treated as 1 toof per D6 (see Rebel Grot Special Rules). This income is applied to the total from da Kommittee Fundin’ Table and so is subject to any penalties incurred by lying.
A Radical Life
Between games your Rebel Grot Mob has the opportunity to reorganise and improve itself. Some of this is done in the various hidden settlements and camps of the rebellion, but others require dangerous “kovert operashuns” back in Mektown. They can also work to “convince” freshly captured Grots to take up arms for da rebellion!
Crew Reassignments and Leadership Disputes
Being a Driver or Gunner is generally quite a prestigious position, or “fastest amongst equals” in the egalitarian aspirations of the Rebellion. Once a Warrior has the job they’re not going to give it up voluntarily. The traditional way of settling this is by having a “frank discussion” in a brewhouse. The discussion usually opens with the challenger posing a rhetorical question like “Wot yoo lookin’ at?” followed by extreme violence, or more likely amongst Grots, some underhanded backstabbin. The victor gets the position until someone else successfully challenges them and life goes on (assuming the loser had the good grace not to die). While this may not be quite the equality of comrades preached in the “Little Green Book”, it is rare that someone wants to point this out to the blood spattered winner.
In rules terms the primary way to change which Warriors are Drivers or Gunners on your Rebel Mob’s Vehicles is to have a bar brawl. The winner of the brawl will take their desired position.
The original Driver/Gunner fights a Hand-to-hand Combat with the Warrior you want to replace them with.
The Warriors are not allowed to use any weapons apart from Knuckles and Knives. The Warriors still gain any advantage they would normally have from their Armour.
The Warriors begin in base-to-base contact and neither counts as Charging. The fight continues until one Warrior goes Out of Action (remember if a Warrior goes Down they go Out of Action immediately!).
The Loser rolls Serious Injuries Table as normal. Results of Captured, Bitter Enmity, and Gobsmacked are treated as Full Recovery in this case.
The only other way to change assignment is if the incumbent crewman skips a game for some reason (e.g. suffering the effects of an Old Battle Wound acting up). Under those circumstances you may substitute in another crewman who will then become the “official” holder of the position from then on.
Who’z da Boss?
Rebel Grots nominally live as “eqwils”, following the principles laid down in the Little Green Book and their motto of “Weez all green”. However, some Grots are more equal than others and the bosses in a Mob (the Head Honcho and the Banna Wava) get the best gear. Rebel Grots, being naturally aspirational sorts, will therefore sometimes find themselves attempting to overthrow the leadership of the mob! Quality entertainment is in short supply in Rebel Grot encampments, so these disputes are resolved via a violent “Koo” in front of large audiences.
Who Fights?
If the Leadership characteristic of any Warrior within a Rebel Grot Mob exceeds that of the Head Honcho, that Warrior will challenge the Head Honcho for command of the Mob in a Koo.
It is possible that two or more Warriors will reach this threshold at the same time. In that case, randomly determine which challenger will fight the existing Head Honcho first. If the existing Head Honcho wins the fight against that challenger, the next (randomly selected if necessary) challenger until no more challengers remain, or a challenger beats the existing Head Honcho and becomes the new Head Honcho.
If a challenger wins a fight, they become the mob’s Head Honcho. If a challenger still remains with a Leadership characteristic higher than that of the new Head Honcho, Pit Fights are fought until there are no challengers remaining.
Additionally, the death of a mob’s Head Honcho may trigger a Koo. If a mob’s Head Honcho dies, the Warrior with the highest Leadership characteristic will take over bloodlessly. If there are multiple Models with the same highest Leadership characteristic, the two with the most Experience Points will Fight to decide the mob’s next Head Honcho.
Note that if the Banna Wava becomes the new Head Honcho, the position of Banna Wava is now up for grabs (the flag gets in the way of all the pointing and yellin’ a boss needs to do). Pick a regular Rebel Grot to become the new Banna Wava; obviously the one who was most supportive of the new Head Honcho during the Koo! Their type changes from “Rebel Grot” to “Banna Wava” and they get access to the Banna Wava equipment list and a big flag to wave, but are otherwise unchanged.
Finally, only the Bosses in a Rebel Grot Mob get access to valued weapons like Shootas and Kannons. If a Head Honcho is deposed they must hand over any weapons listed in the Bosses Gunz equipment section to the new Head Honcho. They then become a regular ‘Rebel Grot’, and will no doubt begin to plot their eventual comeback. If the new Head Honcho was the Banna Wava, then they may either keep their previous weapons, or take the old Bosses Gunz and hand theirs over to the incoming Banna Wava…nothing gets wasted in the Rebellion.
The Koo
The practical demonstration of overthrowing an established hierarchy is an important lesson for any Rebel Grot, and Koos are well spectated. The parameters of the fight will vary depending on the approach of the challenger and what weapons are at hand when the gauntlet (more often a grotty rag) is thrown down.
To determine the type of Koo, roll on the table below:
| D6 |
Result |
|---|---|
| 1-2 |
Shooty
The two Warriors are equipped as normal. They start 16” apart. Roll a D6 each with the winner getting the first turn. They may move around the arena and engage in Hand-to-Hand Combat as normal (in addition to shooting). |
| 3-4 |
Cunnin’
The two Warriors can use all the Hand-to-Hand weapons they own. They are equipped with all armour and bioniks on their Mob sheet entry. They start in base-to-base contact and neither Warrior counts as Charging. |
| 5-6 |
‘Ard
The two Warriors have no Hand-to-Hand weapons apart from Knuckles and Knives. They are equipped with all armour and bioniks on their Mob sheet entry. They start in base-to-base contact and neither Warrior counts as Charging. |
The Loser rolls Serious Injuries Table as normal. Results of Captured, Bitter Enmity, and Gobsmacked are treated as Full Recovery in this case.
Bar Brawl/Koo Experience
Warriors who take part in a Bar Brawl or Koo gain +5 Experience for each Wounding Hit they inflict on their opponent and an additional D6 Experience Points for taking part. If this allows them to Advance, go through the Advancement process immediately.
Joinin’ da Rebellion
This is where you hire new members of your Mob, in exactly the same way as described in the “Creating a Mob” section above. The same limits for each type of Warrior apply and new mobsters can’t have any kustom weapon jobs until after their first battle.
Da Bazaar
Rebel Grots, like all Gretchin, are entrepreneurial sorts and even in their remote hideouts bazaars, stalls, and crude workshops of all sorts spring up. Unfortunately, being cut off from larger Orky society means that the wares available are much more limited than would be found back at Mektown.
Between games your Rebel Grot Mob can visit and purchase new vehicles, equipment and Gubbinz for their Warriors and vehicles, as listed in the equipment section. Gubbinz do not need a Mek to install, Grots look out for each other in the revolushun!
You’ll also need to model any new kit you give your mob - try not to make other players memorise your loadouts!
Selling (Hoarding & Swapping)
You can also choose to sell weapons and equipment at half value, rounding down. If the resulting value is less than one toof then the items have no resale value. Alternatively you may hoard or swap them around the mob. Hoarded weapons, equipment, and Vehicles do not count towards Mob Rating. Note that weapon restrictions must be respected, no swapping kannons to your Snots!

Rebel Grots with Captives
On the whole Rebel Grot Mobs work as described in the GCE Campaign Rules regarding the capture of Warriors or Vehicles. There are a couple of exceptions however.
Capturing enemy Grots
If a Rebel Grot Mob captures an enemy Grot (even from another Rebel Grot mob) and they are not successfully rescued immediately then they may attempt to “convince” them to join the cause. Roll a D6 and add the captured Grot’s leadership to the roll. Roll a second D6 and add the Head Honcho’s leadership, if this exceeds the captured Grot’s total then the Rebel Grot has seen the light (and possibly a big spanner too) and decided to join the Rebel Grot Mob, they may be added to the Mob roster along with all of their equipment. If not, the captive is sent off to experience new levels of irony as a slave to the Rebellion.
Captured Rebel Grots
Rebel Grots know the dangers of their chosen life. The Rebellion doesn’t have the funds to pay for every Grot that gets nabbed back by the Orks or other mobs, and therefore will never pay a ransom for a captured Rebel Grot. They will however happily exchange captives. Rebel Grots captured by some factions will be put to work and rescue attempts may be made at any time (e.g. most Orks, Diggas), others are more inclined to put them to death quickly and so a rescue attempt will need to be mounted immediately (e.g. Muties, Dust Rats). You’ll need to decide what’s most thematic in your own campaign - if in doubt, flip a coin. This only applies to captured Rebel Grots with under 100 experience points - notorious Rebels with over 100 experience points that are captured will be executed if they are not immediately rescued in the next game!
Captured Rebel Grot Vehicles
As for Warriors, Rebel Grots cannot ransom back their vehicles, but they can agree to exchanges. As normal they have one chance to recapture their vehicle as outlined in the GCE Campaign and GCE Scenario Rules. If not immediately recaptured, the enemy mob strips the Vehicle for parts, gaining 2D6 teef income for a Rebel Grot Big Lugga and 1D6 income for a Rebel Grot Cutta.
Permanent Damage to Rebel Grot Vehicles
Rebel Grots Vehicles suffer Permanent Damage as described in the GCE Campaign Rules, but use the Vehicle Permanent Damage Table below.
Vehicle Permanent Damage Table
Rebel Grot Vehicles use a slightly modified Permanent Damage table. Roll a D66:
11 - 13 - Destroyed
That’s it for this Vehicle. It can’t be repaired - remove it from your roster (along with any Fixed Weapons, Gubbinz, etc.). If the Vehicle was destroyed in a battle against a single opponent (as opposed to a group battle) your opponent gains 2D6 teef income for a Big Lugga or 1D6 for a Cutta.
14 - 16 - Badly Mangled:
The Vehicle is in really rough shape - Roll a D6: 1 = Armour Weakened (twice)
2 = Busted Hull and Armour Weakened
3 = Steering Jam and Boneshaker
4 = Rickety and Unreliable
5 = Captured and ‘Ard Looking
6 = Improved!
21 - 22 - Armour Weakened
Reduce the Armour Values of all locations by 1 point.
23 - 24 - Busted Hull
All rolls on the Hull Damage Table get a +1 modifier
25 - 26 - Steering Jams
The vehicle's steering seizes up at just the wrong time. Any turning or swerving Leadership Tests have a -1 penalty applied to them.
31 - 32 - Boneshaker
All shooting from this Vehicle is at an additional -1 to hit unless the Vehicle is Stationary.
33 - 34 - Rickety
It’s a bit wobbly - the vehicle’s movement each turn is reduced permanently by D3, roll this now.
35 - 36 - Unreliable
Before each battle Roll a D6. On a result of 1 the Vehicle cannot be used this game. Further results are cumulative (see GCE Campaign Rules for details).
41 - 56 - Fixed
It looks worse than it is - once those dents are hammered out it’s as good as new. Ish. The Vehicle is available next game as normal.
61 - 63 - Captured
The Vehicle has been captured by the enemy Mob. Rebel Grot Vehicles cannot be ransomed.
64 - 65 - ‘Ard Looking
This Vehicle has been through hell and survived! Friendly Warriors gain +1 Leadership while onboard.
66 - Improved!
Sometimes something needs to be properly broken before you can fix it. By the time the parts are back together the Vehicle is running better than ever - all permanent damage the Vehicle has sustained is fixed!
Da Mekboy’z Workshop
Mekboys are equal parts mechanic, inventor, and swindler. Brilliant in their own ways and they know it. They consider almost any job “open to interpretation” but, conversely, this can sometimes lead to spectacular results. For every bit of wiring that catches fire there’s an engine purring like a well-fed squig. Weapons can be made deadlier, vehicles faster, and so much more besides, but all “fer a small fee” of course.
Unfortunately for the Grot Rebellion, Grots don’t benefit from the unique genetic knowledge of machinery or the quasi-mystic way that inspiration “just comes” to Ork Meks. This means that for truly effective improvements to their weapons they need to risk a visit to the Mek’s workshop and convince a Mek that they are there on a legitimate errand. Mektown is a dangerous place for Rebel Grots, but there are networks of Grot informers and “filth columnists” scattered around to help them make the journey. However, there is always a chance that something will go wrong and they join the long list of “marters to da cause”.

We Can Do It!
After your game has finished any member of your Rebel Grot Mob may take any of their weapons to have one kustom job done.
Unfortunately no self respecting Mek would ever allow the engineless “abominashuns” that Rebel Grots pass off as Vehicles into their Workshops, and as a result neither Rebel Grot Vehicles or their Fixed Weapons can receive kustom jobs. Similarly, Rebel Grots will never willingly subject themselves to a Painboy’s hacksaw, so they cannot visit the Doc’s Serjery or have bioniks fitted.
Before a Rebel Grot can get their weapon upgraded, they must first convince the Mek that they are there on “legitimate business” for a propa Ork and have no sniff of “lip” about them. This can be a big ask for a Rebel Grot used to speaking their mind, and slipups are more frequent than might be hoped for.
For each weapon owner seeking an upgrade, roll a D6. If the score is higher than the Grot’s Initiative, they have raised unwanted attention in Mektown. Roll a further D6 on the Suspicious Mek Table. Apply a -1 modifier if your Rebel Grot Mob rating is 250 or more; their notoriety has reached Mektown. Scores less than 1 are treated as a 1.
| Suspicious Mek Table |
|
|---|---|
| 1D6 |
Result |
| 1 |
Freedumb! Despite their better judgement your Rebel Grot cannot stay silent a second longer in this den of Orkish oppression! They loudly denounce the Meks and start wildly waving a copy of The Little Green Book around. Inevitably they are disappeared and likely fed to the Squigs. Remove the Warrior and their equipment from your mob. |
| 2 |
While on the way to the Meks your Warrior is found “possessin’ subversive materials” and is given a good kickin’ by an attentive Ork. Fortunately they are rescued by members of the “Undaground Railway” and returned to their mob. However, they must miss the next battle and suffer a Serious Injury. Treat a roll of Dead, Captured, or Bitter Enmity as Full Recovery. |
| 3 |
A fellow Grot sidles over conspiratorially to your Warrior and forces a scrawled note into their hand. “Dey know!”. Forewarned your Warrior hightails it out of town, but the job is not done. |
| 4+ |
The Mek glares down at your sweating Warrior and sucks his teeth even harder than usual. The work is performed as normal, but add +1 toof to the cost. |
Assuming your Warrior manages to convince the Mek to do the job, follow the process below.
Eligible Weapons: Restrictions apply and not all weapons can be kustomized, see relevant weapon in the Armoury Appendix.
Kustomised Weapon options are:
- Shootier (+1 Strength)
- Longer Range (+6” Total Range)
- More Dakka (+1 Sustained Fire Dice)
Once you’ve nominated what you’d like done, roll on Da Big Day Table:
| Da Big Day Table - Meks |
|
|---|---|
| D6 |
Result |
| 1 |
We Adda Bitta Trubble. Uh oh. The Mek has made things worse. Roll on the Bodge Table. Despite the mishap the Mekboy still demands D6 teef for their work. |
| 2 |
While we Wuz at It… The Mek has found something to repair instead which has been done without your consent. Your original request has been forgotten about and instead the weapon appears to have received a bright new coat of paint or similar pretty but ineffective change. The Mekboy still demands D6 teef for their work. |
| 3 |
Can’t Get da Parts. The Mekboy has done nothing but charges nothing. |
| 4-6 |
Job’s a Good ’Un. Hurrah! The Mekboy completed the work successfully. You are presented with a bill for D6 teef. Refer to the Weapon’s Job’s a Good ’Un section. |
Da Bad Nooz - Meks
Except for Can’t Get Da Parts you must pay your bill (D6 teef) immediately. Note: The teef paid to the Meks is not added to the Weapon’s value - see the Job’s A Good ‘Un section. If you can’t afford to pay your bill the Mekboy confiscates your Weapon until you’ve paid your bill. Remove their value temporarily from your Mob Rating until you’ve paid.
Bodged Jobs
The work has been bodged but you won’t find out how badly until you start a new game. When you attempt to shoot the bodged Weapon roll on the Bodged Weapon Table:
| Bodged Weapon Table |
|
|---|---|
| D6 |
Bodge |
| 1 |
Just Don’t Ask Where to even start. That bit wasn’t supposed to fall off and there’s this whole section missing… The Weapon is unusable. |
| 2 |
Bits Left Out It turns out the parts left over weren’t spare… The Weapon shoots once like normal then falls to bits in the Warrior’s hand. |
| 3 |
Sights Bodged It’s fine if you squint, I guess? Short and Long Ranges reduced by half (rounding down). |
| 4 |
Aim Bodged The trigger feels all wrong and it’s jumping about like an agitated herd squig! All shots made by the Weapon are at a -1 to Hit. |
| 5 |
Rapid Fire Mechanism Bodged The Weapon loses its Full Auto function. If it didn’t have one to begin with it now requires an Ammo test every time the Weapon is fired. |
| 6 |
Ammo Feed Bodged Any Ammo rolls automatically fail. Still test for Exploding Weapons. |
Getting’ Bodges Fixed
Once you have fielded the weapon or vehicle in a game the bodge is automatically sorted. This costs you nothing and does not prevent another job. Mek tries to make grudging excuses but ultimately concedes and completes the original job you requested.
Job’s A Good ‘Un - Weapons
-
Shootier: +1 Strength
-
Longer Range: +6" Total Range
-
More Dakka: +1 Sustained Fire Dice
Note: The first upgrade (of each type) adds +5 teef to the Weapon’s Value. Second and subsequent upgrades do not but will incur performance loss. These effects are cumulative.
| Weapon Performance Loss Table |
|
|---|---|
| D6 |
Compromise (reroll any results that are the same as the upgrade just received) |
| 1 |
Slowed Fire The Weapon loses a Sustained Fire Dice. If this takes the number to zero the weapon now fires a single shot. If it fired a single shot it becomes ‘Move or Fire’. If it was already ‘Move or Fire’ the weapon is now useless - remove it from your roster. |
| 2 |
Ammo Guzzler The Weapons Ammo rolls are now ‘Automatic’. If it's already Auto roll again for a different effect. |
| 3-4 |
Kicks Some All shots made by the Weapon have a penalty of -1 to Hit (Both Short and Long Range). |
| 5 |
Sawn Off Weapons with a Total Range greater than 30” are reduced to a Maximum of 24”. All other Weapons lose 6” off their Total Range. Short Range is not affected. |
| 6 |
Lightweight The Weapon’s Strength is reduced by -1. |
Special Characters
Rebel Grots cannot make use of most special characters listed in the GCE Campaign Rules, although any noted as specifically working with Rebel Grots may be hired following the usual Special Character rules in the GCE Campaign Rules. However, they do have access to a unique special character, Da Red Gobbo!
Da Red Gobbo
Da Red Gobbo is the power behind the Revolushunary Kommittee, and the figurehead of the whole Grot Rebellion! Due to the Byzantine power struggles that go on in the Kommittee, the actual Red Gobbo changes on a fairly frequent basis, but the symbols of the role, a special kustom slugga and a sceptre, are always “passed along” to the next in line. While the Red Gobbo usually is only seen as a strongly backlit shadow during negotiations with Da Kommittee, they are not above getting out into the wastes and getting their hands dirty. Seeing the sceptre of power being wielded against the orkish oppressors is sure to inspire a Rebel Grot Mob to acts of greatness!
Da Red Gobbo
| M |
WS |
BS |
S |
T |
W |
I |
A |
Ld |
|---|---|---|---|---|---|---|---|---|
| 4 |
D6+1 |
D6+1 |
D3+1 |
4 |
D3 |
D3+1 |
D3 |
7 |
Weapons: Da Red Gobbo has a kustom slugga (see below), club and knife.
Skills: Da Red Gobbo comes with D6 skills (see table below)
Da Red Gobbo’s Kustom Slugga
| Range |
Hit modifier |
Strength |
Save Mod |
D |
Ammo Roll |
Notes |
||
|---|---|---|---|---|---|---|---|---|
| Short |
Long |
Short |
Long |
|||||
| 0” - 6” |
6” - 15” |
+1 |
- |
4 |
0 |
1 |
4+ |
N/A |
Special Rules
Hiring: Da Red Gobbo cannot be hired as in the GCE Campaign Rules for Special Characters. Instead they might turn up if the Mob is fighting a Mob with a higher Mob Rating: You must declare before the start of the scenario that you are attempting to attract the Red Gobbo. Only one Special Character may be induced in this fashion, so if others are available, you must specify which you are choosing.
Compare the two Mob Ratings and roll a D6 on the table below. If you are successful the Red Gobbo joins your mob for the duration of the battle and is counted as part of your Mob (your Mob Rating is not altered). After the game The Red Gobbo leaves the mob, and they may not be hired into the Mob after the battle either!
| Mob rating difference |
D6 roll needed |
|---|---|
| 0-25 |
No help coming! |
| 26-50 |
6+ |
| 51-100 |
5+ |
| 101+ |
4+ |
Does he look different to you?: Da Red Gobbo is a position, not an individual, so their profile and skills change with the machinations of Da Kommittee. This means that their profile must be rolled for each time they join the mob before a fight (even two sequential ones!). Roll for their characteristics before the battle as shown in the profile above. Additionally, Da Red Gobbo has D6 skills, randomly selected from the skill charts in the Campaign Book and this Book. Roll on the chart below to see which Skill List to use for each skill.
| D6 |
Skill Table |
|---|---|
| 1 |
Ferocity |
| 2 |
Muscle |
| 3 |
Boardin’ |
| 4 |
Cunnin’ |
| 5 |
Dakka |
| 6 |
Odd |
Da Big Boss: Da Red Gobbo will only fight for Rebel Grot Mobs. Da Red Gobbo temporarily takes over your Rebel Grot Mob and counts as the leader rather than the Head Honcho. If Da Red Gobbo leaves the table for any reason, including being taken Out of Action, leadership reverts to the Head Honcho.
What a Grot!: The appearance of the semi-mythical Red Gobbo will cause your Grots to redouble their efforts for the cause. Any Rebel Grot within 6” of the Red Gobbo may use the Red Gobbo’s Leadership of 7 for any Leadership Tests they may take. Additionally, Rebel Grot within 6” may test to recover from Pinning, just as if they were within 2” of a friendly Warrior.
I get knocked down: Da Red Gobbo may always test to recover from Pinning, even if there are no friendly models within 2”.
Da troof comes out!: As the Red Gobbo was there and knows exactly what went on, the Head Honcho may not lie to Da Kommittee after the battle when generating income!
Appendices
Armoury
If a weapon can be Kustomised by the Meks it will have it listed in their Notes section, along with any restrictions on which Kustom jobs can be performed.
Notes
- Weapons that use the user’s Strength characteristic will note this “AU” (“As User”).
- Sustained Fire Dice – Weapons with these will have how many listed as “SFD” (e.g. “1 SFD”).
- Kustomisation options will be listed with the prefix “K” (e.g. “K - All”)
Hand-to-Hand
Knives and Knuckles
All Warriors carry at least a knife or a set of knuckledusters.
| Range |
Hit Modifier |
Strength |
Save Mod |
D |
Ammo Roll |
Notes |
|---|---|---|---|---|---|---|
| - |
- |
AU |
Var |
1 |
N/A |
N/A |
Chain
It’s a big length of chain. Whack someone with it and they’re not going to be happy about it. Try to show off too much and you’ll just end up hitting yourself in the back of the head.
| Range |
Hit Modifier |
Strength |
Save Mod |
D |
Ammo Roll |
Notes |
|---|---|---|---|---|---|---|
| - |
- |
AU +1 |
Var |
1 |
N/A |
Opponent may not block. Fumbles count double. |
Opponent May Not Block: Warriors armed with a Chain cannot be forced to reroll a blocked Attack (e.g. using a Shield).
Fumbles Count Double: Fumbles rolled by a Warrior armed with a Chain count as +2 to their opponent’s score, rather than the usual +1.
Club/Choppa
Solid, dependable, vicious. Additional spikey bits optional but encouraged. Whilst a club is any pipe or hefty stick strong enough to crack skulls a choppa can refer to almost any single-handed sharp thing. Often it’s an axe, sometimes a cleaver, and other times it’s a strange hybrid of blade and club. Apply repeatedly to enemies for best results.
| Range |
Hit Modifier |
Strength |
Save Mod |
D |
Ammo Roll |
Notes |
|---|---|---|---|---|---|---|
| - |
- |
AU +1 |
Var |
1 |
N/A |
N/A |
Spear
Do you like stabbing people but hate having to get close enough to smell their BO? Have I got a weapon for you…
| Range |
Hit modifier |
Strength |
Save Mod |
D |
Ammo Roll |
Notes |
||
|---|---|---|---|---|---|---|---|---|
| Short |
Long |
Short |
Long |
|||||
| - |
- |
- |
- |
AU |
Var |
1 |
- |
HtH: +1 Initiative |
| 0” - 8” |
- |
-1 |
- |
AU |
0 |
1 |
4 |
Ranged: 1 Use Only |
+1 Initiative for Hand-to-Hand Combat Draws: In the event of a draw in Hand-to-Hand Combat where Initiative values are compared to decide the winner a Warrior with a Spear counts as having +1 Initiative (over and above their potential maximum statline). This does not stack if the Warrior carries additional spears!
Single-Use Throw: A Warrior with a Spear can choose to throw it in their Shooting Phase, with the ranged profile. The Spear cannot be retrieved during the game but the Warrior will have done so by the next battle.
'Uge Club/Choppa
You know what’s better than a choppa you can hold in your hand? A choppa so big you need two hands!
| Range |
Hit Modifier |
Strength |
Save Mod |
D |
Ammo Roll |
Notes |
|---|---|---|---|---|---|---|
| - |
- |
AU +2 |
Var |
1 |
N/A |
Double-handed, Opponent wins draws. |
Double-handed: A Warrior needs two hands (or equivalent) to use an ‘Uge Club/Choppa in Hand-to-Hand Combat. If they don’t have two functional hands (e.g. due to Bionik replacement) they cannot use this weapon and equally if they’re using this weapon they cannot use any other weapons at the same time. If an arm wound or similar means that the Warrior has two different Strength characteristics, use the higher of the two.
Opponent Wins Draws: In the event of a draw in Hand-to-Hand Combat where Initiative values are compared to decide the winner a Warrior with an ‘Uge Choppa/Club loses, regardless of whether they have higher Initiative than their opponent.
Six-Shoota
A revolver-style weapon that’ll fire as fast as you can fan the hammer.
| Range |
Hit modifier |
Strength |
Save Mod |
D |
Ammo Roll |
Notes |
||
|---|---|---|---|---|---|---|---|---|
| Short |
Long |
Short |
Long |
|||||
| 0” - 6” |
6” - 12” |
+1 |
- |
3 |
0 |
1 |
4+ |
1 SFD, 1 shooting phase to reload |
Reloading: Each time a Six-Shoota is fired a shooting phase must be spent reloading it (if the Warrior wishes to fire again during the battle). Only one Six-Shoota may be reloaded per shooting phase (i.e. a Warrior with two could fire in two consecutive turns but would need to spend two shooting phases reloading in order to use both pistols again). A Six-Shoota that has yet to be reloaded is functionally identical to a Six-Shoota that has failed its Ammo Roll - it cannot be used in Hand to Hand Combat until it is reloaded. Using a Six-Shoota in Hand to Hand Combat does not deplete its ammo.
Slugga
A magazine-fed pistol of dubious efficacy. Loud, plodding, and very Orky.
| Range |
Hit modifier |
Strength |
Save Mod |
D |
Ammo Roll |
Notes |
||
|---|---|---|---|---|---|---|---|---|
| Short |
Long |
Short |
Long |
|||||
| 0” - 6” |
6” - 12” |
+1 |
- |
3 |
0 |
1 |
4+ |
N/A |
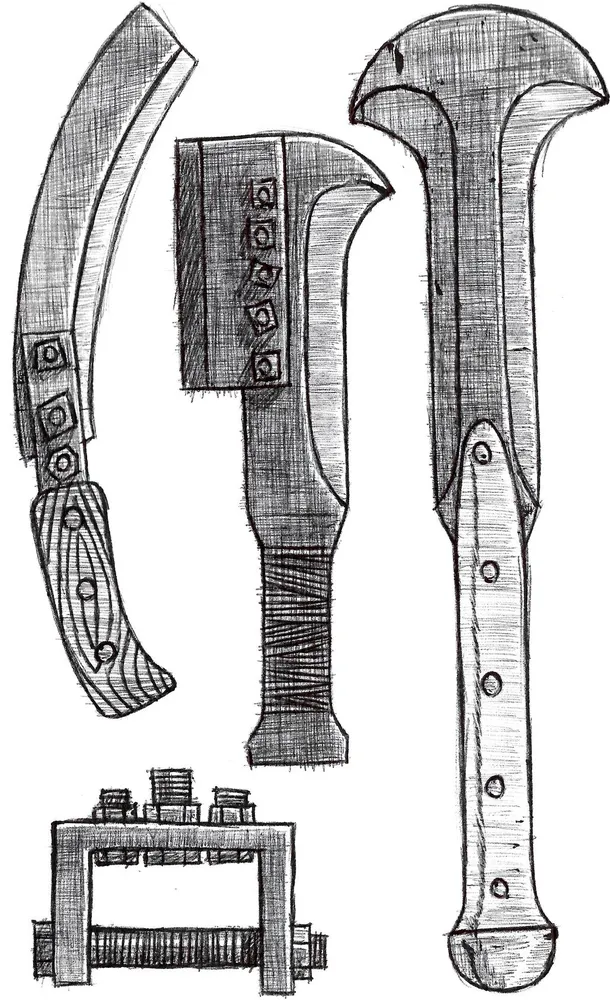
Gunz
Each weapon has a note concerning whether they can be Kustomised or not. See the Da Mekboy’z Workshop section for the relevant rules.
All Gunz require two hands to use.
Blunderbuss
The one advantage of a weapon with range this lousy is that it’s nearly impossible to miss. Whether the thing you hit will actually take much in the way of damage remains to be seen though as the scatter shot fired is turned away by as little as normal clothing.
| Range |
Hit modifier |
Strength |
Save Mod |
D |
Ammo Roll |
Notes |
||
|---|---|---|---|---|---|---|---|---|
| Short |
Long |
Short |
Long |
|||||
| 0” - 6” |
- |
+3 |
- |
3 |
+1 |
1 |
4+ |
K: More Dakka only |
+1 Save Modifier: Warriors hit by this weapon receive +1 to their Armour Save, including if they aren’t wearing any armour (i.e. they receive a 6+ save). This does not affect hits on Vehicles.
Bow
Don’t trust one of your lads with a shoota? Give ‘em a bow to prove themselves with - the old ways are sometimes best!
| Range |
Hit modifier |
Strength |
Save Mod |
D |
Ammo Roll |
Notes |
||
|---|---|---|---|---|---|---|---|---|
| Short |
Long |
Short |
Long |
|||||
| 0” - 12” |
12” - 18” |
- |
-1 |
3 |
+1 |
1 |
4+ |
K: None |
+1 Save Modifier: Warriors hit by this weapon receive +1 to their Armour Save, including if they aren’t wearing any armour (i.e. they receive a 6+ save). This does not affect hits on Vehicles.
Crossbow
Surprisingly killy but a right faff to make ready for another shot. Still - not to be underestimated.
| Range |
Hit modifier |
Strength |
Save Mod |
D |
Ammo Roll |
Notes |
||
|---|---|---|---|---|---|---|---|---|
| Short |
Long |
Short |
Long |
|||||
| 0” - 12” |
12” - 18” |
- |
-1 |
4 |
0 |
1 |
4+ |
Move or Fire, K: None |
Move or Fire: Warriors armed with a Crossbow can either move in their movement phase or choose to fire in their shooting phase, not both. Being onboard a moving Vehicle also counts as moving for the purposes of this rule.
Linked Gun
Any of the Gunz in this section can be permanently joined together to create a Linked Gun which can then be mounted on a Vehicle that can take a Fixed Weapon (Linked Gunz are not equippable by Warriors on foot). Pay for two of the same type of Gun (no mixing!) and use the profile for that gun. Add 1 Sustained Fire Dice to the new Linked Gun’s profile. The Kustomisin’ restrictions of the original Gun still apply. Catapults cannot be used to make Linked Guns – they’re far too weedy!
Kannon
An Orky shotgun. Kicks like a squiggoth and puts hefty holes in whatever it hits.
| Range |
Hit modifier |
Strength |
Save Mod |
D |
Ammo Roll |
Notes |
||
|---|---|---|---|---|---|---|---|---|
| Short |
Long |
Short |
Long |
|||||
| 0” - 4” |
4” - 18” |
- |
-1 |
4 |
0 |
1 |
4+ |
Knockback, K: All |
Shootiest: Head Honcho & Banna Waver Only
Knockback: Newton’s Third Law applies more than usual to the shells fired by an Ork Kannon - any Warrior hit (whether wounded or not) must roll under their Strength characteristic or be knocked back. If knocked back, move the Warrior 2” away from the direction of the shot. If they were Crew onboard a Vehicle at the time they will be knocked overboard (this does not apply to Drivers).
Shoota
What exactly is a shoota? There’s probably a magazine of some kind involved, definitely a barrel, and it’ll go bang when fired. Beyond that there’s rarely two shootas that look or function in the same way.
| Range |
Hit modifier |
Strength |
Save Mod |
D |
Ammo Roll |
Notes |
||
|---|---|---|---|---|---|---|---|---|
| Short |
Long |
Short |
Long |
|||||
| 0” - 12” |
12” - 18” |
+1 |
- |
3 |
0 |
1 |
4+ |
K: All |
Shootiest: Head Honcho & Banna Waver Only
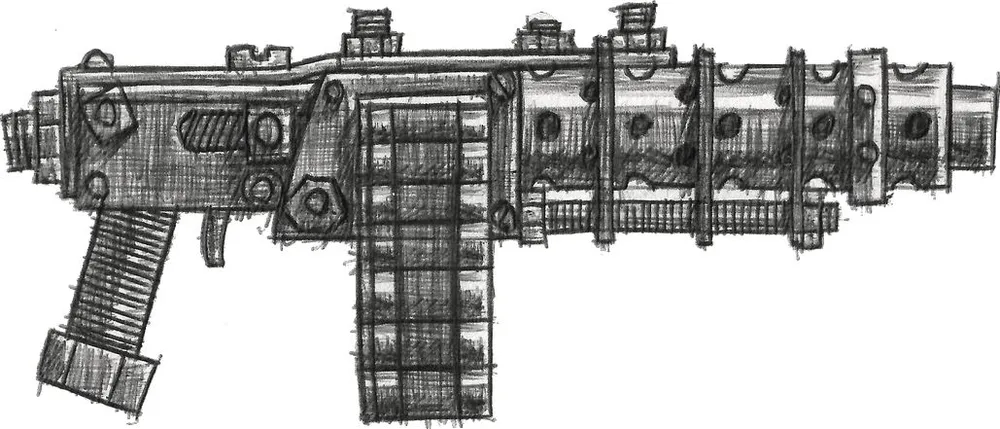

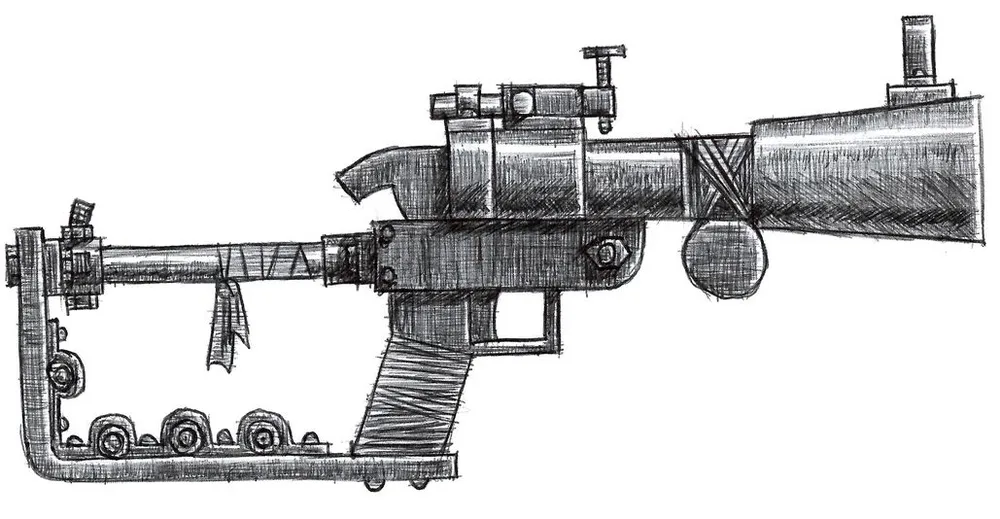
Catapult
Not the big one to knock down walls with…the little one that you point, stretch and ping! About the only benefit of a catapult as a weapon is that you can’t throw a rock without finding some ammo.
| Range |
Hit modifier |
Strength |
Save Mod |
D |
Ammo Roll |
Notes |
||
|---|---|---|---|---|---|---|---|---|
| Short |
Long |
Short |
Long |
|||||
| 0” - 6” |
6” - 12” |
- |
- |
3 |
+1 |
1 |
2+ |
K: None, Fire Twice, Tiny!, RG-only |
Fire Twice: A Warrior using a catapult can fire twice at short range (6”) if they didn’t move and weren’t onboard a Vehicle.
Tiny!: A catapult is easily shoved into a pocket, so does not prevent a Rebel Grot carrying one from also using two weapons in hand-to-hand combat. It does still take two hands to use though, so no driving or doing other things while firing one! It also cannot be used to make a Linked Gun.
'ave some self respekt: Even a Digga wouldn’t be caught dead relying on a catapult as a weapon. Only Rebel Grot Mob members may use catapults and they cannot be sold to the Meks or given to a Mob member if captured - they just get tossed away with a snort.
+1 Save Modifier: Warriors hit by this weapon receive +1 to their Armour Save, including if they aren’t wearing any armour (i.e. they receive a 6+ save). This does not affect hits on Vehicles.
Stikkbombz
As the name suggests these are bombs, on-a-stick. Some fling shrapnel over a large area while others concentrate the force into a single point. They also work rather well as clubs…
In rules terms both kinds have a Hand-to-Hand weapon profile and effectively function as clubs. They both have the following rule:
Might Explode: If both the Attacker and Defender in Hand-to-Hand Combat roll one or more sixes (each) for their Attack Dice then the Stikkbomb goes off, hitting both of them. Do not place the template if the Stikkbomb uses one as both Warriors instead absorb the blast.
In multiple combatant or Pilin’ On situations this only affects the two Warriors currently resolving combat, not anyone providing bonuses to them.
Grenade range: range is determined by the thrower’s Strength. Take the user’s Strength characteristic, multiply it by 2, and then add 2”. For example a Warrior with a Strength characteristic of 4 could throw a Stikkbomb up to 10” (4 x 2, +2”).
Frag
A standard fragmentation grenade - drop one into a group of enemies and watch them panic!
| Range |
Hit modifier |
Strength |
Save Mod |
D |
Ammo Roll |
Notes |
||
|---|---|---|---|---|---|---|---|---|
| Short |
Long |
Short |
Long |
|||||
| - |
- |
- |
- |
AU +1 |
Var |
1 |
- |
HtH: Might Explode |
| G |
- |
- |
- |
3 |
-1 |
1 |
Auto |
Ranged: 2” Blast Template, K: Shootier only |
Krak
These usually take the form of a shaped charge for burning a nasty hole in an armoured target, although as with all Orky tech this is merely the most common approach.
| Range |
Hit modifier |
Strength |
Save Mod |
D |
Ammo Roll |
Notes |
||
|---|---|---|---|---|---|---|---|---|
| Short |
Long |
Short |
Long |
|||||
| - |
- |
- |
- |
AU +1 |
Var |
1 |
- |
HtH: Might Explode |
| G |
- |
- |
- |
6 |
-3 |
D6 |
Auto |
K: Shootier only |
Armour
Shield
Strap a big hunk of metal to an arm and feel safer. Results may vary.
Armour Save +1 against Bows, Crossbows, template weapons, and Hand-To-Hand weapons.
Large: The shield takes one of the Warrior’s hand “slots” and so double-handed weapons cannot be used at the same time as the shield. This includes Gunz that require two hands.
Block: User may choose to force Hand-to-Hand opponent to reroll highest scoring Attack dice once per round. If their opponent has a shield (or parry ability) these cancel each other out and neither Warrior can force a re-roll.
Studded Armour
Often disparagingly known as a “t-shirt save” but the leather of studded armour has saved many a wearer’s innards from ending up as outards.
Studded Armour confers a 6+ Saving Throw.
Flak Armour
Flak Armour is a slightly fancier version of Studded Armour. Its extra layers don’t make much difference to a bullet but they can make all the difference against less high velocity sources of trouble.
Flak Armour provides a 6+ Saving Throw.
Against attacks using Blast Markers or Teardrop templates Flak Armour provides a 5+ Saving Throw. The Save Modifier of these attacks still apply (so a Frag Stikkbomb with a -1 Save Modifier would result in a 6+ saving throw for a Warrior in Flak Armour).
This 5+ save also applies to S3 hits from Vehicle hit location tables - excluding hits from falling overboard.
Big Gunz
Linked Gun
See the Linked Gun profile from the Gunz section of this appendix.
Splattapult
Not yer Grandad's catapult. This is top of the line, vehicle-mounted, Grot heavy weapon tech. It's got it all: springy metal bits, twisted bitsa rope, a basket, and perhaps even a ratchet. Launching flaming balls of doom, pots of angry buzza squigs, or just good old fashioned lumps of topography, a Splattapult can put a real dent in even a trukk's day.
In rules terms Splattapults work differently to regular weapons. They may only be mounted on Rebel Grot Big Luggas where they are assigned a firing arc and Gunner as usual for a Fixed Weapon. The process of firing a Splattapult is detailed below, followed by the different ammo types and their profiles.
Firing a Splattapult
- A Splattapult may only be fired in the owning player’s Shooting Phase, i.e. not as part of Chases or on overwatch.
- Declare which of the three ammo types you are using for this shot. Ammo types are detailed below.
- Nominate target point. This can be anywhere inside the firing arc and line of sight of the Gunner. This can be a point on the ground, or a model, and normal targeting rules do not apply.
- Guess the range to the impact point, choosing a value between 6” and 24”.
- Measure the guessed range towards the target point. This is the impact point.
- Roll the Scatter dice to determine how far off the shot is. A HIT indicates the shot lands exactly at the impact point. If a HIT is rolled, also make an ammo test for the chosen ammo type, and if failed this ammo type may not be fired for the rest of the game. If an arrow is rolled, move the target point 2D6” minus the Gunners ballistic skill in the indicated direction. Negative values count as 0.
- Determine damage based on the ammo type using the profiles below.
Rocks
| Range |
Hit modifier |
Strength |
Save Mod |
D |
Ammo Roll |
Notes |
||
|---|---|---|---|---|---|---|---|---|
| Short |
Long |
Short |
Long |
|||||
| Guess 6” - 24” |
- |
- |
5 |
-3 |
1 |
2+ |
2” Blast Template |
|
Burna
| Range |
Hit modifier |
Strength |
Save Mod |
D |
Ammo Roll |
Notes |
||
|---|---|---|---|---|---|---|---|---|
| Short |
Long |
Short |
Long |
|||||
| Guess 6” - 24” |
- |
- |
5 |
-3 |
1 |
2+ |
2” Blast Template, Splatta, Catching Fire |
|
Splatta: Burna ammo splatters burning, sticky oil all over those unfortunate enough to be close by. The normal rules on who is hit by a blast template do not apply. Instead for each Warrior touched by the template, roll a D6. On a 4+ the Warrior suffers a hit, and may catch fire as detailed below. Vehicles are hit as normal for template weapons as described in the GCE Core Rules and may also catch fire.
Catching Fire: Warriors and Vehicles can both be set fire to using Burna ammo. Roll a D6 for each hit made by Burna ammo – on a 4+ the target catches fire! Note - hit, not wounded; this is in addition to wounding. Warriors on foot that go Down or Out of Action do not catch light but otherwise they are now on fire - see the Movement section of the GCE Core Rules for how that works. Similarly the rules for Vehicles Catching Fire can be found in the Vehicle Shooting section of the GCE Core Rules.
Rippa pot
| Range |
Hit modifier |
Strength |
Save Mod |
D |
Ammo Roll |
Notes |
||
|---|---|---|---|---|---|---|---|---|
| Short |
Long |
Short |
Long |
|||||
| Guess 6” - 24” |
- |
- |
5 |
-3 |
1 |
2+ |
2” Blast Template, Biters! |
|
Biters!: They’re in me shirt! When a Rippa pot cracks open a swarm of enraged buzzer squigs, scorpions, or assorted other nasties burst forth, engulfing all those nearby. Any Warrior directly under the impact point of the Rippa Pot takes a S3 hit from the pot itself. Place the 4” Blast Template and Warriors on foot are hit and damaged as normal for a blast template as detailed in the GCE Core Rules using the profile above. Vehicles hit by Rippa Pots cannot be damaged but the beasts within will automatically hit the Crew and Driver locations with no armour penetration roll needed. Each model on board (friend or foe!) the vehicle must take a Leadership Test, applying a -1 modifier to the dice roll if the vehicle suffered only a partial hit. Any model that fails the test throws themselves D6” from the vehicle in a random direction, taking hits as normal if the vehicle thrusted (or moved more than 6”) in its last movement.
Gubbinz
Some Gubbinz have the stipulation that they can only be mounted in certain places. The sides are the usual vehicle quadrants, as seen in this diagram. These are not “slots” - mounting something on the left side does not mean another piece of Gubbinz can’t be mounted on the Vehicle’s left side. Between games you may move Gubbinz between quadrants, assuming where you’re moving them to is a legal location as described in their rules. No sneakily trying to move things to places they weren’t intended!
If the Gubbinz Damage Location is hit during a battle, randomise which single item of Gubbinz takes the damage. Unless otherwise stated a Penetrating Hit on an item of Gubbinz renders it unusable on a 4+. It will be repaired before the next battle.
Boarding Plank
Why leap when you can stroll? Ork boarding planks are usually spiky affairs that securely attach to their prey once deployed. Tearing them loose is advisable but it’ll hurt!
If a Vehicle declares that it is Racing or Chasing an enemy Vehicle it may deploy a Boarding Plank. No operator is needed for this - it deploys automatically. Once this is done the Enemy Vehicle will suffer 1 point of damage if it moves more than 2” from the Racing/Chasing Vehicle for any reason.
A deployed Boarding Plank may be used by Warriors on either Vehicle to cross between them without taking an Initiative Test.
Big Luggas have three places where a Boarding Plank may be fitted - front, left side, and right side. You may fit one at each location if you wish!
Cuttas may not mount a Boarding Plank.
Extra Armour Plates
You know what’s better than armour? Lots of armour!
The Extra Armour gubbinz provide a Saving Throw, much like Armour on a Warrior. Each purchase of Extra Armour Plates for a Vehicle ups the Saving Throw by +1 (starting at 6+) to a maximum of 4+. When the Vehicle’s Armour is penetrated (any location), a successful Extra Armour Plates save will negate the hit completely. This saving throw is affected by the hit’s Save Modifier.
If Extra Armour Plates are damaged by a 4+ hit to the Gubbinz location then 3 Extra Armour Plates are unusable for the rest of the game.
Big Luggas may have up to 6 Extra Armour Plates - meaning a fully stocked Vehicle of this type can lose 3 and still have a backup 3 to provide a save!
Cuttas may have up to 3 Extra Armour Plates.
Reinforced Ram
Ramming is dangerous at the best of times - what if a vehicle was modified to be even rammier? Wouldn’t that be great? Too right.
When a Vehicle with a Reinforced Ram performs a Ram (or is involved in a head-on Ram) one of the Damage Rolls should be done using 2D6. Pick the highest Damage result.
Sideswiping and Raking aren’t affected by having a Reinforced Ram.
Big Luggas may fit a Reinforced Ram - fitted to the front quadrant of the Vehicle.
Cuttas may not fit a Reinforced Ram.
Spikes
A vehicle covered in spikes looks properly menacing and that’s the usual reason Orks add them. The fact that it’s even more unpleasant for targets on foot is merely a bonus!
Any time a Warrior is hit by the vehicle (friend or foe) and the effect would be a Strength 3 Hit it instead becomes a Strength 4 hit. This includes squashing Warriors on foot, failed Boarding attempts, and falling off in general. It also affects incoming penetrating hits on the Vehicle (shooting/ramming/etc..). All of these are made worse by a spiky vehicle!
Both Big Luggas and Cuttas can have Spikes.
Extra Spikes
There’s clearly still some room onboard for spikes. Look - that bit over there could clearly benefit from a rusty barb the size of your forearm!
Extra Spikes require Spikes to be fitted first and effectively replace them. In addition to the benefits of Spikes a Vehicle with Extra Spikes also inflict a -1 modifier on Initiative Tests against enemy Warriors attempting to board it. This modifier also applies to Warriors trying to avoid being squashed by it (friend or foe!).
If rendered unusable by damage during a game Extra Spikes are downgraded to Spikes (meaning it would take two destroying hits to remove all spikiness from a Vehicle). As with all damage to Gubbinz they’ll be repaired by the next game.
Only Big Luggas can have Extra Spikes.
Wrecker Ball
Did you know that wrecking balls don’t just work on buildings? It’s true. Talk to your local Mek for more information!
Once installed a member of the Mob’s Crew can choose to operate it during your turn. Unlike Driver/Gunner positions this is not a permanent assignment and can vary throughout the battle. A Warrior operating a Wrecker Ball may not fight in Hand-to-Hand Combat in the same player turn they make an attack with it, but they may shoot. Enemies may not operate your Wrecker Ball.
When the Vehicle comes within range to perform a Ram, Rake, or Sideswipe on an enemy Vehicle the Wrecker Ball can be used. The Vehicle does not need to actually perform a Ram/Rake/Sideswipe, although it may if you wish. The Wrecker Ball attack is resolved before that can happen and the enemy Vehicle may not Swerve to avoid it!
A Wrecker Ball attack automatically hits and penetrates D3 random Damage Locations.
If you hit the Driver or Crew location you knock them off the Vehicle in addition to any other damage! The Crew member should be randomised as normal. They take a S3 Hit and are knocked D3” away from their Vehicle (in whatever direction seems most appropriate!).
If a Wrecker Ball takes a Penetrating Hit then roll as normal (4+ renders it unusable) but in addition to this a 6 causes it to also hit the Vehicle it’s mounted on (D3 random Damage Locations are penetrated).
Big Luggas may fit one Wrecker Ball - pick any of the quadrants described above.
Cuttas may not fit a Wrecker Ball.
Loadsa Ammo
Boxes of rokkits, lengthy belts of bullets, extra burny juice! It’s always good to have spare ammunition for the vehicle's fixed weapon.
A Fixed Weapon with Loadsa Ammo ignores its first failed Ammo Roll. Additional failed Ammo Rolls can be ignored by mounting more Loadsa Ammo Gubbinz.
Big Luggas may carry as many Loadsa Ammo Gubbinz as you’d like.
Cuttas may not mount a Fixed Weapon and so may not carry Loadsa Ammo.
Misc Appendix
Vehicle Capacities
Vehicle capacities can be a source of confusion for some players. Vehicles can be all shapes and sizes - build whatever contraptions you like. Crew capacity is based on how many models are physically able to fit† however (depending on your models, players, and preferences) you may prefer to stipulate vehicle capacities rather than using your vehicles’ literal capacities.
Based on the models of the late 1990s Rebel Grot vehicle capacities were roughly as follows:
Big Luggas: Driver, Gunner, 8 additional crew.
Cuttas: Driver, 7 additional crew.
You may wish to adjust this. Discuss them with the other players in your campaign and agree what you feel is reasonable.
† Models that fall off are not deemed to have fallen off in-game!
Licence details and Credits
This document was written by Andrew Meijers, Morgan Fox, Matthew Bester, Tom Inglis, Ben Middleton, and Ben Saunders.
It is licenced under Creative Commons Attribution-NonCommercial-ShareAlike 4.0 International
https://creativecommons.org/licenses/by-nc-sa/4.0/
Unsure what any of that means?
Visit https://gorkamorka.co.uk/creative-commons for an explanation.
Diagrams created by Morgan Fox, also under the CC-BY-NC-SA-4.0 licence.
Box-out vignette was written by Andrew Meijers and is under the same licence as above.
Cover art by Andrew Meijers (Creative Commons Attribution-NonCommercial-ShareAlike 4.0 Unported license)
Additional art and images provided by: Andrew Meijers (Creative Commons Attribution-NonCommercial-ShareAlike 4.0 Unported license) Andrew Trevorrow-Seymour (Creative Commons Attribution-NonCommercial-ShareAlike 4.0 Unported license) Jenny Fox (Creative Commons Attribution-NonCommercial-ShareAlike 4.0 Unported license) Matthew Bester (Creative Commons Attribution-NonCommercial-ShareAlike 4.0 Unported license) Morgan Fox (Creative Commons Attribution-NonCommercial-ShareAlike 4.0 Unported license) Thomas Nopper (Creative Commons Attribution-NonCommercial-ShareAlike 4.0 Unported license)
The layout was made by Morgan Fox using images created by Jenny Fox and is also licensed under a Creative Commons Attribution-NonCommercial-ShareAlike 3.0 Unported license.
GCE Is in no way affiliated with Games Workshop.
Furthermore, Gorkamorka is a trade mark of Games Workshop Ltd. and is used without permission. No challenge to its status is intended.