This game has two main components - battles and campaigns. Battles are the games that take place on a board with miniatures whilst campaigns are the RPG-like mechanics that link battles together and allow your Mobs to evolve.
To play you’ll need this book, a campaign book, some faction rules, and scenarios to play.
These rules are directly compatible with GW’s Gorkamorka rules. The various faction rules found across Da Uvver Book, Digganob, and various other articles can be used with the GCE system.
Similarly the scenarios found in those sources are also compatible.
Changelog
Version 1.45 – November 2025
- Added diagram for how to make turns and tweaked wording of thrusting explanation
- Added missing Pinned definition in glossary
Version 1.4 – October 2025
- Getting On and Off reworked to account for ORB allowing moving Vehicles to “drop off” Boyz while moving along.
- Attacking Stationary Vehicles and Gates patched with WS only.
- Tidied up the bike/small Vehicle wording a bit
- Tidied up the Vehicle thrusting rules
- Clarified template weapon hits on Crew locations
- Removed mention of Pinning for Drivers
- Pruned Stikkbombz in close combat rules - they’re in the faction packs!
- A bit more weapon genericization (Skorchas don’t need to have their own ammo roll section!)
- Closed zero wound loophole (affects experience for wounding hits)
- Added rules for tents
- Added dimensions for small and large teardrop templates
- Drivers now immune to Pinning
- Tweaked the scattering rules to be closer to ORB
- Refined description of Follow Up moves
- Glossary capitalisation overhaul
- Boarding Actions tidied up. Split between relevant Movement, Shooting and Close Combat sections. Could exist as standalone section if needed.
- Stationary, Out of Control, and Unopposed Vehicles rewritten.
- Added Order of Operations to Movement and clarified targets for charging
- Buffed Overwatch to give +1 to hit rather than -1
- Pilin’ On only works for a single round (so users can’t form one invincible defender that faces all attackers)
- Clarified combat sequences for shooting, hand-to-hand, and vehicles.
- Added jumping across gaps/down drops and fleshed out falling mechanics
Version 1.31
- Replaced gas engine diagram with correct one.
Version 1.3
- Added generic Initiative Tests and Leadership Tests to the statline section
- Added rules for forts
- Added rules for moving boards
- Made bikes a type of small Vehicle rather than their own type
- Added diagrams explaining ramming
- Added diagrams explaining swerving
- Standardised on “Difficult Ground” rather than a mish-mash of other terms.

Changes from Gorkamorka Rulebooks rules
- Artillery Dice replaced by D6
- Some tweaks to the psychology section
- Concept of small Vehicles and large Vehicles delineated more clearly
- Drivers immune to Pinning
- Multi-damage weapons affect Vehicles
- Warriors that recover from Down receive +1 Wound (i.e. 0 -> 1) at the expense of -1 WS & -1 BS. This is to cover getting experience for wounding models that don’t have any wounds left to lose.
- Pickin’ Up added to compliment Getting On and Off, and Dropping Off while Vehicles are moving.
- Attacking stationary Vehicles and fort gates nerfed somewhat (full hand to hand round vs. opponent that doesn’t fight back, vs. just WS worth of attacks).
- Only the closest enemy is now an eligible target for a Charge (the Well ‘Ard skill in the ORB implies the existence of this mechanic but the rule isn’t stated anywhere).
- The Pilin’ On cannot be used to make a single unstoppable defender.
- Setting Overwatch now confers a +1 to hit modifier, not a -1.
- Added mechanics for jumping across gaps and down from a height
Introduction
The GCE concept
GCE is an attempt to provide a somewhat generic ruleset that is, to the fullest extent feasible, directly compatible with materials written for the 1997 Games Workshop skirmish game Gorkamorka. Ultimately it may eventually also include implementations of many of those documents to provide a comprehensive set of factions, scenarios, and equipment options that can be applied to a number of settings as players choose.
The Gorkamorka Heritage Project has endeavoured to secure compatible licences for as many existing documents as possible in order to enable this initiative to be as exhaustive as possible. With any luck this will mean that wording of rules can be such that little clarification is needed (as we’ll have known about the many possible ways they can be applied when writing).
Lastly the finished game should be easy for players familiar with Gorkamorka, Necromunda, or Shadow War: Armageddon to pick up.
A note on capitalisation:
Reading through these books you'll often see seemingly random words capitalised. This isn't just our editor not picking up on mistakes - it's our way of making it clear that we're talking about a game concept rather than just being chatty. It's a little tricky to give an example that'll make sense before we get into the actual meat of the material but at least now you'll know what that's all about!
Most capitalised terms can be found in the glossary at the end of this book.
Units of measure
This game uses inches and feet (denoted with " and ' respectively). Centimetres and metres are brilliantly precise but this game, like many other skirmish games, needs a bit of fuzziness to work. You might occasionally see half an inch mentioned but that's as precise as it gets!
When a Vehicle makes a “turn” that move constitutes a shift of up to 45º. The “Turny Gubbinz” is a tool for measuring that. A protractor works too but is far less thematic!
A 3D printable recreation of the cardboard Turny Gubbinz included in the 1997’s Gorkamorka box set was uploaded to Thingiverse some years ago.
Dice
Throughout these rules several different dice are used. They're all six-sided and are as follows:
The basic die, the D6, is numbered one to six. The same die is used when asked to roll a D3:
| D6 |
D3 |
|---|---|
| 1 - 2 |
1 |
| 3 - 4 |
2 |
| 5 - 6 |
3 |
Sustained Fire dice are slightly different but can be rolled using a standard D6. Its faces are 1, 1, 2, 2, 3, and "JAM!" and so treating it as a D3 with rolls of 6 becoming a JAM! result works nicely.
A Scatter die has arrows on four sides and two "Hit" symbols - although the "Hit" result also has a little arrow on it too! These are available to buy from various sources or to print.
Tests
Certain game mechanics require tests to be made; these will be explained in greater detail where relevant but a test usually entails the player rolling a dice and comparing it to a characteristic. In some instances a test is passed by rolling above a characteristic whilst in others it’s below. The specifics will be covered in the relevant section.
In this game a roll of 1 is not always a failure. For some rules a 1 is a failure, of course, but the rule will state how the dice works and you should not assume that it is always a failure.
Modifiers
This game uses modifiers for quite a few mechanics. These are explained where relevant although most are fairly straightforward. Sometimes these take the form of adding or subtracting from a dice roll (such as shooting at a target taking cover rather than in the open) and at other times take the form of determining a total score and then applying bonuses and penalties to it.
Counters
Some players like to use counters to provide visual cues to help you remember what each model is doing. Traditionally these included Hiding, Running, and Overwatch. Some players prefer to take notes rather than clutter the table with counters but the way you play is entirely up to the players involved. Printable counters are available.
Some scenarios will require their own objective counters (often Scrap Counters but sometimes other things). These can be represented with whatever players have available - for example a 25mm base with junk modelled on it.
Templates
Certain weapons require special templates to determine their effects. These are the teardrop shaped template used for weapons like Skorchas and the blast template used for some grenades.
The normal blast template has a diameter of 4” and the normal teardrop template measures 8” long. They are available online from various sources and those measurements should be enough to find the right sizes.
Some mechanics may refer to smaller or larger teardrop templates. These are 4” long and 16” long respectively, used to represent hand flamers and heavy flamers in games such as the second edition of Warhammer 40,000.
If you ever see reference to a 2” blast template then it will be referring to the radius of the template - GCE does not use a 2” diameter template.
Other Books
GCE splits up the various rules into different books. For the full experience you’ll need the Core Rules, Campaign Book, Scenario Book, and at least one Faction Pack.
Core Rules
The rules for playing a battle.
Campaign Book
The rules covering progression mechanics between games.
Scenario Book
The rules covering battle scenarios.
Faction Packs
Each playable faction in GCE has (or will have) a book of its own. Each Faction Pack aims to be the complete rules for that faction, el
iminating the need to cross reference with other faction rules.
What Else You Need
A few other things are required for a game such as; 2 or more players, a firm level playing surface, a tape measure, and some scatter terrain. Paper along with good ol’ pens or pencils are also a good idea although we recommend using the roster provided later to help keep track of any wounds, damage, or other information.
Warrior, Weapon, and Vehicle Statlines
Looking for statlines for things? The details for your faction of choice are all in your Faction Pack. Each one includes an appendix of all the weapons available to that faction, statlines for their Warriors, and details of their Vehicle rules.
Warrior Statlines
The majority of Warriors, creatures, or other entities have statlines. These describe the fighting prowess of whatever it is in various ways and higher numbers are better. They normally look like this:
| M |
WS |
BS |
S |
T |
W |
I |
A |
Ld |
|---|---|---|---|---|---|---|---|---|
| 4 |
3 |
3 |
3 |
4 |
1 |
2 |
1 |
7 |
Of course the numbers vary pretty wildly and a Grot isn't going to have stats anywhere near as high as a fully-fledged Ork Nob!
Let's go through this statline and get a feel for what each thing means:
Movement
How many inches the Model can move at normal pace each turn. It also forms the basis of how fast (or slow) they move when running, dragging things, and otherwise traversing the battlefield. Most Warriors can run at double their Movement characteristic but some can go even faster than that. It's a good idea to know how fast your enemies are ahead of time!
Weapon Skill
When it comes to skill at pummelling opponents WS is the characteristic to look at. It sums up how likely the Warrior or whatever is to win in Hand-to-Hand Combat. Sometimes this refers to skill whilst other times it's more a matter of sheer aggression and force but in any case it's the statistic that is used for the Hand-to-Hand Phase.
Ballistic Skill
Shooting, throwing, and generally attacking things at range is covered by this one. Mostly used in the Shooting Phase this one is a measure of how likely the combatant is to score a Hit on a Target. Whether they then Wound them is another matter!
Strength
Bit of a funny one here - in theory it's a measure of how strong a combatant is but generally most Warriors are pretty similar and sit around 3 (whether they're a Digga-Yoof or an Ork Nob). Really it's more a measure of whether a combatant is significantly stronger than the norm (like a Feral Ork Brute) or weaker (like a Rebel Snot). Strength is mostly used in Hand-to-Hand Combat but also comes up in relation to things like staying onboard Vehicles when things get hairy!
Toughness
This characteristic covers one part of Injuries whilst Wounds covers the other. Toughness is all about how difficult it is to actually do any real harm to a Warrior. Most Orks don't worry too much about a few bullets coming their way 'cos most of the time they won't puncture anything vital - lots of other Warriors aren't so lucky!
Wounds
Some Warriors just won't stay down even if you make 'em bleed from three different places! In game terms the number of Wounds a combatant has determines how soon they need to start rolling on the Injury Table and dealing with the more immediate consequences of being injured. Most combatants only have a single Wound but more experienced Warriors can have quite a few!
Initiative
Some Warriors are clumsy whilst others move like skilled dancers - Initiative basically measures this and spatial awareness. Whether it's jumping between speeding Vehicles or spotting an enemy Hiding nearby this is the characteristic that covers it. If a Warrior is required to take an Initiative Test this is done by rolling a D6 and comparing it to their Initiative characteristic. If the value is equal or under their Initiative value the test is passed. A roll of 6 is always a failure.
Attacks
Mostly used during the Hand-to-Hand Combat Phase this characteristic vaguely covers how swift a Warrior is, or something like that! It indicates how many Attack dice a combatant rolls in Hand-to-Hand Combat (although it's quite possible to move quickly and still bungle every attack!).
Leadership
A combination of confidence and the ability to inspire others. Leadership is generally used as a basis for a Leadership Test covering things like keeping calm while attacking an enemy that causes Fear or encouraging the other Warriors in the Mob to keep fighting (rather than leggin' it like some weedy Grot!). If a Warrior is required to take a Leadership Test this is done by rolling a 2D6 and comparing the result to their Leadership characteristic. If the value is equal or under their Leadership value the test is passed.
Weapon Statlines
Similarly the majority of weapons and attacks have statlines. Unlike Warriors it's fairly common for not all fields in a weapon statline to have values. Empty fields will sometimes have a dash or "N/A" written in them.
For example:
Shoota
| Range |
Hit modifier |
Strength |
Save Mod |
D |
Ammo Roll |
Notes |
||
|---|---|---|---|---|---|---|---|---|
| Short |
Long |
Short |
Long |
|||||
| 0” - 12” |
12” - 18” |
+1 |
- |
3 |
0 |
1 |
4+ |
|
'Uge Choppa
| Range |
Hit Modifier |
Strength |
Save Mod |
D |
Ammo Roll |
Notes |
|---|---|---|---|---|---|---|
| - |
- |
AU +2 |
Var |
1 |
N/A |
Double-handed, Opponent wins draws. |
In basic terms there are ranged Weapons and Hand-to-Hand Combat Weapons. Importantly some ranged weapons can also be used in Hand-to-Hand Combat (see the Armoury section for more details).
Starting with ranged weapons let's go through the different bits of the statline:
Short Range
Any shots attempted within this range will receive the Modifiers for short ranged shots.
Long Range
Again, this determines which Modifiers apply when taking a shot at the weapons maximum range. Different types of range also come into play when it comes to customising weaponry in campaigns.
Hit Modifier
Many weapons receive bonuses that make hitting things at shorter range easier while others receive penalties at longer range.
Strength
In the same way as Warriors have Strength values, so do weapons. This is what is compared to the Toughness or Armour value of Targets when attacking them.
Save Modifier
Only applicable to Models without an Armour Value (so most foot Models) this is a Modifier for the Target's Armour Saving throw. A Warrior with a 4+ Armour Save would only receive a 5+ Armour Save if Hit by a weapon with a Save Modifier value of -1, for example.
Some weapons have a fixed Save Modifier whilst others have “Varies”. The Save Modifier of these weapons is tied to the user’s Strength characteristic rather than the properties of the weapon. For every point of Strength above 3 the weapon receives a -1 Modifier (Strength 4 gives a Save Modifier of -1, Strength 9 gives -6).
A Warrior with no Armour does not benefit from plus Modifiers.
Damage
Damage is what removes Wounds from a Warrior. The majority of weapons only inflict one Damage but occasionally something particularly nasty can inflict much more, such as the Krak Stikkbomb’s "D6 Damage"!
A Warrior that has failed their Armour Save will lose an amount of Wounds equal to Damage, to a minimum of 0.
Terminology Note
the term Wound may sometimes be found being used instead of Damage but they are two distinct concepts with their own place in the phase sequence. Most hazards, such as dangerous terrain or the spikes gubbinz type don’t have a profile, but they can be presumed to cause a single Damage. If there is a profile but Damage is blank “-” it cannot do any harm.
Ammo Roll
Each time a weapon is fired there's a chance it'll run dry, jam, or perhaps even explode. Some weapons have special rules regarding Ammo Rolls but most are required to Test on a result of 6 when rolling to Hit. As long as the player can roll equal to or greater than the Ammo Roll value then Shooting can continue. Weapons with an Ammo Roll value of "Auto" will fail automatically if required to Test. Still test to see if the weapon explodes.
Notes
Fairly straightforward really - if there's any additional special rules to look up they'll be mentioned here.
Now for Hand-to-Hand Combat Weapons:
Some weapons (such as Ork Sluggas) can be used in Shooting and Hand-to-Hand Combat while other weapons can only be used in Hand-to-Hand Combat. Those that can be used in both will have a statline similar to other ranged weapons and simply disregard Range, To Hit Modifiers, and their Ammo Roll when used in Hand-to-Hand Combat.
Strength
Some Hand-to-Hand Combat Weapons will use the Warrior’s Strength value, others (Such as the ‘Uge Choppa) modify the user’s Strength. You can either write “As User” or “AU + X” in this box or add the modifier to the model’s S and write the number.
Save Modifier
Not all weapons have a fixed Save Modifier - some vary depending on the wielder's Strength characteristic. A Warrior with a Strength of 4 receives a -1 Modifier when using the weapon. For each point of Strength above that an additional -1 is added (so a S6 Warrior would get a -3 Save Modifier with that weapon). Anything below 4 receives no Save Modifier when using the weapon. There’s also a table in the Hand to Hand Combat section of this book that shows all Strength and Save Modifier values.
Playing a Game
The mechanics of this game divide roughly into battle stuff and campaign stuff with some overlap here and there. What happens on the board with Models is the “battle stuff” whereas things like permanent Injuries, stat increases, and recruiting new Warriors is the “campaign stuff”. In this part of the rules we’re going to be dealing almost exclusively with the battle side of things.
To play a battle you need at least two players with a Mob each and Models to represent them. Some sort of terrain or obstacles also make for better games. Recruiting and arming a Mob is very much in the “campaign stuff” side of things so we won’t go into how it works here. When you’re done you’ll have a roster sheet with the details of your Warriors, their weapons, and all the other relevant information. Make sure you’ve calculated your Mob Rating though as you’ll need that in a minute.
Then you’ll need some sort of surface to play on - we recommend a minimum play area of 4’ x 4’ although 6’ x 4’ is popular too. Once you know who you’re playing you’ll probably want to play some sort of scenario - after all battles aren’t usually by appointment!
Scenarios
To play a game you’ll need a scenario to put your Mobs through. Whatever you decide on will describe how to set up the board, victory and loss conditions, and any special rules you’ll need. There’s loads of scenarios available for this game and it’s up to you to decide which you feel like having a go at. It’s probably fairly sensible to start with something simple until you’ve got the hang of how the game works though!
The player with the lowest Mob Rating is the attacker by default in scenarios with attackers and defenders, unless the players decide it’d be more fun to swap things around. If both players have the same Mob rating roll a D6 each with the highest scorer taking the role of lowest Mob Rating.
Setting up the board
Many scenarios will include a fairly specific description of the board setup they’re intended to be played on while others won’t give many details at all. Generally speaking a board should contain enough terrain to encourage Movement and break up Line Of Sight. A few good things for Vehicles to Crash into, maybe a structure, perhaps some hills. Ultimately what the board layout looks like comes down to the terrain you have available to choose from.
Table Edges
Often scenarios will have Warriors entering the battle from a table edge - either at the start of the game or arriving as reinforcements. Sometimes players may choose the edge they’d like to use whilst other times a scenario will state it should be a random side. If picking an edge then the following are valid options:
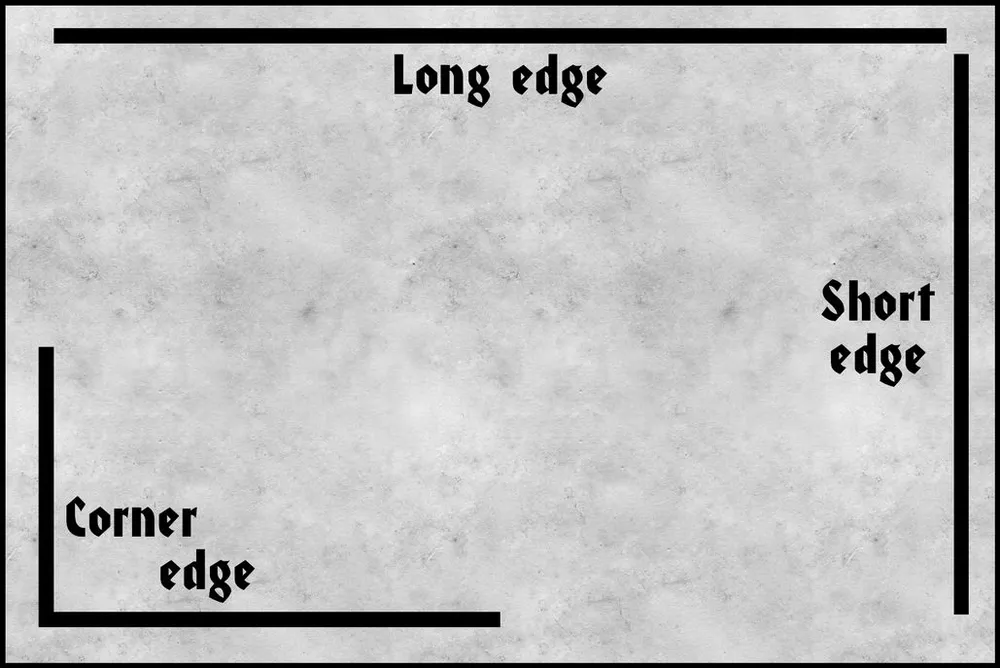
Should a random edge be called for roll a D6:
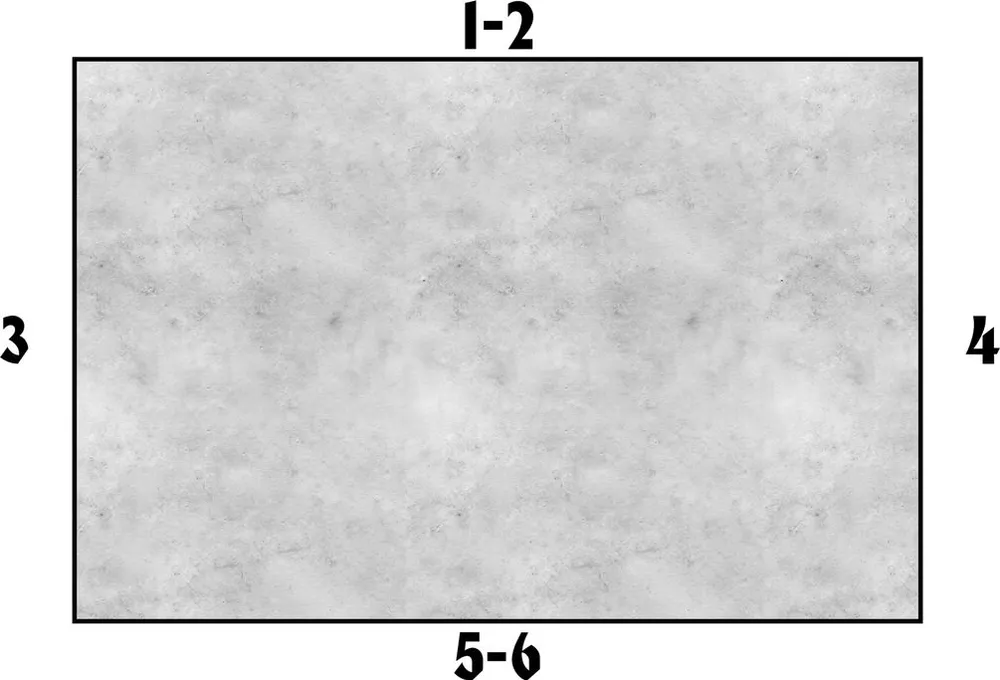
Of course if your board is square then rolling a D4 would work, assuming someone has one! Corners aren’t used for random edge deployment as various scenarios use the opposite edge as a point of reference or objective for NPC Warriors and similar.
Game Turns/Player Turns
This is a turn-based game and players take charge of their forces in the order determined for the game (usually a dice roll but sometimes some other criteria is specified in the scenario). Each game turn consists of every player going through each of the Phases described below (usually referred to as "the player's turn"). Once the players have done this the game moves onto the next game turn. We're making this distinction here because it can otherwise get a little fuzzy later on. Two players finishing a game that lasted six turns would each have six player turns.
Player Turn Sequence
When it is a player's turn they take their forces through the relevant Phases, skipping any that aren't applicable (such as Hand-to-Hand Combat if there are no Models engaged in Hand-to-Hand Combat). Each phase is worked out as a whole, with the player taking the relevant actions with each model for that phase before moving on to the next phase (rather than working out phases on a per-model basis).
The turn sequence goes like this:
- MOVEMENT: During this Phase players may move their Models and Vehicles as per the rules provided later.
- SHOOTING: Models able to do so may make a ranged attack in the Shooting Phase as described in the Shooting rules later.
- HAND-TO-HAND: All Models in Hand-to-Hand Combat may fight during this Phase. In a game with 3+ players this is only dealt with if the active player has Warriors engaged in Hand-to-Hand Combat.
- RECOVERY: Injured Warriors Test to recover and rejoin the battle in the Recovery Phase. The rules for this are provided later.
Once a player has completed running through the turn sequence their opponent then does the same, working through the turn sequence until they have also finished. This is the end of the game turn.
A typical game lasts until only one player remains after the others have Bottled Out (Essentially concede or are defeated) as explained later on. Some scenarios will include specific objectives to be completed and others will end when other criteria have been met, we will explain all of this in great detail later.
Ending A Game
A game automatically ends when a player is left unopposed on the board. This happens when all a player's opponents Warriors go Down or Out of Action, or they are left as the sole remaining player after their opponent has moved all their Models off the board. Note that Vehicles do not count towards this - they cannot drive themselves!
Ending a game this way does not always guarantee Victory for the remaining player, although you have definitely earned some bragging rights!
Once the game has ended the victor can be determined. Scenarios may have very different Victory conditions and so we can’t really cover them all here. Instead we’re going to describe some baseline rules that apply if not superseded by those described in the chosen scenario.
Battles end in either a Win, Loss, or Draw for the players. This last one is not as common but important to bear in mind because it is possible that no one side decisively meets the Scenarios Win Conditions, and as such no bonuses for winning are doled out. Scenarios usually handle how victory and loss are handled, but if they don’t (or you’re making up your own scenario), bear in mind that draws are possible.
There is one other common way to end a game: Bottlin’ Out.
Bottlin’ Out
Battles are not usually fought “to the last man” - after a certain point most Mobs will decide they’ve had enough and retreat. This is usually because their morale is broken but it can also be a tactical decision. While it might well be possible to “win” a battle, if that victory has too high a price it could well be pyrrhic. Remember that Serious Injuries to Warriors and Permanent Damage to Vehicles can be costly, if not impossible to repair!
When to Take a Bottle Test
The general rule of thumb is that, Bottle Tests must be taken once you have suffered 25% or more casualties of the total of your Mob.
Working out the total works as follows: Each Warrior counts as one, each Vehicle counts as one. The total Model count consists of those that have participated in the battle so far. Reinforcements (yet to arrive) do not count. Models back at your base who were not chosen to take part do not count, and Models not taking part at the start of battle due to injuries or permanent damage do not count towards this total.
Secondly we’ll deal with what a Casualty is:
- Warriors who are Down
- Warriors who have been taken Out of Action
- Immobilised Vehicles
- Destroyed Vehicles
- Models that have left the board (unless the scenario states otherwise)
Downed Warriors that recover stop being casualties so it’s possible to be in a position where Bottle Tests are no longer necessary. Similarly if reinforcements arrive the percentage of casualties can go down allowing the Mob to get their nerve back.
Lastly, once a Mob has triggered Bottle Tests. They may choose to voluntarily Bottle at the start of their turn. However, it is important to bear in mind that when a Mob has Bottled Out, that player can no longer claim Victory, even if they would have met the Win conditions.
Taking Bottle Tests and Bottlin’ Out
The threshold percentage for Bottlin’ Out tests vary - unless otherwise stated it is 25% or more. The Scenario will provide specific details if a different value is to be used. If your Mob has the requisite percentage or more casualties when you start your turn you can either choose to Bottle Out or take a Bottle Test to see if your Mob’s nerve holds. You can’t take the Test and then decide to Bottle Out though - make your choice first!
Assuming you decide to try to stay in the fight you’ll need to take a Leadership Test based on your leader’s Leadership (so roll 2D6 - a score equal or under their characteristic is a pass). If your Leader is a casualty they’re unable to rally your Warriors. Whichever Warrior in your Mob that has the highest Leadership characteristic (who isn’t a casualty!) steps up - Test against their Leadership instead.
If you pass you continue your turn as normal. If not, your Mob loses this game. If there are only two players then the game immediately ends - if there’s more then it’s time for the player that bottled to put the kettle on and start on their post-game.
Remember to make a note of any Warriors which are Down and any Vehicles that are Immobilised belonging to the Mob which has Bottled Out. Along with any number of Scrap Counters or other Tokens of importance. These will usually need to pass a test to go unscathed - see “Scrap Counters and Bottlin’ Out”.
Movement on foot
The Movement Phase is where the player is allowed to move all of their Models in accordance with the following rules. Players may move Warriors in any order they like, move one Warrior at a time and make sure you have finished moving each Warrior before moving on to the next.
There are some advanced rules that may arise in the Movement Phase - things like Frenzy and setting Overwatch. We’ll be giving some brief descriptions so you’re aware of the concepts but the full rules are in the Special Rules section of this book.
Order of operations
When it comes to Movement the resolution goes in the following order:
- Charging Warriors
- Compulsory Movement
- All other movement
Compulsory Movement can happen for any number of reasons but basically boils down to movement Warriors are required to make. Warriors who are on fire can’t choose to calmly stand still, for example!
It’s not possible for us to cover every reason for Compulsory Movement in this book as scenarios, skills, equipment, and any number of other things can potentially result in Compulsory Movement. As long as you’re aware of the concept you should be able to figure out the order you need to resolve Movement for your Warriors.
In the sections below we don’t go through the rules in the above order as conceptually it makes most sense to learn how basic movement works before handling the more complex rules.
Moving
During this Phase, each Warrior may move in any direction a distance in inches that is equal to the Warrior's Movement (M) characteristic or lower. Most Warriors will have a Movement (M) characteristic of 4, which means they can move up to 4” in any direction, this includes stairs, ladders, etc.
Normally it is up to the player to decide how much of the Warrior’s move characteristic to use but there are some circumstances which are covered later that may force the Warrior to move in a certain way.
Running
A normal move represents the Warrior moving at a decent rate while still allowing themselves time to survey the battlefield, aim and shoot their weapons and shout words of encouragement to other Mob members. A Warrior may choose to run and when doing so gets to move at double speed; so for example a 4” Movement (M) characteristic means a Warrior can run 8”.
When Running, a Warrior loses their chance to shoot this turn. When electing to run with a Model the player must declare that they are doing so, this way both players understand what is happening and know that the Model in question may not shoot, alternatively placing a Run counter next to them is another great way of keeping track.
Jumping Across A Gap
Warriors sometimes need to hop between bits of terrain – these rules cover that eventuality. They do not deal with jumping between Vehicles (see Boarding Actions on see Boarding Actions (Movement)).
A Warrior can jump across a gap as long as they have sufficient inches of Movement to cover it (the Warrior may jump whilst running). Each inch of gap is equal to an inch of Movement allowance.
Declare that the Warrior is attempting the jump and then roll a D6. If you get a score of equal or greater than the distance then the Warrior soars across the gap. If not, resolve fall damage (see Fall Damage).
Jumping Down
A Warrior can also choose to jump down from somewhere (e.g. from the battlements of a fort). Jumping down takes inches of Movement but only half, rounded down (so a 2” drop takes 1” of Movement). As with jumping across a gap, this can be done whilst a Warrior is Running.
If the drop is 3” or less then take an Initiative test. Passing means the jump goes fine and the Warrior may continue to Move as normal. Failure should be resolved as per the Fall Damage rules (see Fall Damage) and the Warrior’s Movement ends immediately.
If the drop is more than 3” then it works like a Fall (again, see the Fall Damage rules). We mention it here simply because you can choose to jump off a ledge even though you know it will hurt – sometimes you’re facing something worse than a big drop!
Charging
If a Warrior wishes to engage an enemy in Hand-to-Hand Combat then you must first declare that the Warrior will Charge.
Note that Warriors may only Charge the nearest enemy Warrior, although they may choose to ignore enemies who are Down or Pinned.
Without measuring the distance, declare that your Warrior will be Charging and indicate to the opposing player which enemy Warrior they intend to attack.
A Charge move works just like running - double the Warrior’s Movement characteristic.
After declaring a Charge like this you should then measure. Assuming your Warrior can reach their Target, place the Models so that both of their bases are touching or as close to as is practically possible.
If a Warrior does not have enough Movement to reach the enemy then they are considered to have failed their Charge. Move the Charging Warrior as far as possible towards the enemy Warrior (remembering to double your move); the Charging Warrior may not do anything else this turn!
It is worth noting that Models cannot move into Hand-to-Hand Combat without Charging. Any move intended to bring two Warriors together is, by definition, a Charge.
Jumping whilst Charging
A Warrior might need to jump to Charge their target and can choose to do so. See the sections above for those mechanics.
Warriors Carrying Cumbersome Objects
Sometimes Warriors will find themselves lugging large objects around the battlefield, usually in the form of valuable Scrap Counters. Warriors carrying a cumbersome object halve their Movement characteristic. The full rules on these can be found in the Special Rules section of this book.
Gettin’ On or Off Vehicles
A Warrior, starting on foot, who ends their Movement in contact with a friendly Vehicle may attempt to Get On.
Similarly, a Warrior, starting aboard a Vehicle, may attempt to Get Off before carrying on with the rest of their Movement choice or even jump between Vehicles that are alongside and within 2” of each other. However, they may not set Overwatch.
If the Vehicle in question has already moved more than 6” or used its Thrusters, they must roll 4+ on a D6. If they fail they will take a Strength 3 Hit and the Warriors’ Movement Action ends immediately (including Running and Charging). Place them in contact with the side they attempted to enter or exit from.
Caution: A Warrior who Gets Off into base contact with an enemy Warrior on foot counts as Charging. However, should they fail a test and end up Down, your opponent will automatically put them Out of Action in the subsequent Close Combat Phase!
During a Vehicle’s Movement, Warriors may instead be Dropped Off or Picked Up as it moves along but this is handled slightly differently. More details are provided in the Vehicle Movement section, Droppin’ Off or Pickin’ Up.
Boarding Actions (Movement)
Warriors may attempt to Board an enemy Vehicle during the Movement phase. Warriors may also jump between Vehicles that are alongside and within 2” of each other. Declare a Charge and move your Warrior so that they are in contact with the Vehicle’s Side or Rear. The Front cannot be Boarded.
Each Warrior must pass an Initiative Test. Roll equal to or under the Warrior’s Initiative characteristic on a D6. If the Initiative Test is failed the Warrior’s Movement ends immediately and they take a S3 Hit as they hit the ground where they attempted to Board.
Warriors that successfully Board a Vehicle are moved onto it. The Models exact position aboard the Vehicle is not important and if it becomes a problem (likely due to the size of the model) a proxy location may be used the represent the crew compartment.
Warriors on Fire
Unlucky Warriors who have ended up on Fire somehow do not move as normal (what a surprise!). Instead roll a D6 for them before they Move. On a 6 the Fire goes out and they move as normal. Anything less than 6 causes them to take a Strength 4 Hit. Resolve that now.
If the Strength 4 Hit puts them Down (or Out of Action) then the Fire goes out. If not, roll a scatter dice. They move in that direction 2D6”, jumping off Vehicles if that’s the way they need to go! Resolve this Movement now, before you decide how your other Warriors will move this turn, as it is a Compulsory Move.
If their move takes them over an edge (such as off the battlements of a fort) they will automatically fall (no Initiative test) and take damage as described in the Fall Damage section (see Fall Damage).
Warriors on Fire cannot do anything else during their turn. Enemies may not attack them in the Hand-to-Hand Combat Phase (they may shoot them or attempt to squash them with a Vehicle though!).
Friendly Warriors can modify the D6 roll to see if the Fire goes out. They must be within 1” of the burning Warrior at the end of their Movement Phase, not be engaged in Hand-to-Hand Combat, and not on Fire themselves. For each friendly helping add +1 to the D6 roll. A total of 6 causes the Fire to go out. Friendlies helping in this way must skip their Shooting Phase this turn.
Special Rules
During the Movement Phase some advanced rules may come into play. As mentioned earlier there’s the Special Rules section describing these rules in full later in the book. In brief these rules cover the following:
Psychology
Various psychological states that can affect Warriors can come into play (Fear, Terror, Stupidity, Hatred, and Frenzy ). These may limit their Movement options or compel them to Move in certain ways.
Setting Overwatch
Warriors can sacrifice their turn in order to Shoot during an enemy’s turn.
Hiding
Assuming there’s something to Hide behind, Warriors can opt to make themselves nearly impossible to target.
Terrain
Battles usually take place in an open area to allow Vehicles plenty of room to manoeuvre however many also occur around hideouts, ruins, fortified positions, etc. As such there are multiple terrain types, the following rules explain what effects these have on the game.
VEHICLES AND TERRAIN: The effects of terrain on Vehicles is explained in the Vehicles section later.
MOVING BOARDS: Games where the terrain moves down the board are described in the Special Rules section later in this book (see Da Rollin’ Road).
Open Ground
Open ground does not impede Movement in any way. Examples of open ground include solid flat ground, walkways, ladders, doorways and hatches of buildings that a Warrior can physically fit through.
Difficult Ground
Difficult ground causes the Warrior to move at half speed, each 1” of Movement counts as having moved 2”. Examples of Difficult Ground include steep or treacherous slopes, dense vegetation, pools of water and even a Stationary Vehicle
Very Difficult Ground
Very Difficult Ground causes the Warrior to move at quarter speed, this means a Warrior with a 4” move would only be able to move 1”. Examples of Very Difficult Ground include tar pits and noxious or corrosive pools of liquid.
Impassable Ground
Impassable ground is exactly that, impassable. Examples of impassable ground include deep pits, sinking sand, and of course solid objects like walls or big rocks.
Walls and Barriers
There are many types of walls and barriers that a Warrior may wish to climb up or over, they are handled as follows:
| Walls and Barrier Parameters |
Treat As |
|---|---|
| Less than 1" high and no more than 1" across |
Open Ground |
| Between 1" and 2" high, and no more than 1" wide |
Difficult Ground |
| Higher than 2" |
Impassable, except by ladder or similar |
Bear in mind that Fort Walls are an exception to these rules - see the relevant section for details.
It is always good practice to agree on how scenery is going to be treated during terrain setup.
E.g. This barricade, here, can be used as Cover and may be vaulted over without penalty.
Fall Damage
If a Warrior falls from height greater than 2” (e.g. voluntarily, Knocked Back, etc.) they take a Hit. The Strength is equal to the number of inches they have fallen rounding up. However a fall of 10” or more will take a Warrior Out of Action instantly.
A fall of under 6” inflicts 1 Damage, 6” or more inflicts D3 Damage.
Warriors cannot take any sort of saving throw against fall damage. Falling like this will Pin Warriors that are vulnerable to Pinning – regardless of whether any Damage is inflicted.
If the falling Warrior falls on top of another Warrior then roll a D6. On a 4+ the other Warrior takes the same damage as the falling Warrior!
Once that has been resolved make sure you place the Warriors so they are not in base to base contact – it isn’t possible for a fall to count as a Charge!
Common Terrain Features
Whilst the generic rules above are very versatile there are elements of terrain that have slightly more complex rules. Some scenarios may stipulate the use of some of these features but you could also use these rules in an ad hoc manner in putting together your own games.
Tents
Tents are useful whether it’s scorching hot or freezing cold and so are a common sight in the wastes. They block line of sight for all purposes and provide somewhere for Warriors to hide. What they are not is tough. Vehicles can drive right through them but in doing so may end up caught up in the debris.
If a Vehicle moves through a tent it comes to a stop immediately. Remove the tent from play. When the Vehicle next moves, and at the start of each of its subsequent Movement phases roll a D6.
On a roll of 1, 2, or 3, the remains of the tent have covered the Driver’s position - the Vehicle moves as if it has no Driver! On a 4+ the tent’s remains have been shaken off and the Vehicle can now move as normal from now on.
Forts
As with many other things in GCE these rules refer to things in Orky terms but the rules can equally be applied to other factions and terrain features that players agree feel about right.
In rules terms Forts consist of walls and a gate. The walls shouldn’t be excessively tall (3 - 4” or so) as regardless of height they require 4” of movement to scale. Warriors may run or charge to cover this distance. Note that this is an exception to the rules described in the Walls and Barriers section earlier in this book - essentially Fort Walls should be considered to have plenty of handholds from being attacked by whatever the wasteland can throw at them!
Charging Warriors will count as traversing an obstacle and their opponents will count as being higher up for the first round of Hand-to-Hand Combat (see the relevant section for details). Fort walls are effectively immovable objects in game terms and cannot be affected or damaged by anything.
Opening the Gate
Every Fort has a Gate and every Gate has a lever, button, or some special doohickey to open and close it. The location of this device is assumed to be within the Fort, on the columns that make up the Gate itself or somewhere else but it must be accessible and pointed out during setup. A Warrior who ends their Movement Phase in base contact with the device may open or close the gate. This includes enemy Warriors.
Alternatively, unlike the walls of the Fort, the Gate can be Shot at, attacked in Hand-to-Hand Combat, Rammed, and so on. It is the weakest point of the Fort and has a default Armour Value of 9.
Penetrating the Gates Armour follows the same rules as Penetrating Vehicle Armour.
A Warrior who finds themselves unopposed after Charging a Gate, may inflict a number of automatic Hits equal to their Weapon Skill, including any Modifiers during their Combat Phase. The Hits are resolved as normal against the Gates Armour Value.
Ramming the Gate counts as a Head-On Crash. The Rammer takes Damage as normal but the Gate only takes D3 Damage if it’s a large Vehicle and 1 Damage if it is a Small Vehicle. Each point of Damage automatically penetrates the Gates Armour. Note that regardless of the result of the damage roll ramming Vehicles will take damage. You can’t just drive through a chunky metal gate and expect to be unscathed!
For each Penetrating Hit on the Gate roll a D6:
| D6 |
Result |
|---|---|
| 1 - 2 |
Some of the decorative trim peels off. Otherwise the gate is unaffected. |
| 3 |
Something shifted! Future rolls on this table receive a +1 bonus (cumulative). |
| 4 |
There’s a gap! Warriors on foot may move through the gate now. |
| 5 |
Carnage! The gate is destroyed but the debris causes the gateway area to count as Difficult Ground for the rest of the game. No further damage can be done to the gate this game. |
| 6 |
Off the hinges! The gate is completely destroyed and Vehicles and Warriors on foot can move freely through the gateway. |
Shooting
Each turn your Warriors may be able to shoot. Whether they can depends of course on things like whether they have anything to shoot at, whether they’ve got any ammo left, or even whether they’re conscious…
For the purposes of readability we’re going to be talking about “Shooting” but we’re really talking about all ranged attacks. Warriors may be firing guns, throwing Spears, tossing grenades, or something else. Ranged attacks all fall under the banner of “Shooting” so that’s the terminology we’re going with.
The Shooting sequence is:
| Step |
Action |
|---|---|
| 1 |
Nominate Target |
| 2 |
Roll to Hit |
| 3 |
Resolve Wounds & Damage |
| 4 |
Saving Throw |
| 5 |
Gain Experience |
| 6 |
Roll for Injury/Special Effect |
Who Can Shoot
Each Warrior may shoot once in the Shooting Phase - there are exceptions to this but you’ll find details of those in the rules for your chosen faction.
A Warrior may not shoot if they are engaged in Hand-to-Hand Combat, if they ran, or Charged in that turn’s Movement Phase. Some Warriors have skills that allow them to run and fire but unless yours has that skill it’s running or Shooting - not both!
Work through each of your Models one at a time. Choose which Warrior is going to shoot and what weapon they are using. Pick the Target, and then check Line Of Sight to see if they can Hit the Target. If they manage to Hit their Target you then check to see if they have caused any Wounds and Damage. Once this is done, you move on to the next Warrior. It’s usually best to do all Warriors riding in a single Vehicle before moving on to others to make keeping track of things easier (but it’s not mandatory!).
Step 1 – Nominate Target
Warriors need something to shoot at. This is usually a Warrior or Vehicle but it could be an object, or even a specific point on the board (a useful thing to do with template weapons). Next we’ll cover picking a valid target.
Eligible Targets and Line Of Sight
Determining who or what a Warrior can Hit starts with figuring out who they can Target from where they’re standing.
Warriors can see in a 90º arc in front of them. You must also be able to draw an imaginary straight line from the Warrior to the Target.
Warriors riding in Vehicles are allowed to turn around and shoot in any direction. This does not apply to Gunners on Vehicles. For details on Vehicle Shooting see the relevant bit of the Vehicles section.
So, assuming your Warrior can see an enemy, they may have a viable Target. The Target Warrior’s Body must be visible. Tips of guns, blades, and other peripheral parts don’t count. If unsure, roll a D6 (1-3 = not visible, 4-6 = visible).
Normally if a Warrior wants to shoot they have to Target the closest Target to them. The general principle is “the easiest to Hit” but this isn’t always true and various things affect this as explained below.
Before we start it’s worth reminding players that in this game (unless otherwise stated) you may not pre-measure (you measure after declaring your target). As a result weapon range Modifiers apply after a Target is decided on.
We’re now going to work through the process of determining Target priorities. Given that we’ll be trying to cover all eventualities it’ll seem fairly complex but once you’ve played a Shooting Phase or two it’ll be second nature!
1. Closest (Obvious) Target
You must shoot at the most obvious enemy Target. How do you work out “obvious”?
Ignoring Range Modifiers but applying all other Hit Modifiers - which enemy is easiest to hit?
Vehicles (including Small Vehicles) always count as obvious Targets but Wrecked/Immobilised Vehicles and Downed/Pinned Warriors may be ignored. In situations where there are equally obvious targets, the Player whose turn it is decides. Settle any disputes with a dice roll.
Range modifiers are ignored at this stage because premeasuring is not allowed!
2. Cover
A Target in Cover is harder to Hit than one in the open (that’s pretty much the point of taking cover!).
If the closest Target is in Cover and there’s an easier Target further away then they can instead choose to go for them.
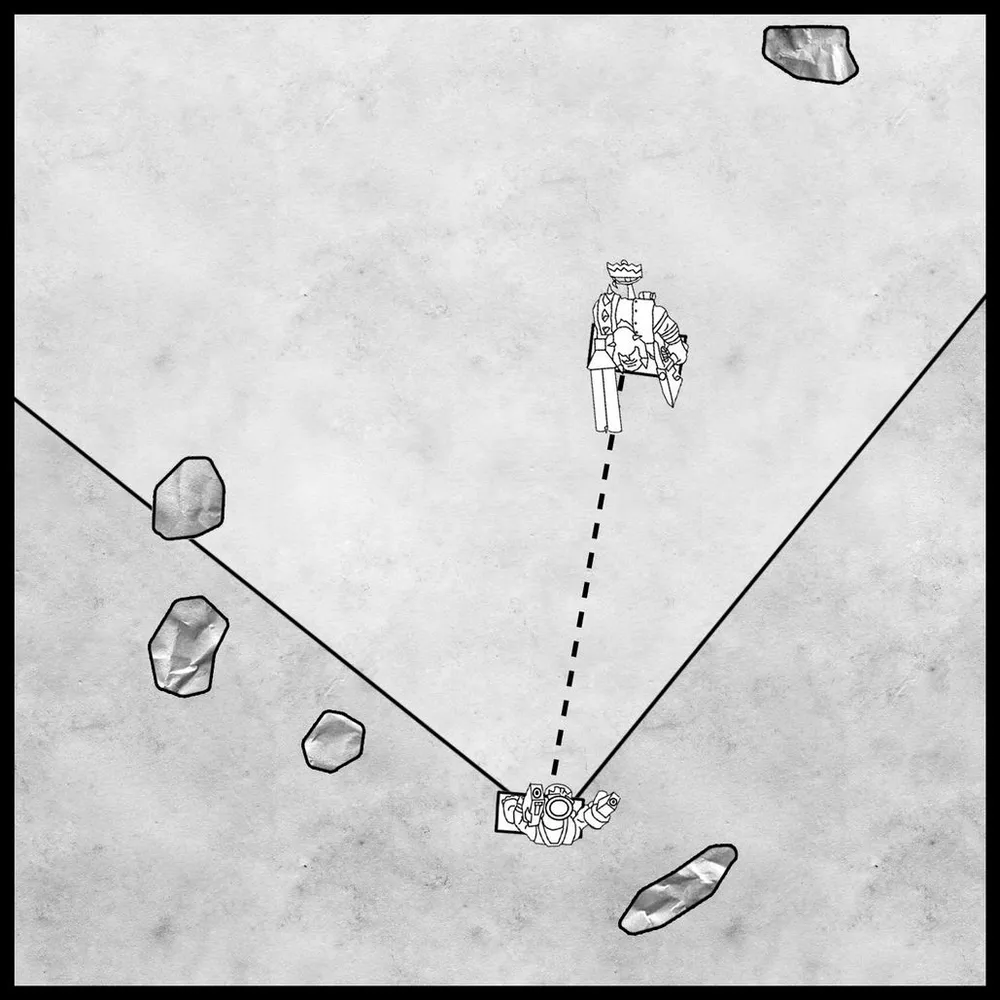
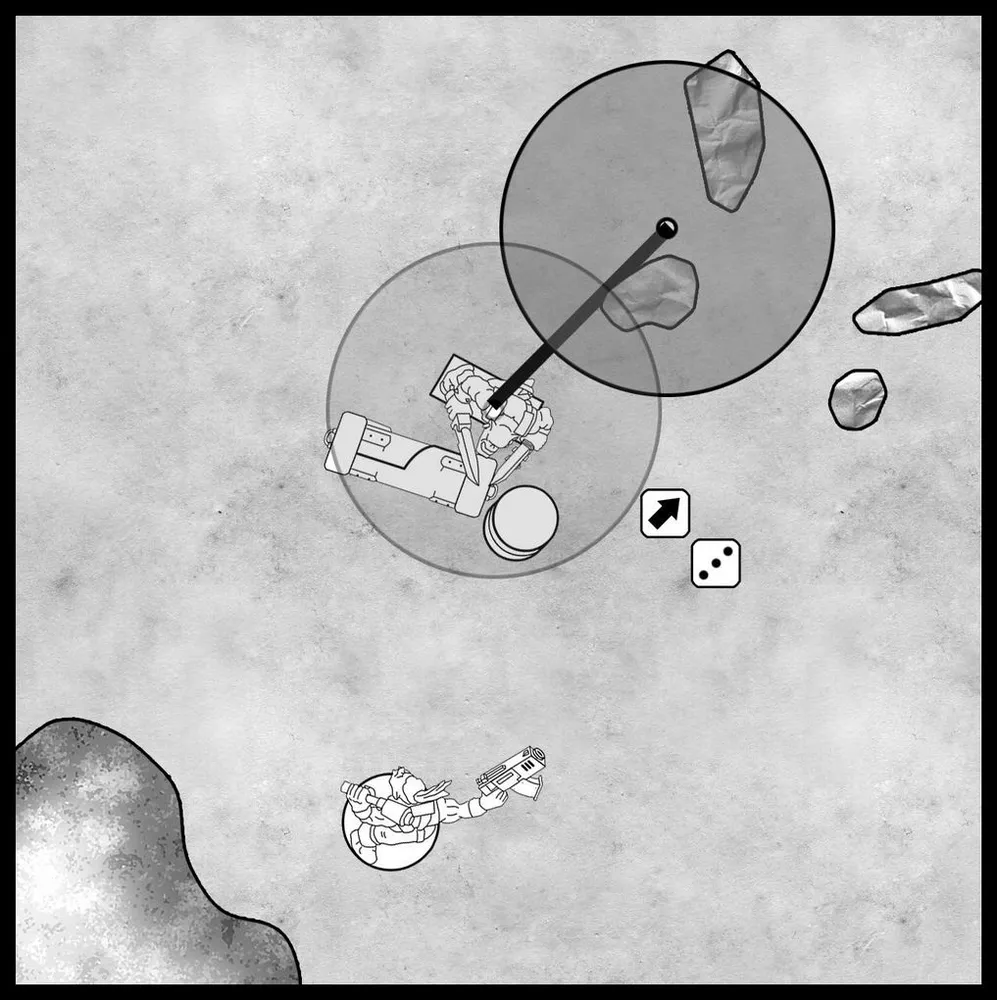
We’ve got an example in the diagram.
Grimlug could Target 1 and Target 2. Target 3 is outside his firing arc and can’t be targeted.
Target 2 is closer but is behind Cover (-2 to Hit). Target 1 is out in the open and so Grimlug can choose to shoot him instead.
3. Declare Target
At this point you should declare which Target you’re trying to shoot.
4. Check Range
Decide which of your Warrior’s weapons you’re going to be using for this Shooting Phase. Measure the distance between your Warrior and their intended Target.
Now check whether the weapon they’re using has any Modifiers for range. For example a Shoota receives +1 to Hit for Targets within 12”.
Out of range Targets automatically miss but you still have to Test and see whether your weapon has developed a jam or a fault (see Ammo Rolls later in this section).

Step 2 – Roll to Hit
To determine whether a shot has Hit its Target roll a D6.
Any roll of 1 always misses regardless of Modifiers.
Assuming the roll wasn’t a 1 the magic number needed is 7. The formula is pretty simple:
Dice Roll + Ballistic Skill + Hit Modifiers = Shooting score
If the result is 7 or more the Warrior Hits their intended Target!
For example:
Krugkikka, an Ork boy, has a BS of 3. He shoots at a Target in the open with his Slugga. The Target is 7” away so there are no Modifiers to worry about.
A BS of 3 means that he needs a dice roll of 4+ in order to get the total of 7 needed to Hit.
Depending on how you like to think about these things it might be easier with this Hit Table:
| BS |
1 |
2 |
3 |
4 |
5 |
6 |
7 |
8 |
9 |
10 |
|---|---|---|---|---|---|---|---|---|---|---|
| D6 |
6 |
5+ |
4+ |
3+ |
2+ |
1 |
0 |
-1 |
-2 |
-3 |
Given that roll of 1 always fails you might wonder why the rest of the results are included. The reason is that if your Warrior is a particularly good shot they might be able to overcome some negative Modifiers and Hit anyway!
For example:
ZodZod is an Ork Gunner with a BS of 6. Even if he’s Shooting at a small Target (-1 to Hit) he still Hits on a dice roll of 2+.
Hit Modifiers
Some shots are easier to make than others, this is represented by the following Modifiers:
| Hit Modifiers |
|
|---|---|
| -1
Partial Cover |
Up to half the Target is obscured. |
| -2
In Cover |
More than half the Target is obscured. |
| -1
Appearing/Disappearing or Charging/Ramming Target |
Firing at a suddenly appearing/disappearing or Charging/Ramming Target whilst on Overwatch. |
| -1
Firing from a Vehicle which has used its Thrusters or Moved more than 6” |
Firing from a Vehicle which has used its Thrusters this turn or moved more than 6” (not everyone has thrusters!). |
| -1
Target used Thrusters or moved more than 6” |
The Target used its Thrusters or moved more than 6” in the previous turn or if the shooter is on a chasing Vehicle and the Target used its Thrusters/moved more than 6” during the chase. |
| -1
Fast Moving Warrior |
Warriors on foot (including mounts) that moved more than 10”. |
| -1
Small Target |
The whole Target is less than ½” tall and wide, examples include unexploded bombs or specific points on the ground or along a wall. Enemy Warriors are always larger than this. |
| +1
Large Target |
The Target is a larger Vehicle (excludes small Vehicles like Bikes) or the whole Target is larger than 2” tall or wide. |
Cover
There are many different types of Cover available, Warriors and Vehicles can both shelter behind cover. Targets are harder to Hit when in cover, exactly how much harder depends on how much Cover the Model has.
-1 Partial Cover: The shooter can see at least half of the Target Model but not all of it.
-2 In Cover: The shooter can see less than half of the Target Model.
Things like weapons, blades, and similar peripheral parts do not count towards these modifiers.
Skrognik (1) is in partial Cover as he sticks his head out and taunts the opposing Mob. He doesn’t have a ranged weapon and wants ‘em to get within clubbing range!
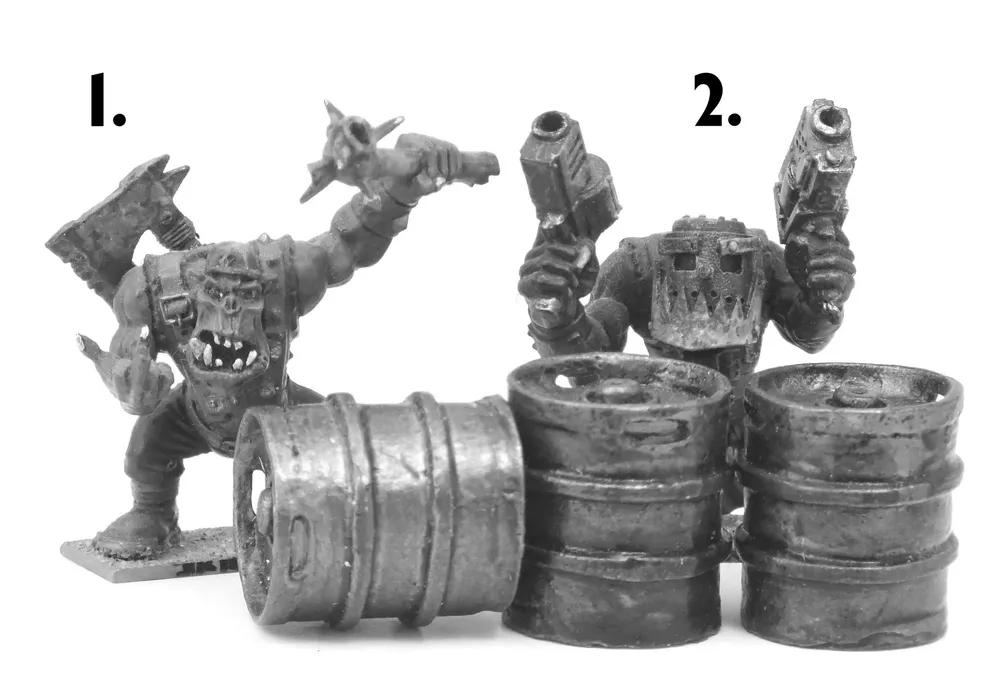
Wazbag (2) is in full Cover - he’s reloading his Six-Shootas and doesn’t want to get Hit until he’s at least got some more shots off.
If the Target is in Cover or partial Cover and is also Hidden (Hiding is explained later on), then the Model cannot be seen or fired at even if the shooter can see parts of the Target Model. Vehicles cannot Hide.
A Vehicle can provide Cover to Warriors, if it is not the most obvious Target itself, i.e. harder to Hit, Wrecked, Immobilised.
If players cannot agree on how much of a Model can be seen then both players should roll a D6 with the highest score winning and their interpretation being applied.
Small And Large Targets
Small and Large Target Modifiers are not normally used except in the case of Vehicles and buildings which are usually Large Targets (+1 to Hit). Games or scenarios might include specific Targets which are either very small or very large.
Range Modifiers
Many weapons have Modifiers for range which affect their accuracy. The following examples will explain how this works.
Example 1:
A Warrior with a BS of 3 and armed with a Kannon fires at a Target who is 12” away. They need to score a 4+ on a D6 to Hit them before any Modifiers for Cover or range are applied. The Target isn’t in Cover and no other Hit Modifiers apply. The Target is in the Kannon’s long range band (4”-18”) so the Warrior gets a -1 range Modifier applied to their Hit roll. The Warrior therefore needs to score a 5+ on a D6 to Hit successfully (5 + 3 - 1 = 7).
Example 2:
A Warrior with a BS of 3 and armed with a Kannon fires at a Target which is 12” away, they are firing from a Vehicle that has used its Thrusters this turn. They need to score a 4+ on a D6 to Hit them before any Hit or range Modifiers are applied. The firing Model receives a -1 range Modifier for the Target being in the Kannon’s long range band (4”-18”) and also receives a -1 Hit Modifier for firing from a Vehicle that has used its Thrusters this turn. With a total Hit Modifier of -2 the Warrior will need to score a 6+ on a D6 to Hit successfully (6 + 3 - 2 = 7).
Shots that need a D6 score of 7+ To Hit
Sometimes Modifiers will mean that even if you roll a 6 to Hit that still won’t be enough. If this occurs, roll a D6 and if the result is a 6 you may have Hit your Target. Roll a further D6 and consult the chart below to see your required result.
| Score Required To Hit |
7 |
8 |
9 |
10 |
|---|---|---|---|---|
| Additional D6 Score |
4+ |
5+ |
6+ |
Miss |
Shooting Into Hand-to-Hand Combat
You may not shoot into Hand-to-Hand Combat. You may however shoot at Vehicles carrying Warriors who are engaged in Hand-to-Hand Combat. If an enemy Vehicle carrying friendly Warriors is Hit, treat the friendly Warriors as part of the Crew and randomly allocate any Hits that occur.
Shooting A Warrior Who Is Down
A Warrior who is Down might be the easiest Target to Hit. You may ignore them in favour of another Target (you can still shoot the Down Warrior!).
If a Warrior who is Down suffers additional Wounds then roll on the Injury Table again and apply any results to the Warrior as normal.
Shooting Vehicle Locations
All Hit Locations should be represented and modelled on Vehicles. Locations that have been clearly modelled on a Vehicle but cannot be seen from the firer’s Line Of Sight must be rerolled. The exception is Template Weapons which have the potential to hit any Hit Location.
Shooting Stationary Vehicles
Warriors may Shoot at a Stationary Vehicle, at a distance, assuming it is an Eligible Target.
A Warrior who finds themselves Unopposed aboard a Stationary Vehicle may choose to either Shoot it at point blank range or attack it during Hand-To-Hand Combat Phase but not both. Not only may they choose the Vehicle Location, all Hits are automatic (roll to see if any Ammo Rolls are triggered). The hits are worked out against the Armour Value as normal.
Hits that cause a target to catch fire
Some ranged weapons can cause their targets to Catch Fire – this is usually handled at this stage, not when rolling to Wound.
If you’re using a weapon that this applies to, now is the time to look up how those rules work (see your faction pack’s
armoury appendix).
Special Weapon Rules
Grenades and Stikkbombz
A Warrior may choose to throw one instead of Shooting their ranged weapon. This is treated exactly like any other shot. The maximum range a grenade or stikkbomb can be thrown depends on the Strength of the Warrior throwing it but it can never be more than 12”. It’s possible for a grenade to travel further due to scattering - see below.
Maximum range of throw = (Warrior’s Strength x 2) + 2”
Or if you prefer you can consult the Throw Table below:
| Thrower’s Strength |
Range of Throw |
|---|---|
| 1 |
4” |
| 2 |
6” |
| 3 |
8” |
| 4 |
10” |
| 5+ |
12” |
Throwing Grenades Between Targets
Sometimes it can be more beneficial to throw a grenade at a point on the ground rather than at an enemy Warrior. This only really applies to grenades with Blast Markers. Aiming at a small Target like that is trickier (and counts as, well, a Small Target - as described earlier) and so is subject to a -1 to Hit Modifier. Other than that the shot is resolved as normal.
Scattering Grenades
Grenades don’t vanish if they miss their intended Target - they scatter! Most of the time the shot has gone wide but sometimes things go hilariously wrong.
If you fail to Hit your chosen Target (if you miss, or find you have insufficient range to reach after declaring the shot) then you must roll to see how far it scatters - it could well still hit something.
Assuming your Warrior missed - roll a D6. On a 6 the grenade doesn’t scatter as normal - roll the Scatter Dice anyway. Any other result tells you how far off the Target they were (in inches). Roll a Scatter Dice as close to where you were aiming as you can to determine the direction of scatter. Note that the Hit symbol on the Scatter Dice also includes an arrow!
Resolve the grenade as having gone off in its scattered position. This applies to all weapons that scatter - not just ones with blast markers!
If you rolled a 6 for distance and a direction on the scatter dice then the grenade is a dud and does nothing. If on the other hand the scatter dice shows Hit and the distance D6 is a 6 then something has gone horribly wrong! Roll on the table below:

| Unreliable Explosives |
|
|---|---|
| D6 |
Result |
| 1 |
The grenade doesn’t make it far before exploding. If it has a template, place it directly over the thrower and work the explosion out as normal. If not, work out a Hit from it on the thrower only. |
| 2-3 |
The grenade goes nowhere near where the thrower aimed. Roll 2D6 and a scatter dice to determine where it ended up. |
| 4-5 |
Was that a dud? Not only does the grenade go massively awry (2D6” in a random direction) but it doesn’t go off immediately either. Place a marker where it landed. If a Warrior or Vehicle goes within 2” of it roll a D6. On a 4+ it’ll go off as normal. |
| 6 |
The Warrior fumbles the grenade and drops it. Luckily the fuse is faulty and it doesn’t go off. |
Blast Markers
Some grenades and Stikkbombz use a blast marker to reflect their area of effect. If you Hit the Target, place the blast marker with its centre directly over the Target, if you miss the blast marker scatters as described above.
Choppa-Block is taking Cover and WezKop decides to try to flush him out with a frag stikkbomb. He has a BS of 3 but with the -1 for the Cover he’d need at least a 5+ to Hit his Target.
Unfortunately he rolls a 4 to Hit and misses. Rolling a scatter dice and a D6 shows us that instead bounced off Choppa-Block’s shoulder and went off harmlessly between some rocks. Zog!
All Warriors wholly underneath the blast marker are automatically Hit, any Warriors partially under the blast marker are Hit on a D6 roll of 4+.

WezKop chucks a frag stikkbomb at the Rebel Grot Banna Waver and gets a perfect hit. The resulting blast marker partially covers one of the grots cowering behind the crates. He rolls a D6 and gets a 6 and the grot in cover takes a hit!
Wounds to Warriors and Penetrating Hits to Vehicles are resolved as normal (Vehicles are affected by template weapons differently from Warriors on foot - see the Taking Damage section of the Vehicle rules).
If a Model is equipped with Stikkbombz or other grenades it is assumed they have enough to last until the end of the battle (or when an Ammo Roll indicates they have run out of ammo). That is to say they can usually throw more than one each game!
Teardrop template weapons
Skorchas and various other flamethrower-like weapons are represented by the teardrop shaped template. For this section we will describe how a skorcha works but the same rules apply to any weapon that uses the teardrop template (unless otherwise stated).
To fire one of these, take the template and place it so that the narrow end of the template is touching the firing Model and the wider end is positioned over the Target. The whole template must be placed within the firer’s 90° arc of fire. Unlike other ranged weapons, they do not need to target a specific Warrior - they can be pointed between Models in whatever way the Gunner pleases.
Once the template has been positioned any Models wholly underneath the template are automatically Hit, any Models partially under the template are Hit on a D6 roll of 4+. Any Warriors Hit will Catch Fire on a 4+.
Wounds to Warriors and Penetrating Hits to Vehicles are resolved as normal.
Note that skorchas do not require a to Hit roll so no Modifiers (e.g. for range, cover, or speed) are applied.

Mav hoses down a couple of Ork boyz from Grimlug’z Ladz with his skorcha.
Zogdreg (2) is completely under the template and takes a Hit whereas Gutrunt is only partially covered and so will only be Hit on a D6 roll of 4+.
Firing On Full Auto
A full auto weapon has one or more Sustained Fire Dice on its profile. When Shooting a weapon capable of firing on full auto, declare whether you are firing a single shot or a shot on full auto. A single shot is worked out as normal, a full auto shot is worked out as follows.
- Roll a sustained fire dice to see how many shots you can resolve this Shooting Phase.
- Pick a Target and check the range.
- If they are within range then the shots are worked out as multiple normal shots with all the usual Modifiers. If you are out of range then you must still roll a D6 for each shot to determine whether the weapon runs out of ammo.
If you wish you may spread your shots out amongst other enemy Models within 4” of the original Target and also within range. Each of the Hits is rolled separately with all relevant Hit Modifiers applied for the chosen Target. At least one Hit must be allocated to the original Target but you may allocate more if you wish. Roll to Hit with each shot before working out any Wounds.
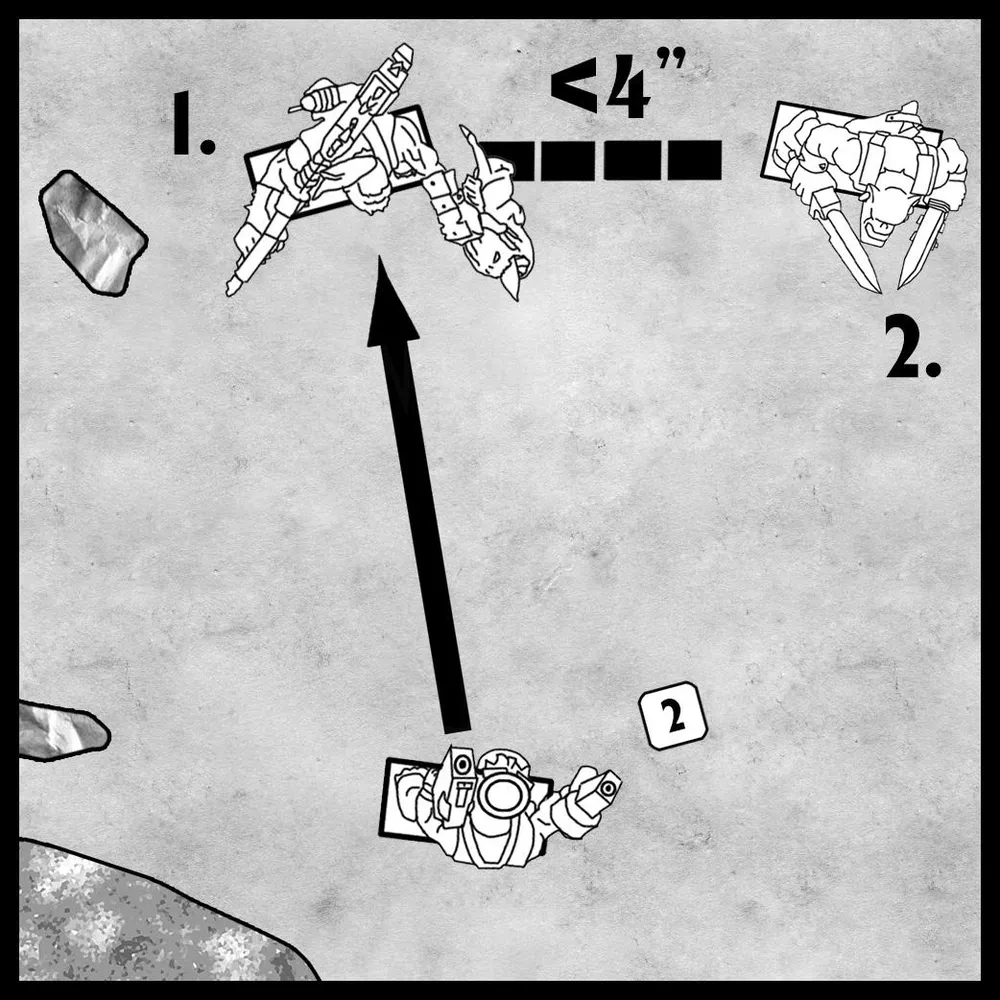
Wazbag Targets Nazgrab (on the left) with his Six-Shoota. He rolls a single sustained fire dice for it and gets two shots.
He’s feeling lucky and decides to have a go at Nazgrab’s mate, Choppa-Block, who’s close enough to Target (within 4” of the initial Target) and in range.
Instead of firing both shots at Nazgrab he splits his shots between the two Targets and rolls to Hit for each one.
Ammo Jams
If you roll a jam symbol on the Sustained Fire dice then no shot is made and something has gone wrong with the weapon. It may only be a momentary jam or the weapon may be useless for the rest of the game - an Ammo Roll is required to find out which. The rules for Ammo Rolls are covered below.
Multiple Full Auto Shots
Some weapons allow the player to roll more than one Sustained Fire dice, you may choose to fire a single shot as normal or up to as many Sustained Fire dice as is allowed by the weapon (An ‘Eavy Shoota can use both dice or just one, for example).
When a jam is rolled then no shots are inflicted by that dice, other shots from other dice are still valid and worked out in the usual way. You must make a separate Ammo Roll for each jam symbol that is rolled.
Ammo Rolls
If you roll a 6 when testing to Hit a Target something has gone wrong with the weapon and an Ammo Roll is required. The Target is still Hit and the shot is worked out as normal.
To make an Ammo Roll, roll a D6 and consult the weapons ammo rating, if you score equal or more than the number indicated then the weapon is fine and may be used as normal, if you score less than the number indicated then the weapon has run out of ammo and may not be used for the rest of the game.
Weapons with sustained fire dice
Any weapon which uses the Sustained Fire dice is more susceptible to Ammo Rolls and ammo jams than normal weapons because they require an Ammo Roll on a Hit roll of 6 and if the jam symbol comes up on the Sustained Fire dice. Make an Ammo Roll for each jam symbol that is rolled.
Weapons with Ammo Rolls of “Auto”
Weapons with an Ammo Roll of “auto” will run out of ammo if required to take an Ammo Roll. You should still roll a D6 to see whether they explode as described below.
Other Ammo Roll triggers
Some weapons have special rules for when Ammo Rolls must be taken. For example, Ork Skorchas must take an Ammo Roll after each shot.
Exploding Weapons
If an Ammo Roll is required and the result is 1, roll a further D6. If the result is lower than the Weapon Ammo Roll number again it explodes! However, Weapons with Auto Ammo Roll will explode on the first result of a 1.
The Warrior takes a Hit from the weapon at its usual Strength -1 (this includes weapons with templates - the Hit only affects the user in this case).
Weapons that have exploded are useless for the rest of the game. The weapon will be automatically repaired in time for the next battle.
Step 3 – Resolve Wounds
If you manage to Hit your Target that’s no guarantee that you’ll actually hurt them! This section specifically deals with Wounding Warriors on foot. See the Vehicle section for details on damaging Vehicles (see Step 1 - Determine Location).
The first thing to take into account when hitting a Target is whether they’re Pinned by the shot.
Pinning
Various things can cause a Warrior to be pinned but the most common cause is being Hit by some sort of projectile. Perhaps there’s gunfire very close to them and they’re keeping their heads down or perhaps an explosion knocked them off their feet. Whatever the cause they’re temporarily not in the fight.
Unless otherwise stated a shot that Hits will Pin a Warrior (Vehicles cannot be pinned but their Crew can). Lie the Model down on its back to represent it being Pinned.
Bear in mind that some factions contain Warriors that are immune to Pinning. Check your faction pack for details.
One important exception: Vehicle Drivers are immune to Pinning.
Warriors that start their turn Pinned cannot do anything until the Recovery Phase at which point they recover automatically. They may not need to wait that long though:
Escaping from Pinning
Any pinned Warrior who is engaged in Hand-to-Hand Combat automatically escapes pinning (e.g. if they’re Charged by an enemy Warrior).
If a Pinned Warrior starts their turn with another friendly Warrior (who is not themselves Pinned or Down!) within 2” they may be able to escape Pinning immediately. The Pinned Warrior can take an Initiative Test (roll a D6 - a score that is equal or under their Initiative characteristic passes). If they succeed then stand the Model up - they may take their turn as normal.
Falling Due to Pinning
If a Warrior on foot (not embarked on a Vehicle) becomes Pinned within 2” of a drop, such as a big hole, then they must pass an Initiative test (roll a D6 – the Warrior needs equal or under their Initiative characteristic). If they fail then they fall over the edge!
See the Fall Damage rules for how that works (see Fall Damage).
Wounding
A Target that is Hit may well be Wounded by the shot. That’s the general idea of Shooting at an enemy after all!
Roll a D6 and compare the Strength value of your weapon with the Toughness characteristic of your Target. Consult the Wound Chart below to determine if your shot has managed to Wound the Target. A result of “N” on the Wound chart indicates it is impossible to Wound a Target of that Toughness with a weapon of that Strength.

Wound Chart
STR |
TARGET’S TOUGHNESS |
|||||||||
|---|---|---|---|---|---|---|---|---|---|---|
| 1 |
2 |
3 |
4 |
5 |
6 |
7 |
8 |
9 |
10 |
|
| 1 |
4 |
5 |
6 |
6 |
N |
- |
- |
- |
- |
- |
| 2 |
3 |
4 |
5 |
6 |
6 |
N |
- |
- |
- |
- |
| 3 |
2 |
3 |
4 |
5 |
6 |
6 |
N |
- |
- |
- |
| 4 |
2 |
2 |
3 |
4 |
5 |
6 |
6 |
N |
- |
- |
| 5 |
2 |
2 |
2 |
3 |
4 |
5 |
6 |
6 |
N |
- |
| 6 |
2 |
2 |
2 |
2 |
3 |
4 |
5 |
6 |
6 |
N |
| 7 |
2 |
2 |
2 |
2 |
2 |
3 |
4 |
5 |
6 |
6 |
| 8 |
2 |
2 |
2 |
2 |
2 |
2 |
3 |
4 |
5 |
6 |
| 9 |
2 |
2 |
2 |
2 |
2 |
2 |
2 |
3 |
4 |
5 |
| 10 |
2 |
2 |
2 |
2 |
2 |
2 |
2 |
2 |
3 |
4 |
Damage
If the roll to Wound is successful, the next step is to look at the Weapon’s Damage (if any). Some weapons can inflict more than one Damage on a Warrior and each point of Damage removes one Wound from their profile but never below zero. If the Target has Armour, or some other kind of Saving Throw, now is the time to check and see if they are able to stop the Damage (or other effects).
Note: the term Wound can sometimes be found being used instead of Damage.
Step 4 - Saving Throw
Some Warriors may be fortunate enough to be wearing Armour, or have a special Skill, or something else that makes them eligible to take a “Saving Throw”. Roll a D6, if the score is high enough then all of the Damage (or some other Special effect) that would have been inflicted has been stopped and no Injury roll is made.
Saving Throw Modifiers
Some weapons are better at penetrating Armour than others. To represent this weapons have an Armour Save Modifier indicated in their descriptions. For example an ‘Eavy Shoota has a -2 save Modifier - all Armour Saves must deduct 2 from the dice roll. It is impossible to make a save if the score required is greater than 6.
Bear in mind that Saving Throw Modifiers only apply to normal saves. If a save states in its description that it is unmodifiable (or similar) then it is unaffected by Saving Throw Modifiers.
Step 5 – Gain Experience
If you are using the GCE campaign system (rather than playing a one-off game) then it’s at this step your Warrior would gain experience points for Wounding an enemy, assuming the scenario you are playing gives experience for wounding enemies (most do, but we cannot speak for every scenario ever written!).
Step 6 – Roll for Injury/Special Effect
Some of the steps above may have been skipped if the ranged weapon is something exotic. Normally you’d just be resolving an Injury, which is covered below, but if your ranged weapon has special rules that do something unusual this is usually when those rules come into play.
Injuries
When a Warrior has been reduced to zero Wounds they have been Injured. They must roll to determine the extent of their Injuries. The player who caused the Wound should roll a D6 and consult the Injury Table below.
| D6 |
EFFECT |
|---|---|
| 1-2 |
FLESH WOUND:
-1 WS and -1 BS for the rest of the game. |
| 3-5 |
DOWN:
Place the Model face down. |
| 6 |
OUT OF ACTION:
Remove the Model from play. |
Flesh Wound
The Warrior has been lucky. They may continue to fight as normal. However, they suffer with a -1 WS and -1 BS penalty for the rest of the game. A Warrior may receive multiple Flesh Wounds per round and continue to fight so long as both their WS and BS characteristics do not reach 0. When this does happen the Warrior automatically goes Out of Action.
Note: one could say that a Warrior that “recovers” in this manner technically has zero Wounds. GCE deals with this by treating the Warrior as if they regain a single Wound by losing WS and BS. However, this is only ever to a maximum of 1.
Down
A Warrior who is Down is placed face down on the table and can’t do anything except crawl as described below.
If a Warrior is on foot (i.e. not embarked on a Vehicle) and goes Down within 2” of a drop then they may fall. The Warrior must pass an Initiative test or will fall and take damage as described in the Fall Damage section (see Fall Damage).
Any Warrior who is Down must roll on the Injury Table above in their own Recovery Phase. A result of Flesh Wound lets the Warrior get back in the fight with a -1 WS and -1 BS penalty; stand the Model back on its feet. A result of Down leaves the Warrior face down and unchanged. An Out of Action result removes the Warrior from the table.
During the Movement Phase, any Warriors who are down are allowed to crawl 2”. They may not do anything else and cannot run or Charge.
Out of Action
The Warrior can take no more part in the fight, remove the Model from the table. When the fight is over you can Test to see if they survive and what lasting Injuries the Warrior may have suffered.
A Note On Order Of Operations
Most of the time, players will follow these sequences without issue, only needing to roll one dice at a time. One action with one result. Easy peasy! However, as Warriors level up, gain skills, and new equipment, things can get more complicated! Multiple dice becomes the norm and the temptation to start “batch rolling” can quickly replace “sequential” play.
Batch rolling dice is much faster and by using different coloured dice you can even represent different Warriors, weapons or equipment at the same time. Most of the time, the order doesn’t matter but there will be occasions when dealing with the multiple results at the same time can create problems, such as earning experience points or dealing with multiple Vehicle Damage results. As long as both players are aware of these pitfalls, batch rolling dice can really help keep the pace of a game going. However, both players should be consistent with their chosen method and endeavour to resolve multiple different results in an order both find agreeable.
Hand-to-Hand Combat
Certain situations result in Warriors taking part in the Hand-to-Hand Combat Phase. The main ones are as follows:
- Warriors in base contact after Charging an enemy or being Charged by an enemy.
- Warriors on different levels with at least their base in contact with the top of their enemies head after Charging or being Charged.
- Warriors successfully Boarding an enemy Vehicle and fighting its Crew.
- An unopposed Warrior on a Stationary Vehicle, who also did not Shoot.
- Leadership challenges between games e.g. Bar Brawl or Pit Fight.
Before detailing how Hand-to-Hand Combat works it’s important to clarify which Models can take part in it.
Hand-to-Hand Combat Phase is an infantry-only situation. Vehicles, including Bikes, do not take part in Hand-to-Hand Combat directly. Drivers, Gunners, and other Vehicle Crew do take part in Hand-to-Hand Combat though, assuming an enemy boards their Vehicle.
Pinned Warriors will automatically recover from pinning if engaged in Hand-to-Hand Combat. On the other hand, Warriors who are Down cannot defend themselves in Hand-to-Hand Combat - if an enemy engages them Unopposed they will automatically go Out of Action!
Hand-to-Hand vs. Close Combat
For legacy reasons these terms are currently used interchangeably. In game terms they mean exactly the same thing.
Close Combat Weapons
Before we discuss how Hand-to-Hand Combat works we need to first establish how the weaponry for it works.
Equipment Limitations
Unless otherwise stated, Warriors can carry the following:
- Two ranged-only weapons*
- Unlimited close combat weapons
- Unlimited grenades
- Unlimited equipment items
Faction pack rules can override this, but if no other rules are stipulated then the limitations above apply.
*Note that in GCE pistols count as Hand-to-Hand weapons if listed in that section of a faction pack’s armoury. See the pistols section below for further details.
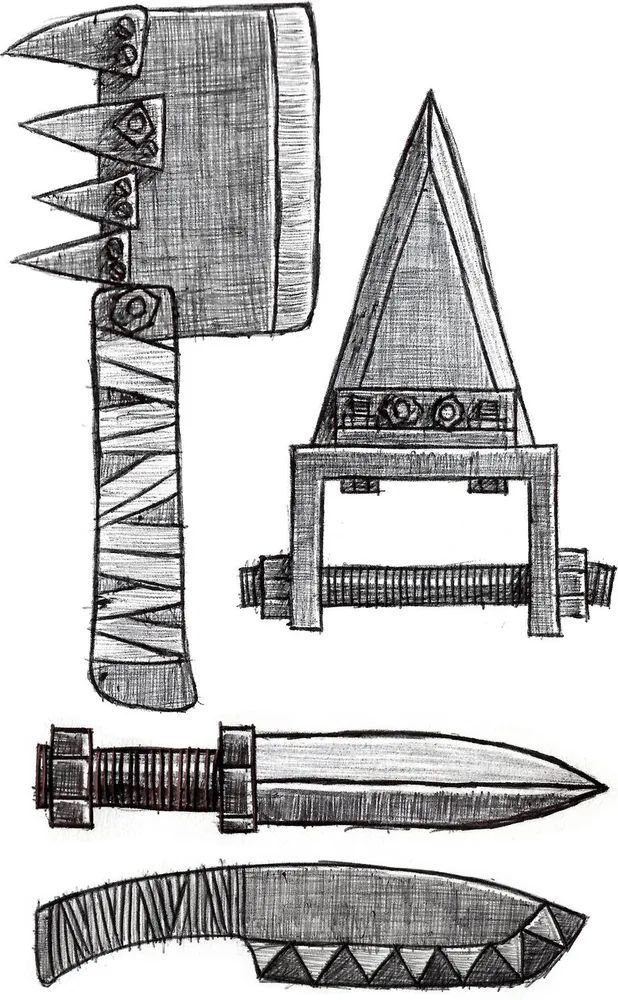
Usage Limitations
A Warrior can carry stuff but that isn’t the same as actually using it in combat.
When it comes to close combat weapons Warriors can be armed with as many as they have hands for. Unless otherwise stated, all close combat weapons are single-handed.
Hopefully it goes without saying that double-handed weapons require two hands to use. If your Warrior has only one hand then they can never use a double-handed close combat weapon!
Conversely, if a Warrior has more than two hands then they can use more close combat weapons.
Specialisation Bonus
While a Warrior is carrying only close combat weapons then they can receive a bonus for specialisation in the form of bonus Attack Dice.
Warriors that are carrying any ranged-only weapons cannot receive this bonus, regardless of how many hands they have.


Grenades, ranged bioniks, and equipment do not count for the purposes of negating the bonus. If your Mutie happens to be carrying a Stranglehook that does not count as a ranged-only weapon, despite it having a ranged profile (because it is equipment), etc..
Assuming your Warrior isn’t disqualified (e.g. for having a couple of shotguns hidden about their person!), the following rule applies:
For each additional close combat weapon they are armed with they may roll an extra Attack Dice. So being armed with two close combat weapons gives a Warrior +1 Attack Dice.
All Warriors count as carrying a Knife (or equivalent), regardless of whether one is on their profile. If they carry another single-handed Hand-to-Hand Combat Weapon that is enough to provide the bonus Attack Dice.
Pistols in Hand-to-Hand Combat
In GCE you will find pistols listed in the Hand-to-Hand section of many faction packs. They have a ranged profile listed and that is used during the Shooting Phase. In Hand-to-Hand Combat the only characteristics that matter for them is their Strength, Save Modifier, and Damage.
It is not used like a ranged weapon in Hand-to-Hand Combat – you do not roll to hit, take Ammo Rolls, etc..
For example, an Ork Slugga has the following statline:
| Range |
Hit modifier |
Strength |
Save Mod |
D |
Ammo Roll |
Notes |
||
|---|---|---|---|---|---|---|---|---|
| Short |
Long |
Short |
Long |
|||||
| 0” - 6” |
6” - 12” |
+1 |
- |
3 |
0 |
1 |
4+ |
N/A |
When used in Hand-to-Hand Combat it is treated like as if this is its statline:
| Range |
Hit Modifier |
Strength |
Save Mod |
D |
Ammo Roll |
Notes |
|---|---|---|---|---|---|---|
| - |
- |
3 |
0 |
1 |
N/A |
N/A |
If a pistol has failed its Ammo Roll then it is useless for the rest of the game – it therefore cannot be used in Hand-to-Hand Combat either.
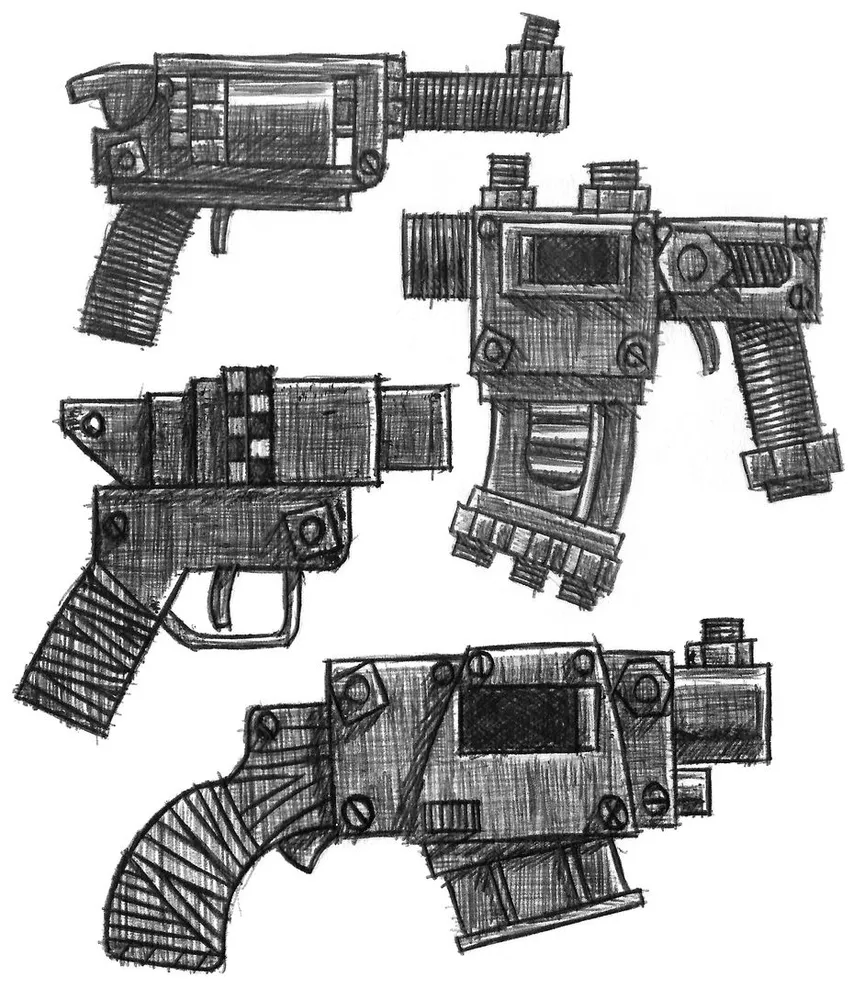
Similarly a pistol that is being reloaded/recharged/etc. and would not be able to fire this turn then it also cannot be used in Hand-to-Hand Combat. Using such a weapon in Hand-to-Hand Combat does not trigger reload/recharge/etc. mechanics (unless otherwise specifically stated in the weapon’s rules).
E.g. Grimgutz has a Shoota and a Choppa. On his profile he has an Attack characteristic of 1. He rolls a single Attack Dice as his Shoota is a ranged weapon, denying him a specialisation bonus.
Uxolur, a Mutie Unk with two hands, carries a Demilune (a pole with a chainsword blade at each end). It’s a double-handed weapon and so his Attacks characteristic shows how many Attack Dice he can roll.
Krixit, a rebel grot with his own Choppa and an Attack characteristic of 1 rolls two Attack Dice. Like all other Warriors he counts as having a Knife which makes the Choppa his second weapon.
Ibstekia, a Digga Yoof with two Sluggas and a Choppa rolls two Attack Dice. He has an Attacks characteristic of 1 and 3 Hand-to-Hand Combat Weapons. He’s only got two arms though so that extra Slugga is just going to have to stay in its holster!
Sequence
When Two Warriors are in base contact to fight a Round of Hand-to-Hand Combat, here is the sequence:
| Step |
Action |
|---|---|
| 0 |
Declare Weapons |
| 1 |
Roll Attack Dice |
| 2 |
Calculate Combat Score |
| 3 |
Apply Modifiers |
| 4 |
Determine Winner |
| 5 |
Number of Strikes |
| 6 |
Resolve Wounds |
| 7 |
Calculate Damage |
| 8 |
Saving Throw |
| 9 |
Gain Experience Points |
| 10 |
Roll for Injury/Special Effect |
| 11 |
Aftermath |
To make sure things are comprehensive we’re going to take an in-depth look at each step now. Each of the steps is straightforward and you’ll probably not need more than the list above to remind you how it goes once you’ve used it a few times!
Step 0 - Declare Weapons
Before combat starts, each Warrior must declare what weapon(s) they wish to fight with. Weapons cannot be swapped again until the Warriors are out of Close Combat, so choose wisely!
Step 1 - Roll Attack Dice
Each Warrior has an Attacks characteristic in their profile but there may be Modifiers such as skills or extra weapons (see Specialisation Bonus on see Specialisation Bonus).
Step 2 - Calculate Combat Score
Roll those dice! Each Warrior picks their single highest dice roll. Also make a note of any results of 1 and 6. Depending on faction rules players may also have weapons or other equipment that allows these dice rolls to be modified through things like blocking or parrying.
Step 3 - Apply Modifiers
Each Warrior will have a combat score determined according to the following formula:
Weapon Skill (WS) + Highest Attack Dice Roll +/- Modifiers
Weapon Skill: make sure you factor in any Flesh Wounds they’ve sustained this game and any changes to it due to other circumstances (such as fighting an Ork Slaver armed with a whip).
Highest Attack Dice Roll: Just one!
Combat Score Modifiers: The table below contains modifiers that always apply. However, there are many more skills and weapons that have their own modifiers, both positive and negative, that could change the outcome of a round of combat.
| Combat Score Modifiers |
|
|---|---|
| +1 |
Charging A Warrior that Charges into combat gains a +1 Modifier for that Round. If the combat continues into another turn then the Modifier no longer applies. |
| +1 |
Critical Blows Each roll of a 6 on an Attack Dice, excluding the first, gives a +1 bonus. For example three sixes would give a +2 Modifier, not a +3 modifier. |
| +1 |
Opponent Fumbles Each 1 your opponent rolls on their Attack Dice gives your Warrior a +1 Modifier. Unlike critical blows, this modifier applies to all Attack Dice. |
| +1 |
Higher Up If a Warrior is more elevated than their Opponent e.g. stood on a wall, they receive a +1 Modifier for the duration of the combat. |
| -1 |
Charging Obstacles If a Charger needs to traverse an Obstacle such as a Barricade or Boarding a Vehicle then a -1 Modifier which effectively cancels out the +1 for Charging. This only applies in the first Round of combat. |
These rules have to be fairly exhaustive but in practice the process is straightforward - take a look at the examples below.

Grimgutz (Weapon Skill 3) Charges Krixit (WS 2). He rolls his single Attack Dice and gets a 4.
Krixit rolls his two Attack Dice and gets a 3 and a 5.
Grimgutz scores 8:
*Weapon Skill: *3
*Highest Attack Dice: *4
*Modifier for Charging: *+1
Total: 8
Krixit scores 7:
*Weapon Skill: *2
*Highest Attack Dice: *5
*No Modifiers: *0
Total: 7
Another example:
Ibstekia (WS 2) is Charged by Uxolur (WS 3). He rolls two Attack Dice and gets two sixes! Boxcars!
Uxolur rolls his single dice and gets a result of 1! Oh no!
Ibstekia scores 10:
*Weapon Skill: *2
*Highest Attack Dice: *6
*Modifier for Critical Blows: *+1
*Modifier for opponent’s fumble: *+1
Total: 10
Uxolur scores 5:
*Weapon Skill: *3
*Highest Attack Dice: *1
*Modifier for Charging: *+1
Total: 5
Step 4 - Determine Winner
Compare the scores - whoever has the highest wins this round of Hand-to-Hand Combat.
If the scores are the same then whoever has the highest Initiative characteristic wins. This may be affected by weapons though - Spears give a +1 Initiative bonus in the event of draws, for example. Similarly regardless of Initiative score a Warrior with a ‘Uge Choppa always loses draws! Check the equipment and skills the Warriors have to be sure you get it right.
If after all that their Initiative scores are the same then it’s a stalemate. The combat will have another round in the next Player turn. If a game has more than two players then the next round of combat takes place in the next turn of a player with a Warrior in the combat.
Step 5 - Number Of Strikes
How much did the winner win by? That’s how many Strikes (same as Hits) their opponent takes. If it was a resolved draw (and not a stalemate) then it’s only a single Hit. There must be a clear winner for Hits to be scored.
Using the examples above:
Grimgutz scored 8, Krixit scored 7. Grimgutz wins and inflicts one Hit (8 - 7 = 1).
Ibstekia scored 10, Uxolur scored 5. Ibstekia wins and inflicts five Hits (10 - 5 = 5).
We now know who has won and how many times they’ve Hit their opponent. If two weapons were used, you must split and alternate the Hits. Crucially, with an odd number of strikes the winner picks how they alternate.
Step 6 - Resolve Wounds
Resolve the Strikes in the same way you would any other Hit by using the Wound Chart:
STR |
TARGET’S TOUGHNESS |
|||||||||
|---|---|---|---|---|---|---|---|---|---|---|
| 1 |
2 |
3 |
4 |
5 |
6 |
7 |
8 |
9 |
10 |
|
| 1 |
4 |
5 |
6 |
6 |
N |
- |
- |
- |
- |
- |
| 2 |
3 |
4 |
5 |
6 |
6 |
N |
- |
- |
- |
- |
| 3 |
2 |
3 |
4 |
5 |
6 |
6 |
N |
- |
- |
- |
| 4 |
2 |
2 |
3 |
4 |
5 |
6 |
6 |
N |
- |
- |
| 5 |
2 |
2 |
2 |
3 |
4 |
5 |
6 |
6 |
N |
- |
| 6 |
2 |
2 |
2 |
2 |
3 |
4 |
5 |
6 |
6 |
N |
| 7 |
2 |
2 |
2 |
2 |
2 |
3 |
4 |
5 |
6 |
6 |
| 8 |
2 |
2 |
2 |
2 |
2 |
2 |
3 |
4 |
5 |
6 |
| 9 |
2 |
2 |
2 |
2 |
2 |
2 |
2 |
3 |
4 |
5 |
| 10 |
2 |
2 |
2 |
2 |
2 |
2 |
2 |
2 |
3 |
4 |
Step 7 - Damage
If the roll to Wound is successful, the next step is to look at the Hand-To-Hand Weapon’s Damage (if any). Some weapons can inflict more than one Damage on a Warrior and each point of Damage removes one Wound from their profile but never below zero.
Note: the term Wound can sometimes be found being used instead of Damage.
Step 8 - Saving Throw
Some Warriors may be fortunate enough to be wearing Armour, or have a special Skill, or something else that makes them eligible to take a “Saving Throw”. Roll a D6, if the score is high enough then all of the Damage (or some other Special effect) that would have been inflicted has been stopped and no Injury roll is made.
Armour Modifiers
The table below is used to determine Saving Throw Modifiers based on the Strength of the Model in Close Combat, including the Weapons Modifiers.
E.g. An Ork Boy is base Strength 3 but a Choppa provides +1 for a total of 4. The Save Modifier is -1.
| Model’s Strength |
Armour Save Modifier |
|---|---|
| 0-3 |
0 |
| 4 |
-1 |
| 5 |
-2 |
| 6 |
-3 |
| 7 |
-4 |
| 8 |
-5 |
| 9+ |
-6 |
Step 9 – Gain Experience
If you are using the GCE campaign system (rather than playing a one-off game) then it’s at this step your Warrior would gain experience points for Wounding an enemy, assuming the scenario you are playing gives experience for wounding enemies (most do, but we cannot speak for every scenario ever written!).
Step 10 - Roll for Injuries
As per usual if they’ve just taken their last Wound roll on the Injury Table:
| D6 |
EFFECT |
|---|---|
| 1-2 |
FLESH WOUND:
-1 WS and -1 BS for the rest of the game. |
| 3-5 |
DOWN:
Place the Model face down. |
| 6 |
OUT OF ACTION:
Remove the Model from play. |
Warriors reduced to 0 WS and 0 BS automatically go Out of Action.
There’s an important difference in Hand-to-Hand combat - if a Warrior goes Down they go Out of Action immediately! This is not the case if the fight is onboard a Vehicle - that’s covered in the next section.
Step 11 - Aftermath
One of several things can happen in the aftermath of a round of Hand-to-Hand Combat:
Combat continues.
-or-
A Follow Up move is made.
-or-
The losing Warrior is thrown off a Vehicle.
The first one is the simplest - both Warriors are still beating lumps out of each other. One might have been Wounded, or not, but they’re not Out of Action so they keep fighting. Another round of Hand-to-Hand Combat will be resolved next turn (either player’s turn - or any controlling player in bigger games).
The second comes into play for the winning Warrior if they take their opponent Out of Action. They may immediately move 2” in any direction (e.g. to move into Cover or towards some nearby enemies) and may use this Movement to engage another Warrior in Hand-to-Hand Combat. Should that happen the combat is resolved next turn (don’t be greedy!) and the short move prevents them from claiming the +1 bonus for Charging.
Lastly if the fight is taking place onboard a Vehicle the loser of a round of Hand-to-Hand Combat will be chucked overboard! Regardless of whether they’re Wounded or not the price of losing is being ejected from the Vehicle. Place the Warrior D3” away from the Vehicle in a random direction. They then take a S3 Hit as they hit the ground!
This does mean that going Down in Hand-to-Hand Combat onboard a Vehicle doesn’t automatically put a Warrior Out of Action.
Multiple Combats
Whilst one-on-one combat is the most common situation bigger fights happen too and whilst the rules are similar there are some important differences. These situations cannot happen onboard Vehicles (See the Pilin’ On section for the exception to this) so bear that in mind.
The six steps from above still apply:
- Determine how many attacks each Warrior has this round
- Roll Attack Dice
- Work out each Warrior’s combat score
- Compare scores and determine a winner
- Resolve Wounds
- Deal with the aftermath
In basic terms Multiple Combat situations are broken down into several rounds of combat which become progressively harder for the defender.
First we’ll deal with a single Warrior being Charged by multiple attackers and then we can take a look at how other setups are handled.
Firstly the outnumbering player can choose the order in which their Warriors take on the outnumbered Warrior. The first combat is resolved as normal.
Assuming the outnumbered Warrior survived they must then defend against the next Warrior (again, nominated by the outnumbering player). Unfortunately being outnumbered makes combat even more deadly…
The second attacker gains an additional Attack Dice and +1 to their combat score!
These bonuses are cumulative - the third attacker gains two Attack Dice and +2 to their combat score. The fourth gets three additional Attack Dice and +3 to their combat score - and so on.
Downed Warriors and Multiple Combatant Situations
In normal one-on-one combat a Warrior who goes down is automatically taken Out of Action. This is not the case in situations involving Multiple Combatants. As long as there are still Warriors on both sides in the fight the Downed Warriors are ignored as everyone focuses on the “last man standing”.
If the last Warrior of one side goes Down or Out of Action then the other Down Warriors from their side will be taken Out of Action too.
Complicated multiple-combatant setups
Whilst some factions lean towards small groups others bring overwhelming numbers to the fight. Under those circumstances it’s quite feasible to have uneven matchups like eight attackers and three defenders (for example). In these cases one player is the outnumbering player (i.e. whoever had the most Warriors in that combat once Charges and so on have been resolved). We’ll be referring to them during this section as “the outnumbering player”. Don’t take this too literally - it’s quite possible that most of their Warriors will be taken out and they’ll be outnumbered at some point during this Combat Phase. “The outnumbering player” is still the same person if that happens - we don’t do a recount in the middle of resolving the Hand-to-Hand Phase!
So, should one of these combat situations come up where both sides have multiple Models in Hand-to-Hand Combat it’s up to the outnumbering player to decide how to split their forces. Each enemy Warrior needs at least one attacker assigned to them but other than that the split can work however the outnumbering player wants. Once they’re split that will be how they are distributed until the end of the Phase. If they take out their opponent and still have Warriors who didn’t get a chance to fight then too bad! When splitting forces it’s a gamble on what’s the right amount of force to deal with a Target - too much and some goes to waste, too little and your Target doesn’t get taken down. Choose wisely!
Effectively the fight is then split into several Multiple Combats and worked out. The outnumbering player decides which order these are decided.
For example:
Da Red Hand Gang‘s Grots descend in force on Grodkicka, Baz, and Skroggy to try to take them out. There’s 11 attackers and three defenders. Skroggy is merely an Ork Yoof though and so much less of a threat whereas Grodkicka is a vicious Ork Nob!
The grots split themselves up between the three defenders:
5 vs. Grodkicka (Ork Nob)
4 vs. Baz (Boy)
2 vs. Skroggy (Yoof)
The split doesn’t have to be even so the Grot player decides to only attack Skroggy with two of his Warriors.
These would be worked out as three separate multiple-combatant situations in whatever order the outnumbering player wants.
*The grot player decides to deal with Grodkicka first - he’s the scariest! After resolving four attackers against him he finally goes Down. The fifth grot stands over his body shouting and *trying to look tough - he didn’t get to fight but he’s going to try to convince everyone that he totally helped!
The defeated Ork Nob may be Down but Baz and Skroggy are keeping the Grots distracted enough to stop him getting taken Out of Action. For now!
Two of the Grots fighting Grodkicka also went Down and they’re lying in little heaps nearby while everyone else keeps beating chunks out of each other. As long as there’s at least one of their Grots actively fighting the Orks the Down Warriors won’t automatically be taken Out of Action. If he goes though...
Boarding Actions (Hand-to-hand Combat)
The Movement and Vehicle Shooting sections cover how to Board a Vehicle and who can Shoot. Here we’ll deal with what happens in Hand-to-Hand Combat.
When a Vehicle is Boarded the player that the Vehicle belongs to is the Defender. They decide who each Boarder, the “Attacker”, will face. Any friendly Warrior aboard can be assigned to fight a Boarder, including the Driver (assuming they’re not Down, of course). Pinned Warriors may be nominated but only if there are no other Defenders available. If the Attacker finds themselves aboard Unopposed this is described later.
Close Combat aboard Vehicles is strictly one-on-one and resolved one at a time. Once an Attacker and Defender have been assigned, a round of Hand-to-Hand Combat is conducted as normal. Once the outcome of the fight has been resolved the process is repeated however there are no Multiple Combats or bonuses. This continues until all Attackers or Defenders (whichever is higher) have had a chance to fight.
The Defender may use the same Warrior, more than once, for different Attackers, assuming they win the previous Hand-to-Hand Combat and are able to, i.e. not Down.
The Pilin’ On rule is an exception to the above and is covered in the next section.
If there are Attackers still to fight and no Defenders remain, then the remaining Attackers are considered Unopposed. See below for details.
Charging Vehicles Modifiers
Successfully Boarding a Vehicle counts as a Charging. However, Vehicles count as Obstacles. As a result, the normal bonus for Charging is cancelled out for the first Combat. After which, neither modifier applies.
Losing Combat
Warriors who go Down or Out of Action after a round of Hand-to-Hand Combat have lost and are thrown overboard. However, going Down aboard a Vehicle does not automatically put a Warrior Out of Action like it does elsewhere. Place the loser 2” behind the Vehicle and take a S3 Hit.
Leaving Combat
A Vehicle that has been Boarded is not considered to be “engaged” or “locked” in Close Combat. Warriors are free to disengage and Get Off the Vehicle in their Movement Phase. However, an Attacker will always take a S3 Hit as they disengage from a Vehicle with Defenders. If they are Wounded, their movement ends and they hit the ground - place them 2” from the Vehicle side they leapt from.
Unopposed Boarders
If a Boarder finds themselves Unopposed aboard a Vehicle, it will go Out of Control. They cannot attempt to gain control of the Vehicle but may choose to Get Off without penalty at the start of their next Movement Phase. If the Warrior remains aboard the Vehicle they may attempt to Shoot it at it but the normal rules for Shooting still apply or they may wait until the Combat Phase. Choose a Location and Hit it a number of times equal to their Attack Statline. All Hits are automatic and Armour Penetration is worked out as normal.
Stationary Vehicles (Close Combat)
If a Warrior is Unopposed aboard a Stationary enemy Vehicle and did not Shoot that turn, they may choose a Location and Hit it a number of times equal to their Attack Statline. All Hits are automatic. Armour Penetration is worked out as normal but the Warrior receives a bonus D6 to Penetrate Armour to represent how Vulnerable being Stationary is.
Follow Up
This is a bonus 2” Movement that a Warrior that defeats all their opponents in Close Combat may make. This applies even if it is not the Warrior’s turn - the move is made immediately following Hand-to-Hand combat. It can be used for whatever purpose the Warrior likes - getting behind cover, boarding a nearby Vehicle, or even engaging another Warrior on Combat. Terrain penalties apply as normal.
If used for a Charge move then it does have the caveat that no bonuses are applied for Charging and the combat won’t be resolved until the next relevant turn (i.e. a turn for any of the combatants involved).
Warriors who defeat opponents aboard a Vehicle do not make Follow Up moves.
Pilin’ On
Some Warriors have the Pilin’ On special rule which comes into effect when attacking or defending Vehicles in Hand-to-Hand Combat. This allows Boarders to break the normal one-on-one rule when fighting on Vehicles. Pilin’ On Warriors work together in order to behave like a single opponent.
When fighting onboard a Vehicle Warriors with this rule can choose to help each other. The Warriors “helping” will not fight in Hand-to-Hand Combat directly this turn. Each group of “helpers” will assist a single nominated Warrior who will gain a bonus and additional Attack Dice.
- Choose a lead Warrior
- Decide which other Warriors with Pilin’ On will help them
- Resolve the round of Hand-to-Hand Combat as normal, applying bonuses
Each “helping” Warrior adds +1 to the lead Warrior’s combat score and +1 Attack Dice.
For example as attackers:
Klepski, Kilgor, and Ravvi are Rebel Grots who successfully board an Ork Trak. They decide to work together with Klepski as the nominated Warrior. He has:
- a Weapon Skill of 2
- an Attacks characteristic of 1
- a Knife
Normally he would only roll 1 Attack Dice.
He would also have a +1 as he has successfully boarded this turn.
However he has two mates helping him out!
That gives him a bonus of +2 and +2 Attack Dice.
As a result he rolls 3 Attack Dice and has a total bonus of +3.
The player controlling the Rebel Grots declares the grouping and their opponent then decides who from the Trak’s Crew should take them on this round.
Or defenders:
Bruvov, Skiffa, Leggit, Gerdat, and Soxem are five Rebel Grots onboard a cutta.
SkubGob, an Ork boy, jumps aboard followed by Modkoff, an Ork yoof.
The Rebel Grot player can choose who fights each of the boarders but needs to decide the split before combat begins.
Bruvov, Skiffa, and Leggit decide to take on SkubGob while Gerdat and Soxem deal with Modkoff.
Skiffa takes the lead with Bruvov and Leggit piling in to help. Skiffa receives a bonus of +2 to their combat score and +2 Attack Dice thanks to them.
Meanwhile Soxem takes the lead against Modkoff with Gerdat helping him. Soxem gets a bonus of +1 and an additional Attack Dice.
Notes
Pilin’ On can be used both when Boarding a Vehicle and when defending one.
When attacking the grouping must be declared first. The owner of the Vehicle being boarded then decides who should face the grouped Warriors.
When defending a Vehicle any groupings using the Pilin’ On rules must be declared before players begin resolving combat but the defending player may choose who each group should face as normal.
If the “helped” Warrior fights multiple times in a turn then they will not receive the bonuses for subsequent opponents. Similarly the “helpers” can only help in one combat per turn – choose your groups wisely!
If a group of Warriors loses a round of Hand-to-Hand Combat whilst using the Pilin’ On rules whichever Warrior was taking the lead is thrown overboard. The rest remain on the Vehicle. Similarly Injuries are inflicted only on the lead Warrior in a Pilin’ On situation.
Recovery Phase
With all the fighting done for the moment we’re now pausing for a moment to see how injured and stunned Warriors are doing.
Pinned Warriors
Warriors that started their turn Pinned now automatically recover. Stand them up - they may act as normal next turn.
Injured Warriors
Warriors that are Down must roll on the Injury Table during the Recovery Phase. For each Warrior which is Down Roll a D6 to see how they fare:
| D6 |
EFFECT |
|---|---|
| 1-2 |
FLESH WOUND:
-1 WS and -1 BS for the rest of the game. |
| 3-5 |
DOWN:
Place the Model face down. |
| 6 |
OUT OF ACTION:
Remove the Model from play. |
If the result is Flesh Wound the Warrior will be stood back up and regain a single Wound at the expense of -1 WS and -1 BS. However, if the Warrior would be reduced to both 0 WS and 0 BS then they will automatically go Out of Action instead. There’s only so much punishment anyone can take!
The roll can be affected by various skills and items so make sure you’re familiar with your faction’s special rules!
Vehicles
In this section we’ll be dealing with Vehicles and their interactions in the game. It’s important to note that Vehicles are separate from their Drivers and Crew. Normal Vehicles cannot fight in Hand-to-Hand Combat (this includes Small Vehicles like Bikes).
Movement
The majority of Vehicles encountered in this game use the same mechanics for Movement although some factions have less traditional options. We’ll deal with the most common Vehicles here as these rules are the defaults - faction packs provide the specifics for Vehicle movement if they’re different.
Normal Vehicle Movement
Most Vehicles in this game have two types of Movement - their Gas Engines and their Thrusters. These aren’t always literally powered by fungus gas and the equivalent of Thruster Movement for other contraptions might just be putting the drive system in high gear. For the purposes of this section of rules we’ll call them “Gas Engines” and “Thrusters” though!
Assuming the Vehicle is not Wrecked or Immobilised it may take its Movement normally. This involves making a Gas Engine move followed by using Thrusters.
Making a turn
Whenever a Vehicle makes a turn the pivot point is the centre of the Vehicle model. Not the side, not the back, not the front – the centre of its main body. Where exactly that point is we leave to you and your opponent but the diagram should provide guidance.
Crucially, the turn itself should not move the Vehicle any distance.
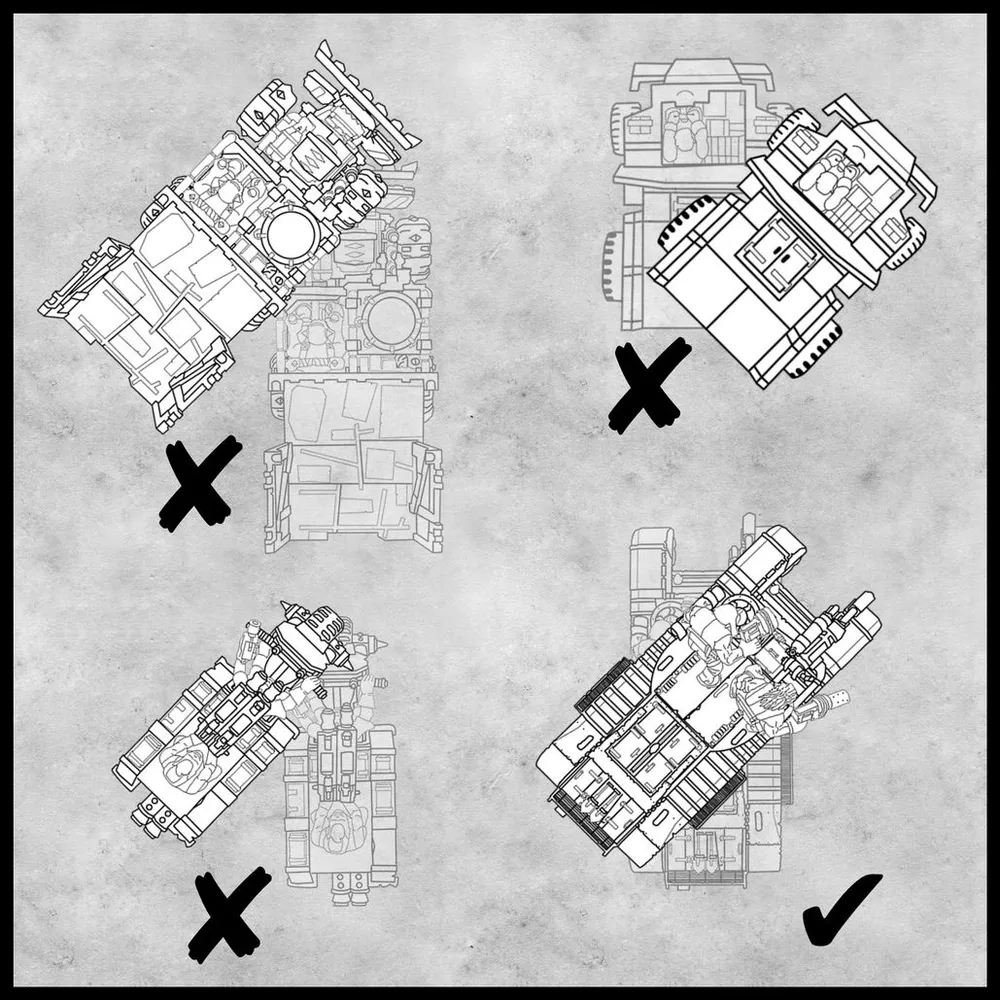
Gas Engines
Unless otherwise stated a Vehicle may move 6” using Gas Engines during each of its Movement Phases.
A Vehicle could choose to simply go straight ahead 6” but turning is a rather common requirement so we’ll deal with that now.
For turning Movement allowance is split into two even halves with the option of a turn after each half. Each turn can be up to 45º and the Vehicle has to move at least 1” before making a turn.
Any unused Gas Engine Movement in each half of its movement is forfeited. This can mean that when manoeuvring carefully your Vehicle may not end up moving its full theoretical gas engine distance.
So move up to half your move (1" minimum), then you may turn up to 45º, then repeat the first two steps. Any movement allowance you didn’t use is lost.
This is perhaps best illustrated with an example:
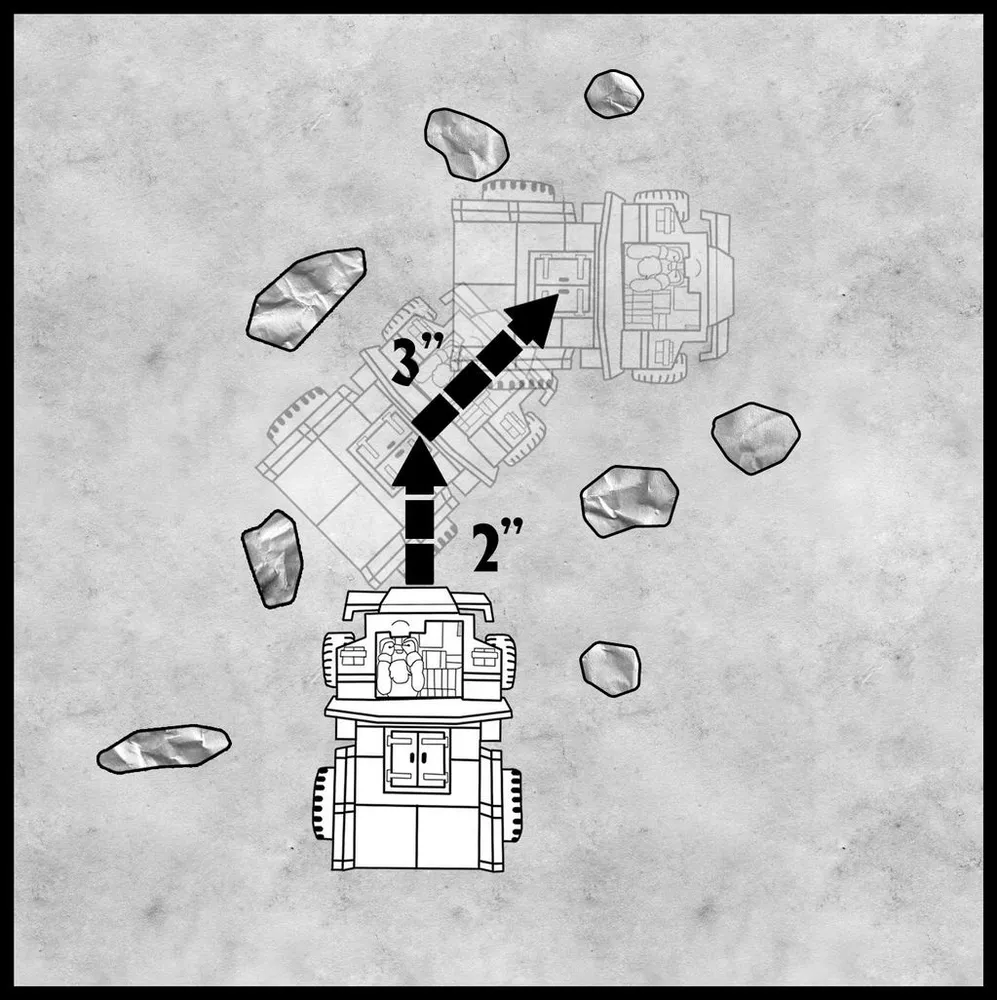
An Ork Trukk wants to get through a narrow gap in some rocks using its Gas Engines. Its 6" of Movement are split into 3" blocks. It moves 2” and then turns 45º. This turn ends its first movement half, despite having 1” unused. It then has 3” of Movement left and can make another turn.
Assuming there weren't any rocks in the way it could move 4" forward and then make one turn. This would use its Gas Engine Movement entirely as it would be 3" forward, decide not to turn, then move another 1" forward, then a 45º turn.
This is all assuming you want to turn! If not then feel free to just move 6” forward!
Thrusters
The Vehicle has now used its Gas Engine Movement for the turn but the Driver wants to keep moving - time to fire up the Thrusters!
Thruster Movement is unreliable and the speed can only be sustained briefly before the Driver has to take their foot off the pedal. Too much and they’re likely to lose control - this might just end up in them wrestling with the steering and firing up the Thrusters again; alternatively they could careen into that boulder and crash horribly…
The amount of speed each pull of the Thrusters delivers varies between Vehicles. See the Vehicle Datacard for details (in the relevant Faction Pack). As an example: Ork wheeled Vehicles are fairly fast - each Thrust move they make can be up to 6” while their tracked Vehicles have a maximum Thrust up to 5”.
Before making a Thrust move the player controlling the Vehicle has to declare how far they’re attempting to Thrust. After doing so they then need to pass a Thrust Test. The Vehicle’s profile will list its Thrust thresholds. For example:
| Ork Trukk |
|
|---|---|
| Thrust Number |
Score Required (D6) |
| 1 |
2+ |
| 2 |
3+ |
| 3+ |
4+ |
As you can see their first Thrust is very easy to pass - roll a D6 and on a 2+ the Vehicle Thrusts successfully!
You may also have guessed from the example above that in each Movement Phase a Vehicle can Thrust many times. Pass a Thrust Test and not only does the Vehicle move forward - it can Thrust again!
Something else you might have noticed - every Thrust after the second is successful on a 4+. You can basically keep Thrusting until you either fail a Test, Crash into something, or decide you’ve pushed your luck far enough and stop voluntarily.
Importantly Thrust Movements go forward. You may not turn during them, only after each one.
Turning while Thrusting
Thrust Movements only go forwards but after each one a Driver can attempt to turn - assuming they can hold their nerve!
If the Vehicle’s Thrust move is successful, move the Vehicle forward by the declared amount. If you wish to turn then the Driver must pass a Leadership Test (roll 2D6 - the total must be equal or under their Leadership characteristic). Assuming they succeed you may turn 45º left or right. On the other hand if they fail then move the Vehicle another D6” forward - that’s the end of its Movement for this turn.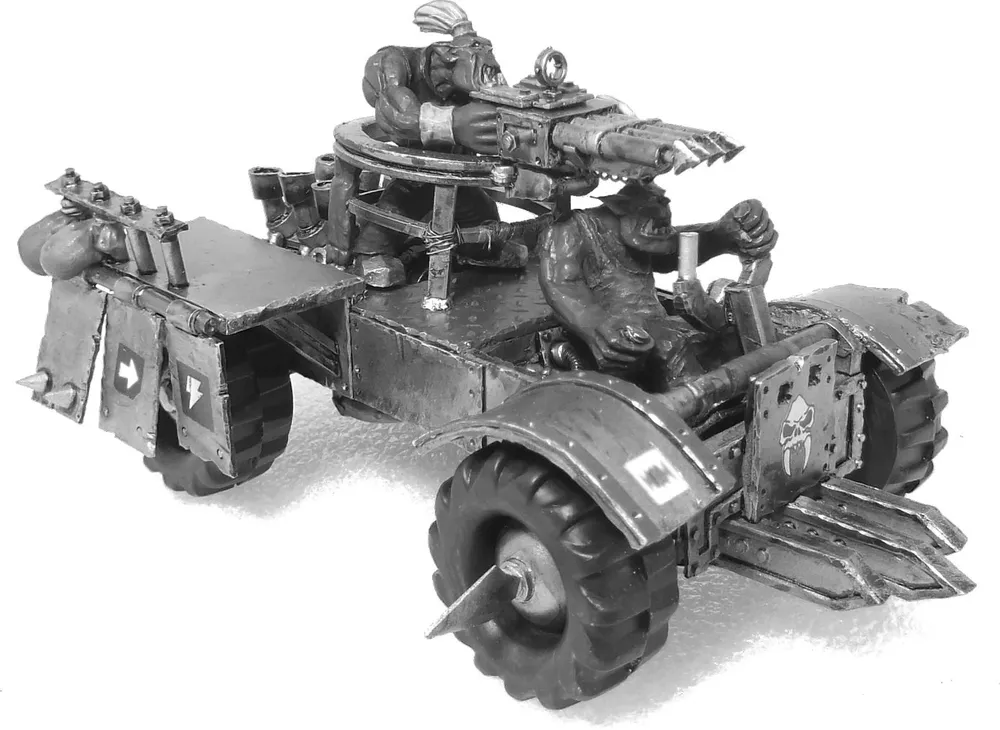
Failed Thrust Tests
We’ve dealt with when things go well - what about when Thrusters fail?
Should you fail a Thrust Test for a Vehicle roll on the Thruster Buster Table:
| Thruster Buster Table |
|
|---|---|
| D6 |
Result |
| 1 |
Spin The Vehicle Spins - roll a scatter dice to determine which direction it’s now facing. |
| 2 |
D6” forward and Spin Move the Vehicle D6” forward and then roll a scatter dice to see which way it’s pointing. |
| 3 |
Swerve and move D6” forward Roll a D6 to determine which direction to turn the Vehicle 45º (1 - 3 left, 4 - 6 right). Then move the Vehicle D6” forward. |
| 4+ |
D6” forward Move the Vehicle D6” forward. |
Once a Vehicle has done whatever that Thruster Buster Table has determined it should, its Movement ends for this turn. The Thrusters aren’t exhausted by this abuse - they’ve just temporarily failed. They’ll be working fine by the next time the Vehicle is allowed to move - assuming the enemy doesn’t shoot them full of holes or something.
Slow Speed Manoeuvres
Sometimes Vehicles will end up in difficult positions, effectively stuck or at risk of crashing or colliding unintentionally. This is when the reverse gear might be useful. Declare you are making a Slow Speed Manoeuvre at the start of your Vehicle Movement.
A Slow Speed Manoeuvre still counts as moving but will not Hit anything. It is also limited to only 3” of your available Gas Engine Movement allocation (or equivalent). During the Slow Speed Manoeuvre you may however split this into three 1” increments. After each 1” move you may make a turn of up to 45º. These 1” moves can be forwards or backwards.
The amount of inches available for Slow Speed Manoeuvres is limited to what a Vehicle is capable of. If through damage or some other rule the Vehicle would not be able to make a Gas Engine move (or equivalent) then it cannot miraculously gain extra Movement through the use of Slow Speed Manoeuvres.
Unless otherwise stated Vehicles that perform a Slow Speed Manoeuvre may not use their Thrusters in the same Movement Phase.
Note that this is the only time Vehicles may move backwards!
Stationary Vehicles (Movement)
A Vehicle is considered to be Stationary if it has not moved at least 1” during its Movement Phase. A Stationary Vehicle cannot Swerve to avoid Rams or Collisions and is treated as Difficult Terrain by Warriors on foot.
Droppin’ Off or Pickin’ Up
During the Vehicle’s Movement, Warriors who have not yet Got On or Off a Vehicle this turn already, may choose to be Dropped Off or Picked Up instead. This is a special action and they do not count as having moved yet but must wait until the Vehicle has completed its whole Movement phase before they can be used.
Warriors who wish to be “Dropped Off” during the Vehicles Movement may do so and are placed to the Side or Rear of the Vehicle, not the Front, stupid! They may not set Overwatch.
Warriors who wish to be “Picked Up” during the Vehicles Movement must already be suitably positioned as the Vehicle passes them by. Again, not the Front, stupid!
However, if Vehicle has moved more than 6” or used its Thrusters, they must roll 4+ on a D6. If they fail they will take a Strength 3 Hit and the Warriors’ Movement Action will be forfeited (including Running and Charging). Place them in contact with the side they attempted to exit from.
Caution: A Warrior who gets Dropped Off into base contact with an enemy Warrior on foot counts as Charging. However, should they fail a test and end up Down, your opponent will automatically put them Out of Action in the subsequent Close Combat Phase!
Traversing Terrain
Flat, even ground is easy to move over. Once things get lumpier most Vehicles struggle - not all, but most.
You should check your Vehicle’s profile to see how it copes with different types of terrain.
Generally the following rules apply but (as always) faction pack rules take precedence:
| Tracks |
|
|---|---|
| Terrain Type |
Movement |
| Open |
Normal |
| Difficult Ground |
Normal |
| Very Difficult Ground |
Immobilised |
| Impassable Ground |
Crash/Collide |
| Wheels |
|
|---|---|
| Terrain Type |
Movement |
| Open |
Normal |
| Difficult Ground |
Slow Speed Manoeuvres only |
| Very Difficult Ground |
Immobilised |
| Impassable Ground |
Crash/Collide |
As you can see a wheeled Vehicle like an Ork Trukk can move over Difficult Ground but it’ll be doing so very slowly - more likely it’ll be trying to move its way off Difficult Ground so it can move as normal again.
Very Difficult Ground is effectively completely impassable to Ork Trukks - if they end up there somehow (e.g. jammed Thrusters) that’s where they’ll be Immobilised and stay there for the rest of the game.
Impassable Ground is just that. You’ve most likely just crashed into a rock or collided with another Vehicle. You ain't going nowhere!
Being Immobilised by Terrain
If a Vehicle moves into terrain that its table indicates will immobilise it they immediately Spin (roll a Scatter Dice) and are then Immobilised.
Out of Control Vehicles
If a Vehicle’s Driver isn’t “available” to control a Vehicle then things aren’t going to go so well!
A Driver could be Down, thrown overboard, or something else.
If this happens the Vehicle’s Movement Phase will consist of it swerving left or right 45º (roll a D6 to determine which) and then moving D6” forward. Obviously it will not avoid terrain, other Vehicles, or anything else during this move!
Taking the wheel
Crew members aboard their Out of Control Vehicle can try to take back the wheel - assuming they’re not Down, Pinned, or similarly incapacitated (e.g. afflicted by Terror). One Crew member may attempt to take control each turn and will succeed on a D6 result of 4+. This test takes place during the Movement Phase.
If they fail then they can try again next turn. In the meantime it’ll move randomly as described above.
However if it’s a Small Vehicle (e.g. a Bike) they only get one attempt. After that it’ll become Immobilised and any Crew will be thrown D3” and take S3 Hits.
If no one else has taken control and a Driver recovers from being Down then they automatically bring the Vehicle under control.
Anyone taking control of a Vehicle becomes the Driver for the duration of the battle. This is only temporary though - they don’t permanently take over the position in your Mob’s roster!
Drivers displaced in this way become part of the Vehicle's Crew.
Chasing: Racing and Tailing
Chasing moves are a special kind of Vehicle Movement where a Vehicle moves whenever the Vehicle they’re chasing moves - in the enemy’s turn. The chasing Vehicle can also shoot both in their own Shooting Phase as well as the enemy’s Shooting Phase. Even better - the chasing Vehicle and everyone onboard shoots before the enemy in their opponent’s Shooting Phase!
That’s the “why” covered - now for the “how”. Chases come in two varieties - racing and tailing. They follow the same rules and the difference is in positioning.
To declare that a Vehicle is racing another one a player must get their Vehicle roughly parallel to their opponent’s Vehicle with 2” or less between the two.
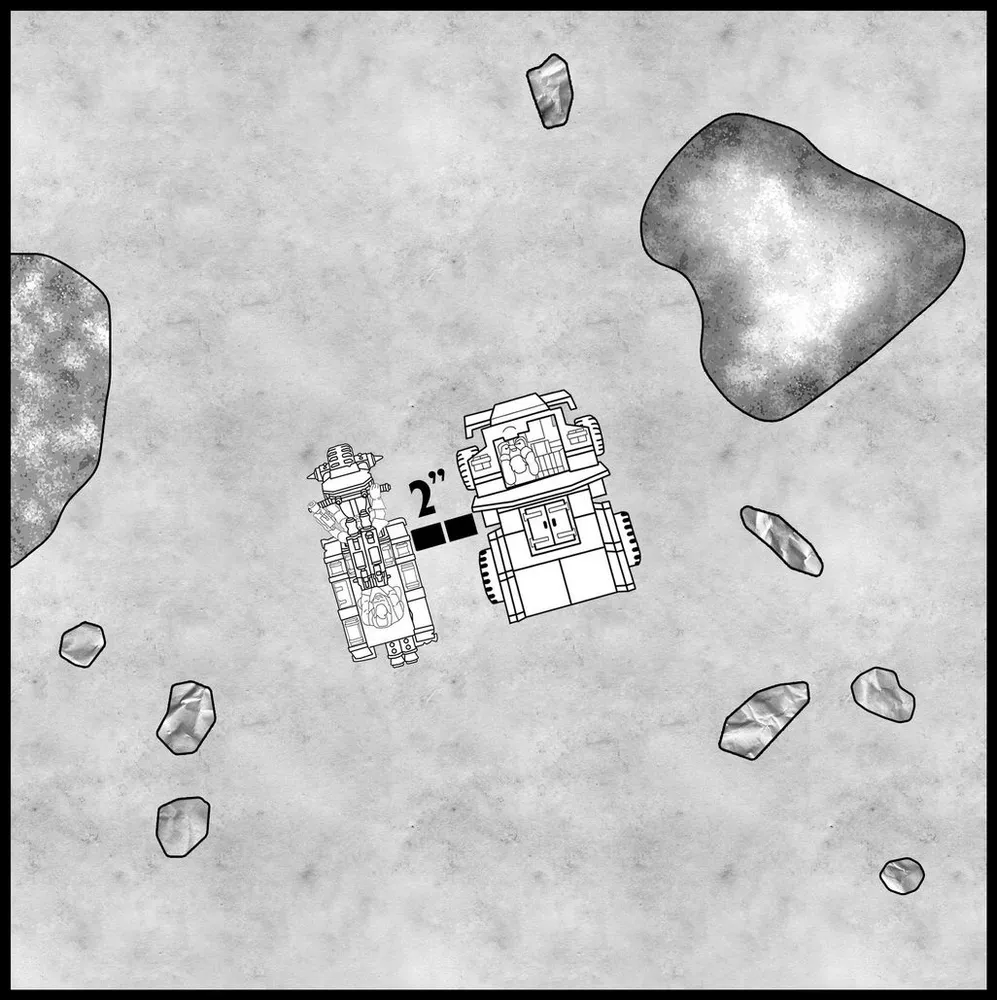
Similarly a tailing situation involves the chaser getting the front of their Vehicle close to the rear of the enemy’s Vehicle (again, 2” or less).
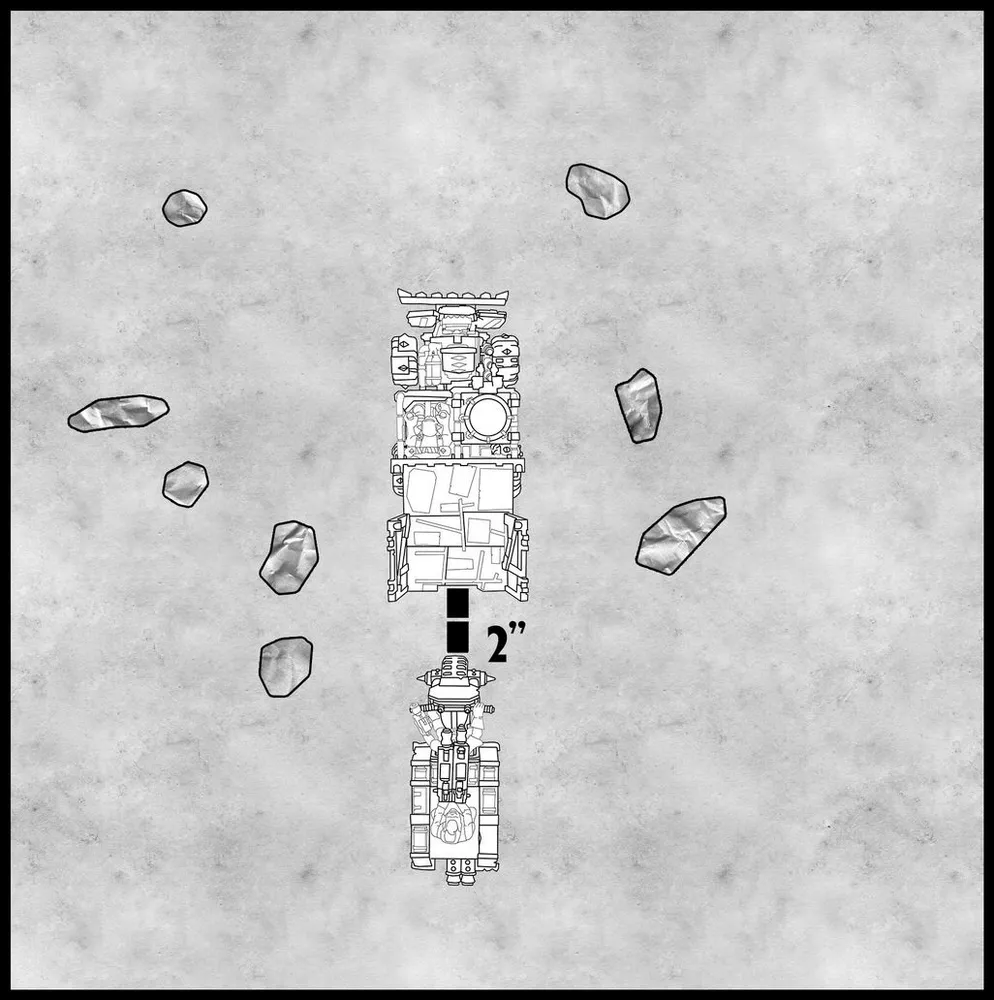
Once a Vehicle is in position for a tail or a race its owner declares that they’re chasing and their Vehicle’s Movement ends.
From now on their Vehicle moves when the opponent’s does, alternating as each separate stage of movement happens (Gas Engines, each Thrust, or equivalent). This works just as normal - Gas Engines, then Thrusters, turns, everything. If the chasing Vehicle needs to Thrust then they take Thrust Tests as normal - they may need to Thrust multiple times to maintain the 2” distance. If they fail then they’ll need to roll on the Thruster Buster Table and automatically stop chasing. If they’re unable to keep up then they are shaken off and stop chasing.
In the same way if the chasing Vehicle needs to turn using Thrusters to keep pace they’ll need to pass a Leadership Test - failing means the chase stops (and they move D6” forward as normal).
If the Vehicle being raced manoeuvres into a position where the two Models cannot be placed side by side the chasing Vehicle can fall back to a tailing position. To do this the chasing Driver will need to pass a Leadership Test (should they fail then the chase ends).
This also works in reverse - a tail can become a race if the Driver passes a Leadership Test.
At any point a racing or tailing Vehicle can decide to give up the chase. From then on they’ll only move in their own Movement Phase (until they decide to chase someone else!).
Small Vehicles
We’re going to refer to “Small Vehicles” in this section, rather than Bikes specifically. Various factions have small Vehicles that deal with Damage the same way so we’re lumping them together to avoid too many “counts-as” explanations. Generally small Vehicles have a bad time when they come into contact with anything tougher than wet cardboard!
Ramming
A great way to Damage Vehicles is to smash them into each other and that’s definitely the case in this game. Notably, damage dealt by ramming automatically penetrates armour! Small Vehicles such as Bikes can also Ram things but this generally puts them at a considerable disadvantage.
Ramming Actions fall into several categories - rakes, sideswipes, and proper Ramming.
Before we get into how they work we’ll need to cover swerving out of the way as that applies to all three Actions.
Swerving
Assuming a Vehicle isn’t Stationary and isn’t Immobilised its Driver may take a Leadership Test to avoid a Ram of any kind (roll 2D6 - if the total is less than or equal to their Leadership characteristic they pass). This includes rakes and sideswipes.
If they pass then their Vehicle immediately Swerves out of the way. Shift the Vehicle left, right, or forward (but not backwards!) to get it out of the path of the ramming Vehicle and then rotate it 45˚.
Note - you get to choose which way your Driver Swerves and so you should probably consider your options and the consequences! This means you could potentially choose to Swerve into Warriors on foot, or to avoid Difficult Ground. In doing so don’t forget to resolve the relevant happenings (whether that’s entering Difficult Ground, squashing Warriors on foot, or whatever else).
If you find yourself boxed in for some reason (e.g. being T-Boned into a cliff face) then you have nowhere to Swerve to so don’t bother taking the Leadership Test. To put it another way, if an obstacle(s) would prevent the Target Vehicle from Swerving far enough out of the way to allow the Attacking Vehicle to pass by, the Ram is successful.
Similarly you are not required to attempt to Swerve to avoid a ramming attempt - for example if Swerving might force you into a patch of Very Difficult Ground you might instead choose not to.
Here are some examples of Swerving to avoid ramming actions:
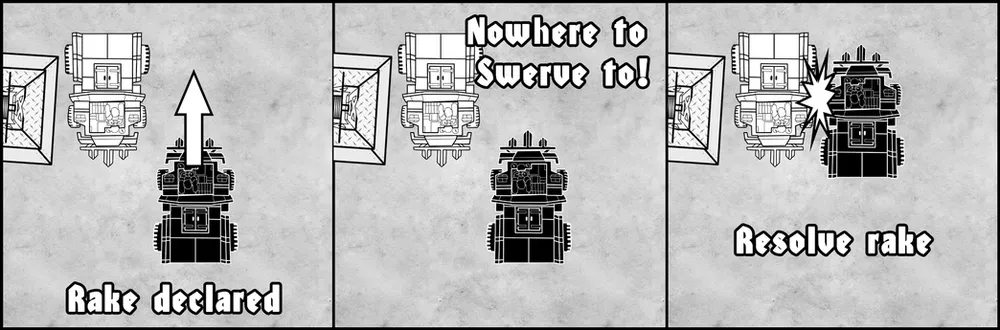
The rammer declares their intention to Rake. The target would need to Swerve to their right to avoid the Rake but they’re boxed in by a scrap mine’s drum hoist (Impassable Ground). There’s no point in attempting to Swerve and so the Rake is resolved immediately.
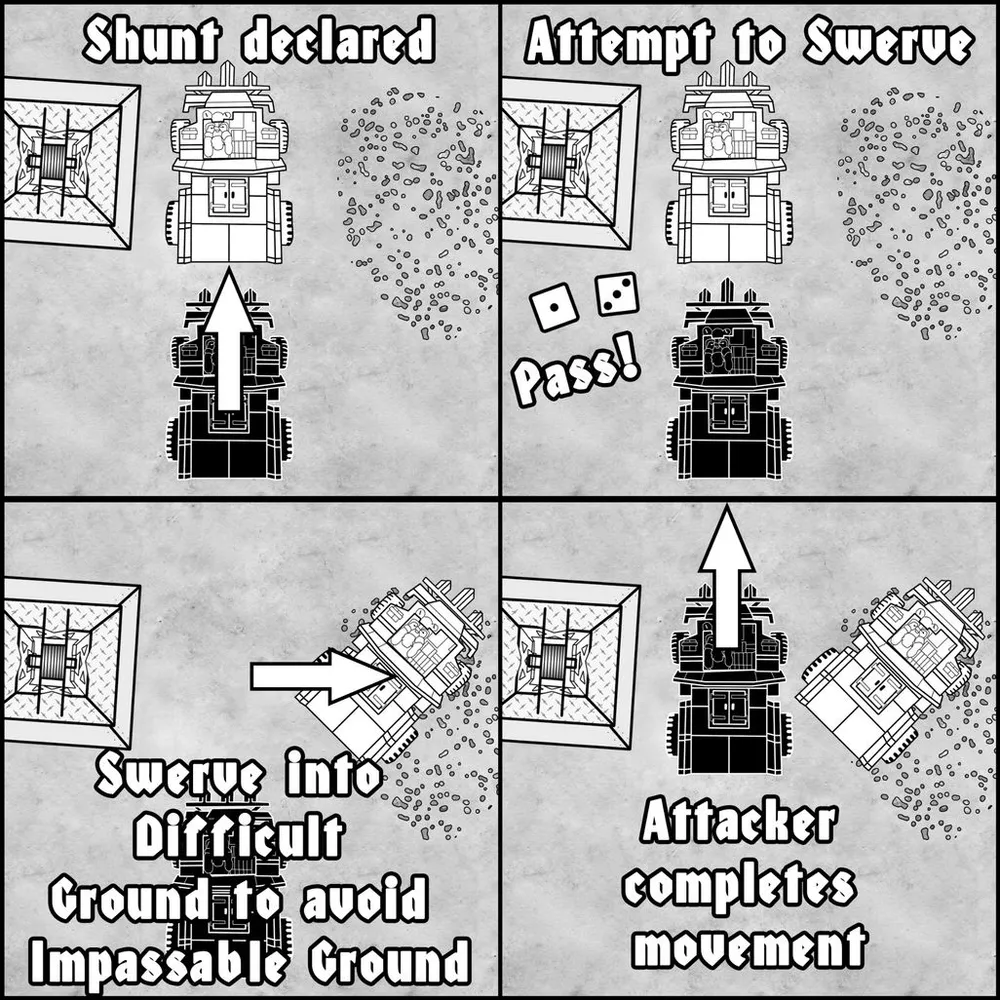
The target has a scrap mine’s drum hoist (Impassable Ground) to their left and a patch of rocky ground (Difficult Ground) to their right. The rammer declares their intention to Shunt and the target attempts to Swerve. They Swerve out of the rammer’s path and into the rocky ground. Swerving into Difficult Ground isn’t ideal but it’s less dangerous than getting rammed!
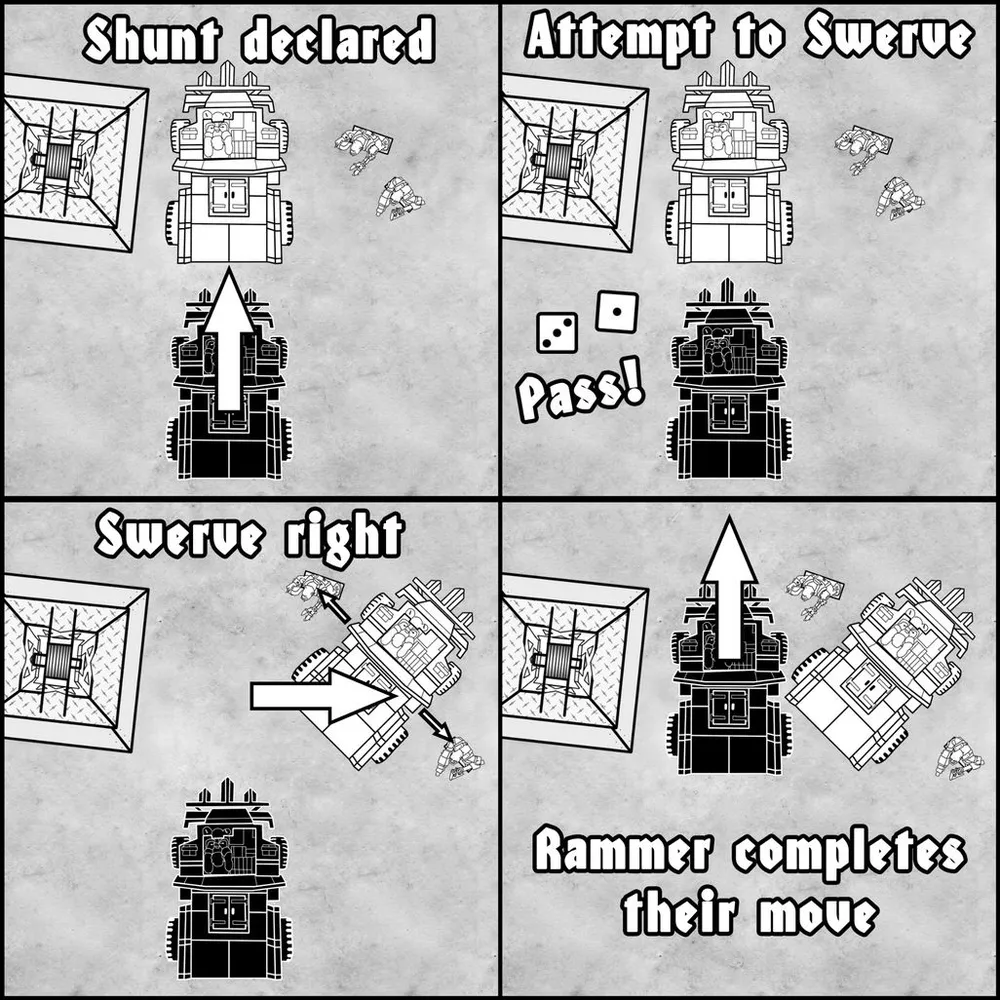
Similar to the example above, this time there’s two Warriors on foot to the right of the target. When the rammer declares their intention to Shunt the target Swerves out of their way. This forces the Warriors on foot to take Initiative tests to avoid being Squashed (rules for this can be found in a later part of this section). Regardless of whether the Warriors on foot pass or fail the target Vehicle has avoided taking damage.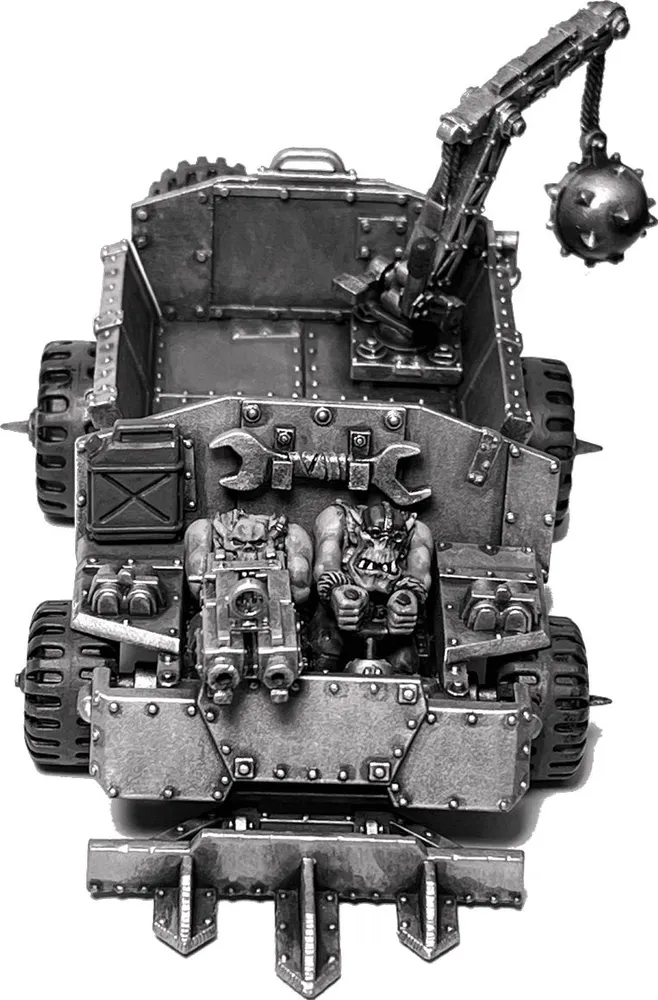

In this simple example a T-Bone ram is declared and the target is boxed in. If the target Swerved to their right they would still be in the rammer’s path and Swerving forward is impossible due to the scrap mine’s drum hoist (Impassable Ground). As a result there’s no point in attempting to Swerve and so the T-Bone is resolved immediately.
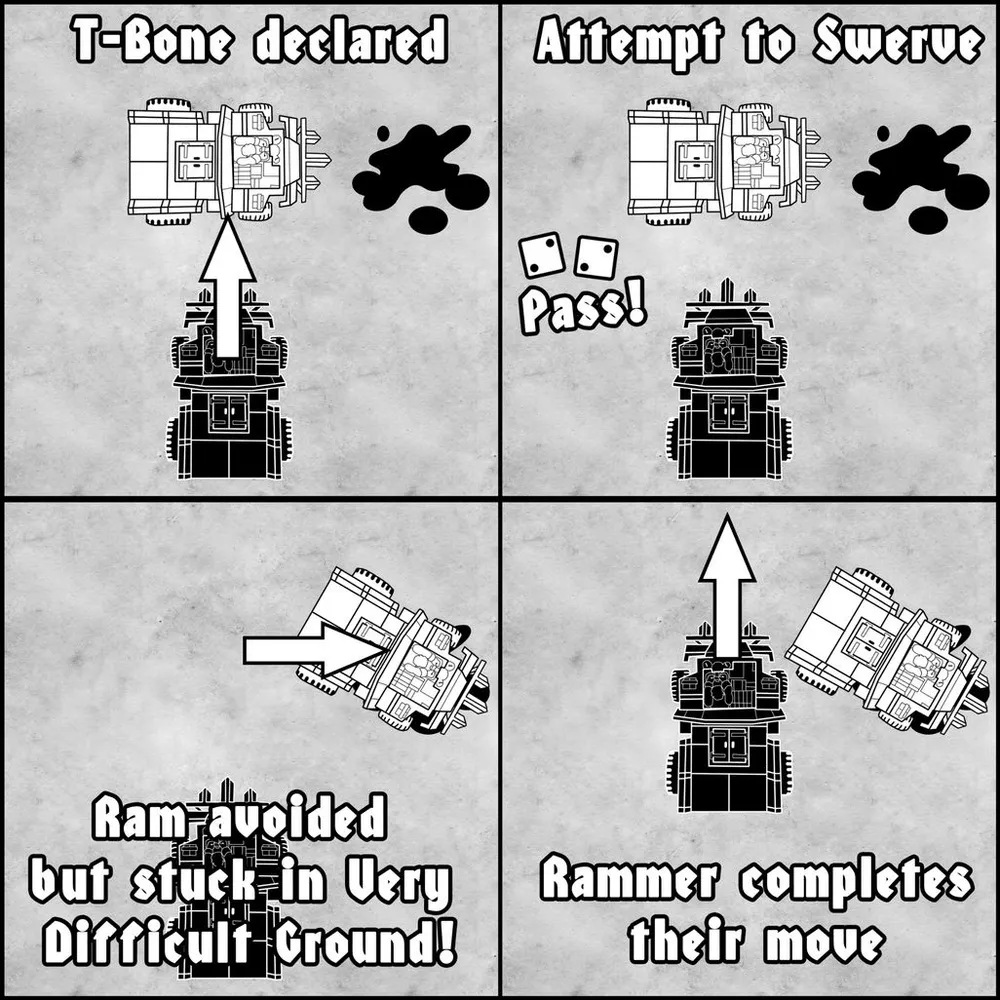
This example is similar to the one above except the rocks are replaced by tar pits (Very Difficult Ground). Swerving into the tar pits will Immobilise this type of Vehicle (a wheeled Ork trukk) but that may be preferable to taking D3 Damage. In our example the target chooses to be Immobilised but avoid the Damage but they could have instead chosen not to Swerve and simply take the Damage.
Krunch
After many of the ramming actions described below the targeted Vehicle will “Krunch” away from the point of impact. Essentially the Vehicle is getting bashed aside as the ramming Vehicle smashes into them. The Krunch rule simulates where the Vehicle ends up, not the path it takes (Don’t worry too much about the physics of this - think of ridiculous Hollywood car chases!).
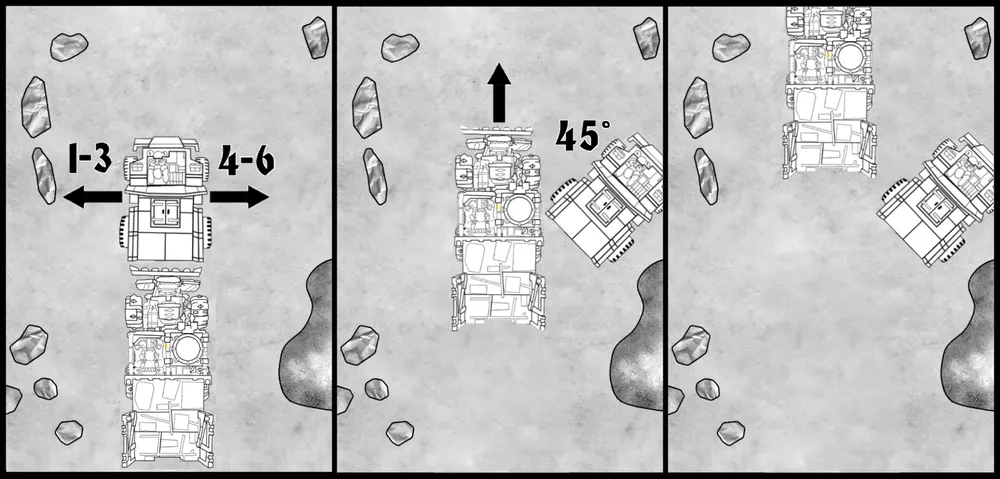
When this is called for, first shift the targeted Vehicle out of the rammer’s path, laterally, and after doing so, rotate it 45˚ in the direction of the shift. The direction depends on what makes sense to the players (it’s often obvious from the angle of impact) but roll a D6 to determine which direction if uncertain.
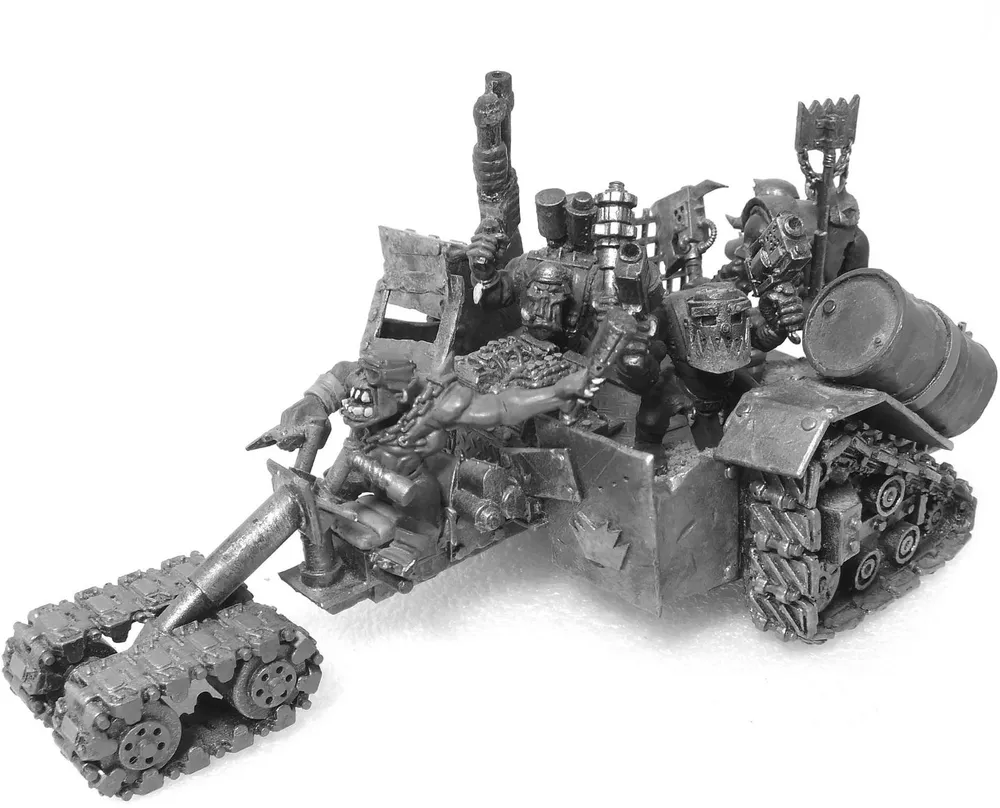
Note - if the Target Vehicle cannot be pushed out of the way (e.g. because of terrain) then leave it in place. The ramming Vehicle’s movement ends immediately.
Rakes and Sideswipes
To perform a rake or a sideswipe the attacking Vehicle needs to be passing within 2” of an enemy Vehicle. In the case of a rake they’re going in opposite directions and a sideswipe involves both Vehicles going in the same direction.


Assuming the Target Vehicle doesn’t Swerve out of the way they’re resolved as described below and then the attacking Vehicle completes its move (assuming it wasn’t Immobilised by any Damage it took!).
Rakes
Roll a D3 for each Vehicle to determine how much Damage each takes. The Vehicles both Krunch off in opposite directions away from the point of impact afterwards. The hits auto-penetrate armour like all other ramming Damage.
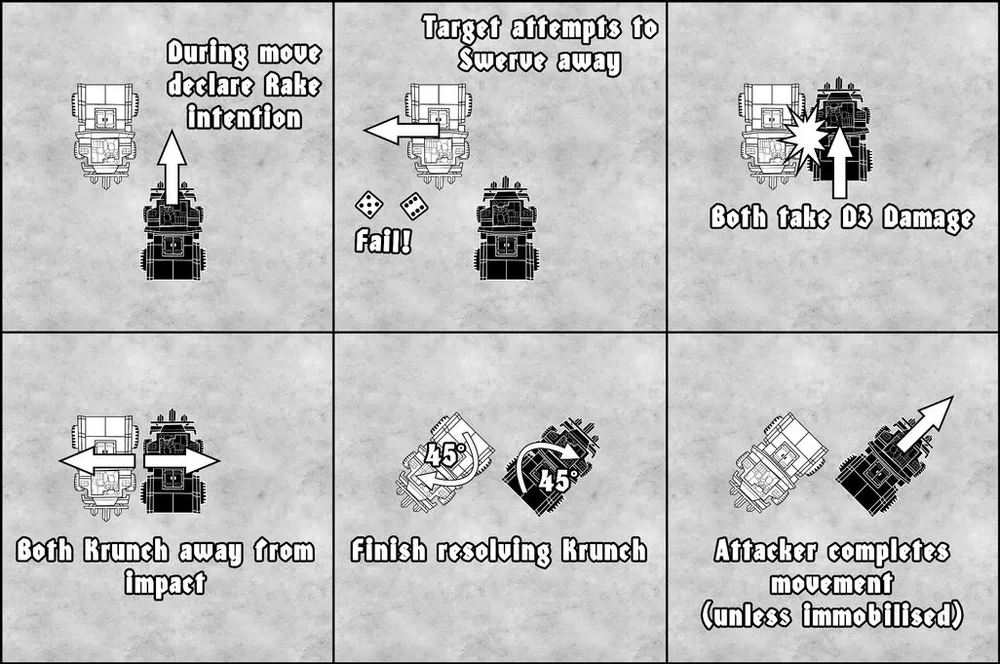
Small Vehicles (e.g. Bikes) take Damage and Krunch away as normal but larger Vehicles only take D3 -1 Damage from the impact and do not Krunch away afterwards.
Sideswipes
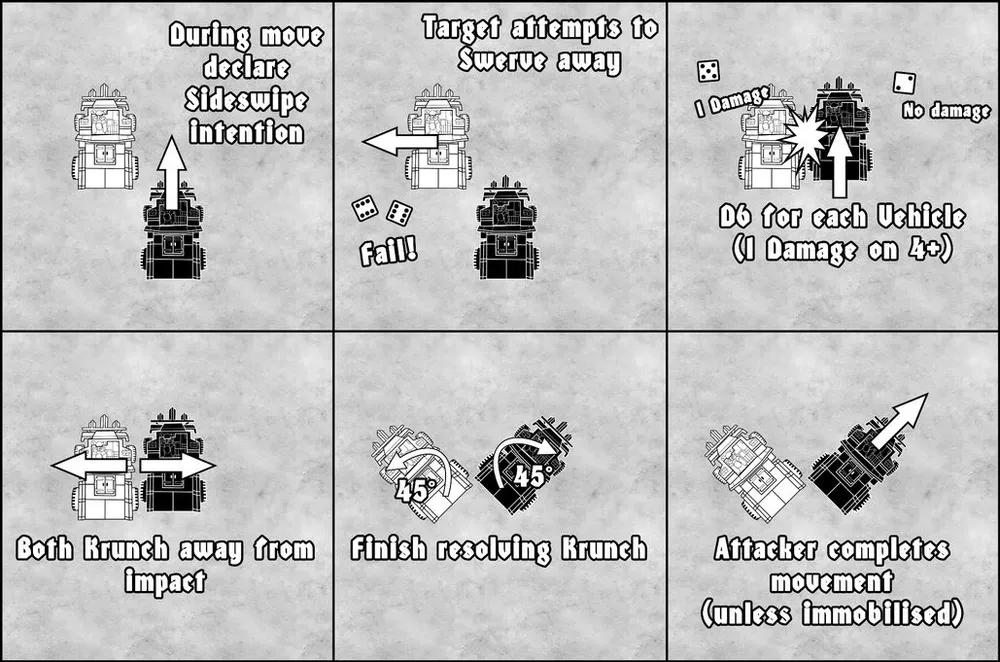
Roll a D6 for each Vehicle. On a 4+ the Vehicle takes 1 point of Damage and Krunches away from the point of impact. As mentioned before, these hits auto penetrate armour, as they’re a form of ramming.
Larger Vehicles cannot be damaged by sideswipes from Small Vehicles and won’t Krunch away afterwards either. Small Vehicles take Damage as normal though (this also means they can Damage each other) and should roll as described above.
Rams
Now comes the heavy stuff! There’s three ways a Ram can happen - a head-on ram, a shunt, and a T-bone. The Vehicle doing the Ramming will be using its front to bash into its Target but the type of Ramming action depends which quadrant of the Vehicle is Hit.
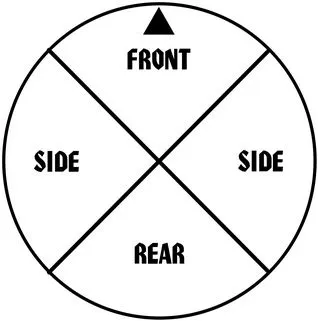
Each quadrant is a 90º arc from a Vehicle’s centre, as shown in the diagram.
To Ram a Vehicle, declare that you are and make a legal move using Gas Engines or Thrusters until your Vehicle is touching your intended victim (No, you can’t Ram using Slow Speed Manoeuvres…). When you make contact the Target Vehicle may attempt to Swerve out of the way (if able), if they fail a Ram will occur. If a legal move was not possible i.e. failing any tests required but still coming in contact with an enemy Vehicle treat it as a Collision instead.
Also, as with Rakes and Sideswipes, small Vehicles are at a disadvantage so make sure you read to the end of the section if they’re involved!
Shunts - Hits to a Vehicle’s rear
Ramming into the rear of an enemy Vehicle does no Damage to the Rammer and 1 point of Damage to the Rammed Vehicle. Afterwards the rammed Vehicle will Krunch away from the impact.
The Rammed Vehicle can avoid this by successfully passing a Leadership Test. If they do, they Swerve out of the way (as described above) and avoid taking damage - then the Ramming Vehicle completes its move as normal.
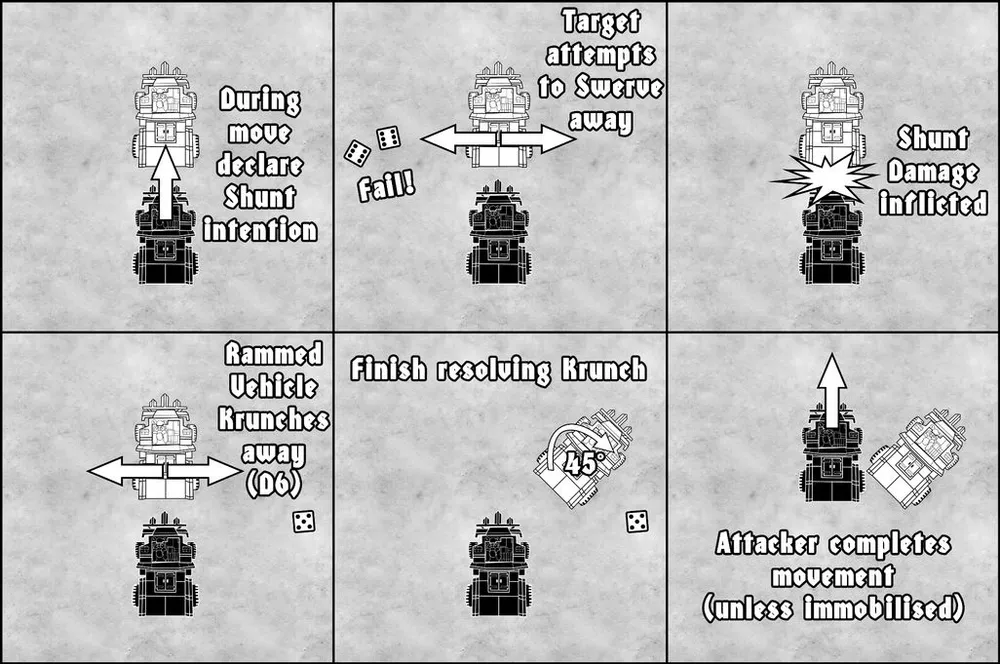
A small Vehicle shunting a larger Vehicle won’t inflict any Damage but will inflict a point of Damage against another small Vehicle. On the other hand if a small Vehicle is shunted by a larger Vehicle it will take D3 Damage!
T-Bones - Hits to a Vehicle’s sides
A Vehicle Ramming the side of another takes 1 point of Damage and inflicts D3 points of Damage to its Target (assuming the enemy Driver doesn’t pass a Leadership Test to Swerve out of the way, of course). Afterwards the rammed Vehicle will Krunch away from the impact (roll a D6 to determine which direction if uncertain).
Small Vehicles inflict no Damage on larger Vehicles if they T-bone them and larger Vehicles take no Damage when T-boning small Vehicles. Small Vehicles take D3 points of Damage if T-boned and take 1 point of Damage if they T-bone an enemy small Vehicle.
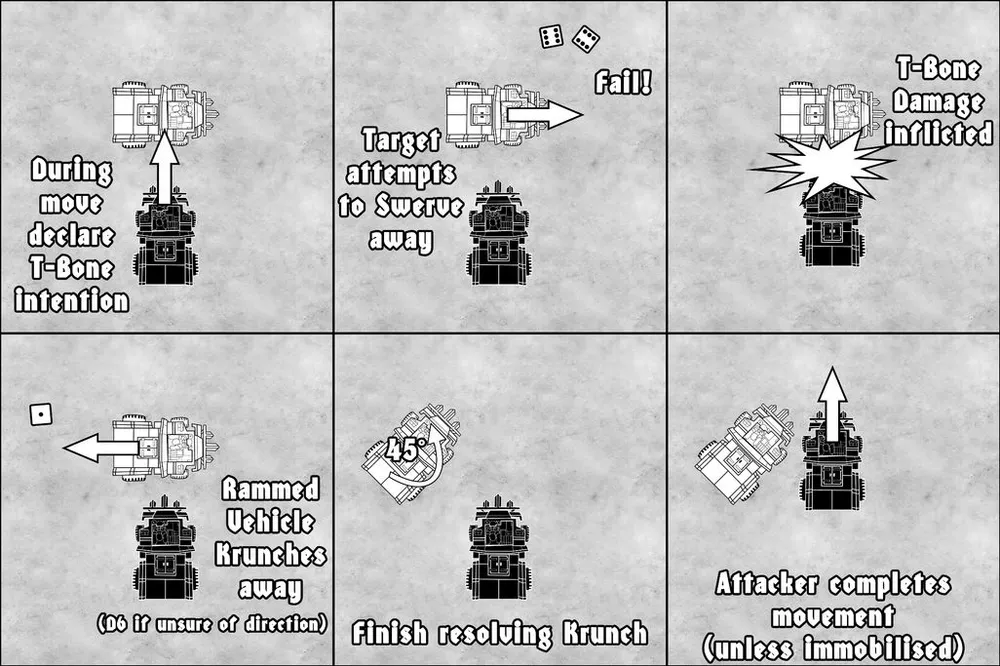
Head-On Rams
If two Vehicles are facing off, front to front, Swerving doesn’t work in the same way as for shunts or T-bones. There’s no Leadership Test.
Instead each player places a dice to choose (in secret) which direction they wish to go:
- 1-2 Swerve Left
- 3-4 Straight On
- 5-6 Swerve Right
Once both players have set their dice they should reveal their intentions to their opponent.
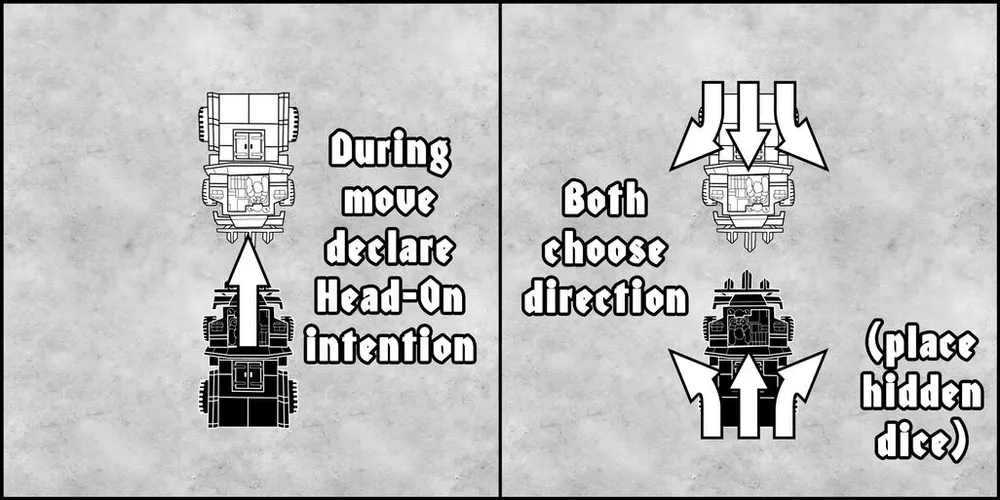
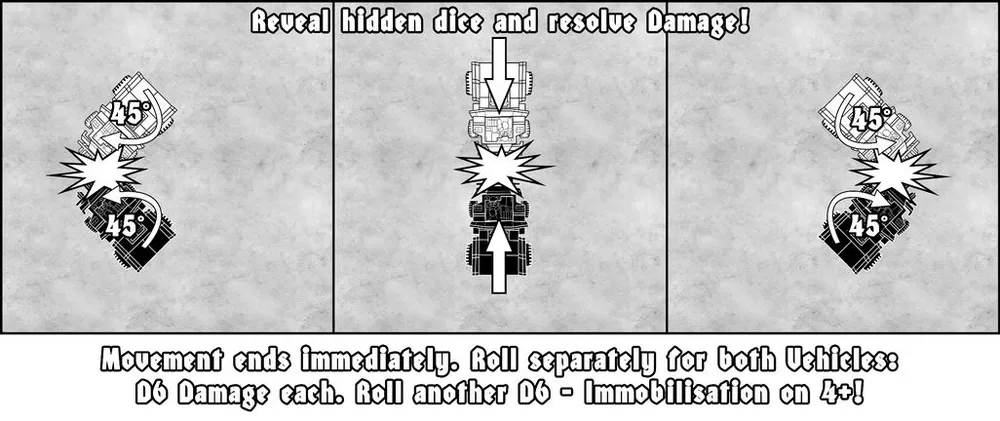
If they avoid each other then Swerve the Vehicles as appropriate and the Movement Phase resumes for the Ramming player. However if they both Swerve towards each other (e.g. the Ramming Vehicle Swerves left and the Target Swerves right) or both choose to move straight on then a Head-On Ram occurs and bad things happen!
It’s rare for Vehicles to survive Head-On Rams as they do D6 Damage to both the Rammer and the Rammed enemy Vehicle. Even if they survive that roll a D6 for each Vehicle - on a 4+ that Vehicle is Immobilised!
Small Vehicles also take D6 Damage but a Large Vehicle Ramming them Head-On will only take 1 point of Damage and won’t be subject to the additional Immobilisation Damage described above.
Furthermore, unlike Shunts and T-bones a head-on Ram ends the Movement of both Vehicles immediately. Probably with a pretty nasty crunching sound!
Squashing Warriors on foot
Ramming Actions only apply against other Vehicles - Models on foot are instead subject to squashing!
If a Vehicle passes over a Warrior on foot they can attempt to run them down. The Vehicle may also do this by passing within 2” (a rake or a sideswipe).
Getting Squashed and Avoiding it
If the Warrior is Down then they cannot avoid being squashed. Otherwise they may take an Initiative Test (rolling equal or under their Initiative characteristic on a D6) in order to jump out of the way. If they pass, place the Warrior on either side of the Vehicle (whichever seems most appropriate). If the Warrior was “Pinned” they will automatically unpin as nothing steals the nerves and gets the legs moving like the need to avoid getting squashed by a Trukk.
If they fail to avoid the Vehicle they take a S3 Hit. Place them behind the Vehicle. This applies to Warriors that are Down too.
Collisions - Unintentional Ramming
In the midst of all this carnage it’s easily possible for Vehicles to Crash with each other without it being a Ramming Action. A roll on the Thruster Buster Table might result in a Swerve into another Vehicle, for example. We term that a Collision and here’s how things work out when they happen, depending which quadrant of each Vehicle takes the impact:
Front-to-Front
Both Vehicles take D6 Damage. Roll an additional D6 for each Vehicle - on a 4+ that Vehicle is Immobilised.
Larger Vehicles hitting small Vehicles take only 1 point of Damage and don’t have to roll for Immobilisation.
Side-to-Side
The Vehicles take 1 Damage each. Small Vehicles that are Hit by a larger Vehicle take D3 Damage.
All others (e.g. rear to side)
Both Vehicles take 1 point of Damage. Larger Vehicles hitting small Vehicles take no Damage.
Avoiding a Collision
Assuming the Vehicle that’s about to be Crashed with has an available Driver and isn’t Stationary or Immobilised it can attempt to Swerve out of the way. The Driver will need to pass a Leadership Test which will allow them to Swerve left or right as appropriate.
Movement after a Collision
When Collisions happen the Drivers are trying to slow their Vehicles down and avoid Damage - unlike a Ram. Should two Vehicles Crash that ends their Movement, even if they were originally supposed to move further.
Note
If you’re unsure whether two Vehicles Crashed roll a D6 - on a 1-3 they scraped nothing more than paint, on a 4+ resolve a Collision as described above.
Crashes
We’ve dealt with Vehicles coming into contact with each other and Warriors on foot - what if they hit terrain instead? Crashes fall into two categories: head-on and any other. We’ll deal with the latter first as they’re simpler. Note that Vehicle Drivers may not attempt to Swerve to avoid Crashes. They’re Crashing because they didn’t succeed in keeping control!
Side Crashes and rear Crashes
A Spin or a Swerve might result in a Vehicle Crashing into some terrain. If this happens, roll a D6 - on a 4+ the Vehicle takes 1 point of Damage.
Assuming the Vehicle isn’t Immobilised by that Damage it Swerves away from the point of impact. It may then continue its move as normal.
Front Crashes
The Vehicle takes D3 Damage. Roll an additional D6 for the Vehicle - on a 4+ it is Immobilised. Its Movement ends immediately for this turn.
Clipping
If you are uncertain if a Vehicle has come in contact with another Vehicle or terrain roll a D6. If the result is 4+ treat it as a Collision or Crash.
Shooting
Lots of Vehicles mount Fixed Weapons and their Shooting Phases work the same as Warriors on foot with the following differences:
Drivers
During the Shooting Phase Vehicle Drivers can fire a single-handed weapon (such as a Pistol) or throw a projectile weapon (like a Stikkbomb). Their arc of fire is the front 90º quadrant of the Vehicle with the range measured from the front edge (if the Vehicle has a Ram sticking out that does not count as the main edge!).
Gunners & Fixed Weapons

Most importantly Fixed Weapons have a fixed fire arc - a 90º section of the Vehicle that they cover. Anything outside that area cannot be targeted. This can be changed between battles but is fixed during play. Vehicles should be Modelled to reflect their firing arc.
Range should be measured from the main edge of that Vehicle quadrant rather than the gun barrel. Don’t try to get sneaky by adding a Boarding Plank and calling that the main Vehicle edge though! Sneaky gits.
Only the assigned Gunner may fire their Fixed Weapon during a battle but a Gunner may instead choose to shoot an alternative weapon, if they have one.
Linked Weapons
A type of Fixed Weapon created from joining two Gunz of the same type together. The new weapon gains a single Sustained Fire Dice and counts as a single weapon from now on (e.g. for the purposes of Ork weapons being Kustomized). You may not merge multiple Linked Weapons!
Crew
The Crew of a Vehicle may Shoot during their turn in any direction. Crew cannot be targeted directly and are part of Crew Location.
Boarding Actions (Shooting)
A Vehicle that has been Boarded is not considered to be “engaged” or “locked” in Close Combat. Boarders are considered part of the Crew Location and may both Shoot during their turn. Boarders may not be targeted directly and friendly fire prevents Defenders from targeting your own Vehicle. However, stray shots may still inadvertently hit the Crew Location and go on to injure an Attacker, if you're very lucky (or unlucky).
Small Vehicle Riders (Bikers)
Many factions have Bikes or equivalents - sometimes they can mount Fixed Weapons (see the relevant faction pack). These Fixed Weapons are controlled by the Driver and do not operate like the weapons on other Vehicles. Instead of having a fire arc they instead have a corridor of fire 2” wide, based on the orientation of the model. The range should be measured from the front of the Small Vehicle.
However if they decide not to fire them they can instead fire a single-handed weapon or throw a projectile. If they choose this option their firing arc is a full 360º!

Taking Damage
Vehicles take Damage in a different way from Warriors on foot - partly because they’re generally tougher and partly because there’s big things to hit.
The basic process of damaging a Vehicle is as follows:
| Step |
Action |
|---|---|
| 1 |
Determine Location |
| 2 |
Penetrate Armour |
| 3 |
Saving Throw |
| 4 |
Gain Experience |
| 5 |
Take Damage |
Step 1 - Determine Location
On a Vehicle’s profile you’ll find its Hit Location Table. Here’s an example:
| Ork Trukk with ‘Eavy Shoota and Boarding Plank |
|||||
|---|---|---|---|---|---|
| D6 |
Armour |
Location |
D6 |
Armour |
Location |
| 1 |
8 |
Crew |
4 |
8 |
Wheels |
| 2 |
8 |
Fixed Weapon |
5 |
8 |
Driver |
| 3 |
8 |
Gubbins |
6 |
10 |
Engines |
These are mostly fixed but some elements vary depending on equipment and what’s happening during a battle. For example if the Driver is thrown overboard then that location can’t be Hit. We’ll get on to what happens in those instances in an upcoming section.
When a Vehicle takes a Hit of some kind (from Shooting, Ramming, or whatever else) a location usually needs to be determined (as with most things there’s some exceptions!).
Roll a D6 for each point of Damage a Vehicle takes. Something like a Shoota isn’t much of a threat to the average Trukk but a well-placed Rokkit can be very nasty indeed!
Weapons of all kinds list the amount of Damage a single Hit deals. Rams, Crashes, and Collisions do varying amounts of Damage as described in a previous section.
Template Weapons
Weapons that cause explosions, blasts of flame, or similar area-of-effect Damage are worse for Vehicles.
There are two main templates used in this game - a 4” diameter blast marker and teardrop template 8” long.
Some other games use 2” or 3” markers so make sure you measure before adding them to your kit!
If a template Hits a Vehicle and covers a large part of it a “Full Hit” is inflicted. A Full Hit inflicts D3 Hits on a Vehicle. If a template only clips a bit of it, that's a “Partial Hit”. Roll a D6 - on a 4+ the Vehicle takes a single Hit.

Given the varied size of Vehicles in this game you’ll have to use your best judgement as to what counts as a Full Hit. If you and your opponent disagree, flip a coin!
Templates and the Crew Location
After a Vehicle takes a Hit from a template weapon the Hit locations will have to be determined. If the Crew compartment is Hit things are extra nasty!
Each time the Crew location is rolled due to a Hit from a template weapon, resolve it as if each individual Warrior covered by the Crew location has been Hit once by the weapon. Remember a Vehicle's Crew includes its Gunner and any Warriors aboard (belonging to either player).
E.g. Grimlug’z Trak, Ruzt, takes a Full Hit from a Stikkbomb. D3 hits are rolled resulting in a Hit to the Traks and a Hit to the Crew. The Traks take one Hit. There’s four Crew onboard (the Gunner and three Warr
iors in combat) so four Hits to the Crew location are resolved.
Vehicles Catching Fire
Some weapons have the special rule “Catching Fire” - if such a weapon Hits a Vehicle Location it will Catch Fire on a 4+, just like Warriors on foot!
You read that correctly – the weapon does not need to penetrate the Vehicle’s armour to catch fire.
At the start of the Target Players own turn roll a D6 for each Location that is on Fire! On a 1 - 5 it takes a S4 Hit. On a 6 the Fire goes out.
If the Crew Location is hit then see the section above as the crew are in for a bad time!
Crew members can try to put the Fire out instead of using a Weapon in the Shooting Phase. Each Warrior helping to put out the Fire Modifies the dice roll above by +1.
E.g. Nazgrab’s Trukk’s wheels are on Fire. There’s three Crew onboard (including the Gunner). The Gunner decides to shoot but the other two lads spend the time trying to put out the Fire. The player rolls D6 and adds 2 to the result to determine if the Fire goes out. Unfortunately they roll a 3 giving a total of 5. If the Gunner had helped that would have been 3+3 giving the 6 needed for the Fire to go out. As a result the wheels take a S4 Hit. Let’s hope they have better luck next turn!
Step 2 - Penetrate Armour
Each Hit location on a Vehicle has an Armour value listed on its profile. To see whether a Hit Penetrates roll a D6 and add the Strength of the Hit. If that score equals or exceeds the listed Armour value for the location the Hit Penetrates.
That only applies to things with a Strength value though…
...things like Ramming and Crashing automatically Penetrate any location they Hit!
It’s difficult to make an exhaustive list of everything that automatically Penetrates Armour but here are most of them:
- All types of Ramming
- Crashes
- Collisions
- Certain Gubbins
Step 3 – Saving Throw
Some Vehicles have a saving throw of some sort against Damage. A common one is from having the Extra Armour Gubbinz but there may well be others.
If the Vehicle has such a saving throw, now is the time to take it. If passed the Damage is disregarded and the process ends here (assuming the save doesn’t have some other mechanics – see the relevant rules for details).
Vehicles that don’t have a saving throw obviously skip this step!
Step 4 – Gain Experience
If you are using the GCE campaign system (rather than playing a one-off game) then it’s at this step your Warrior would gain Experience Points for Penetrating a Vehicle’s armour, assuming the scenario you are playing gives experience for Penetrating armour (most do, but we cannot speak for every scenario ever written!).
Step 5 - Resolve Damage
Each Hit location has a number (e.g. 1 = Crew). Starting with the lowest number roll a D6 and consult the appropriate section of the Vehicle’s Damage Table. Sometimes you will also need to roll to determine what the location refers to for this specific Hit (e.g. if you have multiple items of Gubbins). You’ll find the Damage Table for your faction’s Vehicles listed in their special rules.
Resolve each Penetrating Hit fully before moving onto the next one as different results can end up making a Vehicle Spin, Swerve, or otherwise behave erratically. If that happens you might have to resolve even more Damage and that should be done immediately.
E.g. Grimlug’z other Trak, Spike, suffers two Penetrating Hits, one to the Traks and the other to the Driver. The Traks are the lowest number (4) and so are worked out first. The resulting roll on the Damage Table causes the Vehicle to Swerve into a nearby rock. Unfortunately this inflicts another point of Damage. We’re still dealing with the first result and its aftermath though so we handle the new point of Damage right now. It’s a 6 - the engines. A roll on the Damage Table indicates that the Vehicle is Immobilised. Oh dear! Now it’s time to see how the Driver got on. Rolling on the Damage Table results in a potential Leadership Test to avoid a Swerve. That can now safely be ignored though because the Vehicle is Immobilised!

Gubbinz
Vehicles usually have the option of Gubbinz. If you’ve not spent much time in Britain you might not have come across this rather odd word. It’s a vague term for “gadget” or “gizmo” and that’s what Gubbinz are in GCE. They’re additional things added to Vehicles to improve them in some way. Boarding Planks, defensive Spikes, or just Extra Armour Plates.
When a Vehicle has Gubbinz of some sort they’re added to their Hit Location Tables and can be Damaged during a game. Unless otherwise stated they’ll be fixed automatically by the time the next game happens.
The specific Gubbinz available are listed in the faction packs. You’ll also find any number of other Gubbinz floating around the Internet that you may want to use during a campaign.
Special rules
GCE contains a number of advanced rules that come up under specific circumstances and cause unusual interactions. This section covers those.
Psychology
Warriors can experience a number of psychological states during battles and this section deals with how they work.
Fear
Certain situations or opponents will result in a Warrior experiencing Fear.
Charging an opponent that causes Fear
If the Warrior wishes to Charge an enemy that causes Fear they must declare a Charge and then take a Leadership Test. If they pass they Charge as normal. Failing results in the Warrior standing still where they are for the rest of their turn instead. They may not shoot or do anything else this turn.
Being Charged by an opponent that causes Fear
When an enemy that causes Fear declares a Charge the Warrior must take a Leadership Test. If they pass they fight as normal, if not they fight as if their Weapon Skill was halved (rounding up).
Drivers and Fear
Vehicle Drivers are immune to Fear.
Warriors who cause Fear and opponents who cause Fear
Warriors who cause Fear are immune to its effects.
Terror
Terror is like Fear but somehow worse. Warriors that cause Terror also cause Fear as described above.
Movement around opponents that cause Terror
Warriors that start their Movement within 8” of an opponent that causes Terror must immediately take a Leadership Test. If they pass they may move as normal but if they fail they must immediately move 2D6” away! If this move is more than their Movement characteristic they count as running for the purposes of Shooting and similar.
Warriors that fail their Leadership Tests onboard a Vehicle will jump off during their 2D6” of Movement.
Drivers and Terror
Drivers, like everyone else, must take a Leadership Test if close to an enemy that causes Terror. If they fail they will instead drive as far as they can to get away from whatever it is, using Thrusters if the Vehicle has them until a thrust test is failed. If this takes them off the board they do not return for the rest of the battle. If the Driver’s nerve holds they may move as normal but the Crew may not have been so calm!
Warriors Charged by opponents who cause Terror
If a Warrior fails their Leadership Test for overcoming Terror and ends up in Hand-to-Hand Combat with whatever caused it they will count as having Weapon Skill 0.
Warriors who cause Fear and opponents who cause Terror
Warriors who cause Fear treat opponents that cause Terror in the same way a normal Warrior would treat an opponent that causes Fear.
Warriors who cause Terror
Warriors who cause Terror are immune to both Fear and Terror.
Stupidity
One too many concussions can have a grave effect on the intellect of some Warriors. Alternatively they could simply be heavily drugged. Perhaps both!
Warriors affected by Stupidity must pass a Leadership at the start of each of their turns. If they pass then they manage to function normally. If not they’re restricted to the following rules:
Movement
Roll a D6. On a 1 - 3 they do not move, on a 4+ they move their full normal Movement in a random direction (roll a scatter dice). If they’re on a Vehicle they fall off and take a S3 Hit and continue their move if possible.
If this Movement takes them into base-to-base contact with an enemy they engage in Hand-to-Hand Combat (the Movement counts as Charging).
Stupid Warriors in Hand-to-Hand Combat
At the start of each Hand-to-Hand Combat Phase a Warrior suffering from Stupidity must roll a D6.
On a 4+ they fight normally, on a 1 - 3 they instead roll no Attack Dice. Their combat score consists only of their Weapon Skill and any Modifiers (such as +1 for Charging).
Stupid Drivers
Instead of moving normally the Vehicle Swerves in a random direction and moves D6” forward. That is the end of the Vehicle’s Movement for this turn.
Stupidity and Fear/Terror
The Warrior automatically passes Tests against being affected by Fear or Terror.
Note: Any action that falls outside of what is mentioned above should be assumed to be too complicated for the Stupid Warrior to perform.
Hatred
Warriors can Hate specific enemies, whole groups, or even whole factions. Gits.
In combat this manifests itself in a variety of ways:
Hatred in Hand-to-Hand
For the first turn of combat against a Hated enemy a Warrior affected by Hatred may choose to reroll their Attack Dice (individual dice or all of them). The second result stands.
If a Warrior that wins combat can see other enemies they Hate they must use their 2” of Follow Up move to try to reach them. If possible they must use these 2” to immediately engage in Hand-to-Hand Combat (although, as per usual, that combat won’t be resolved until the enemy’s turn). If there are no Hated enemies in Line Of Sight then the Warrior may use their Follow Up move as normal.
Hateful Drivers
If during a Vehicle’s Movement their front arc (see Rams) passes within 6” of an enemy the Driver Hates then they must attempt to squash them by any means until either they are successful or the Target is no longer within their front arc.
Leadership and hatred
If there are Hated enemies in Line Of Sight the affected Warrior counts as having Leadership 10.
Frenzy
Sometimes you’ll find a Warrior afflicted with Frenzy which is a fun blend of Hatred and Stupidity!
If you would like to you can see if your Frenzied Warrior can calm down. If you choose to do this, have the Warrior take a Leadership Test. If they pass they keep their cool for this turn. They’ll be back to being Frenzied next turn (and so you can Test again to calm them down, and so on).
Frenzy and Movement
If there is an enemy within Charging distance the Frenzied Warrior must Charge them.
Frenzy and Hand-to-Hand Combat
Frenzied Warriors count as having double their Attacks characteristic (before any other multipliers).
Warriors afflicted with Frenzy may not block or parry (assuming they have the means to do so normally).
Should a Warrior with Frenzy defeat an opponent in Hand-to-Hand Combat they must use their Follow Up move (usually 2”) to move towards other enemies. If possible they must use it to enter Hand-to-Hand Combat with an enemy.
Frenzied Drivers
Vehicles driven by a Driver affected by Frenzy must attempt to Ram any Vehicles that pass within 6” of their front arc (see Rams) at any point during their Movement. Similarly if an enemy Warrior on foot is within 6” of their front arc of the Vehicle during its Movement Phase the Driver must attempt to squash them by any means until either they are successful or the Target is no longer within their front arc.
Frenzy and Fear, Terror, Stupidity, or Hatred
Frenzied Warriors ignore Fear, Terror, Stupidity, and Hatred.
Frenzied Warriors on Fire
Warriors who have caught Fire move normally (subject to the restrictions explained above). They still take the usual Strength 4 Hits each turn they are on Fire and other Warriors can still try to put them out - they’re just a bit too riled up to notice something as boring as being on Fire...
Overwatch
Most of the time Warriors can only shoot in their own turn but there are exceptions to this. Overwatch is one of those and allows a Warrior to fire their weapon in an opponent’s turn.
Setting Overwatch
Assuming they’re somewhere suitable it’s simply a matter of declaring that a Warrior is on Overwatch. That Warrior may not do anything else this turn (Moving, Shooting, picking up Scrap, Hide, etc.). A Warrior who is already Hidden may be set on Overwatch and remain Hidden but not the other way around. It’s usually sensible to stick a counter or something next to Warriors on Overwatch to make it clear that’s what’s happening. Warriors may not set Overwatch if they are on a moving Vehicle (Stationary Vehicles are fine).
Bear in mind the firing arc of the Warrior on Overwatch - they’ll only be able to Target things within that 90º so make sure you orientate them bearing this in mind!
Shooting on Overwatch
At any point in an enemy’s turn a Warrior on Overwatch may take their shot. The player controlling the Warrior on Overwatch should stop their opponent and resolve the shot/s. This can be in the middle of an enemy Warrior’s Movement if you so choose.
If you would normally have multiple shots for whatever reason you may take them as normal.
To represent the time and effort taken to set a Warrior on Overwatch they gain a +1 to hit modifier.
Losing Overwatch status
Once a Warrior on Overwatch has fired their weapon they automatically lose their Overwatch status. Similarly if their opponent’s turn ends without them firing they Overwatch ends. Of course they can set Overwatch again next turn if you’d like.
If the Warrior is forced to move for any reason (for example, dodging a Vehicle trying to squash them) they immediately lose their Overwatch status.
Notes
If a Warrior is Hiding they can still go on Overwatch although that requires something to Hide behind.
Hiding
There are times when it’s probably best to just take cover. A Warrior with some Cover can do exactly that by Hiding.
If a Warrior ends their Movement in some reasonable amount of Cover they can decide to Hide. In their next turn they can move and remain Hidden, assuming they only move about in cover. They may also go onto Overwatch in their next Movement Phase and remain Hidden.
Who Can’t Hide
Warriors who have Run or Charged this turn cannot Hide. Vehicles cannot Hide and Warriors cannot Hide aboard Vehicles. Also if a Warrior who is already set on Overwatch who tries to go into Hiding will lose Overwatch and must set again next turn.
Benefits of Hiding
A Warrior with Hidden status cannot be targeted directly. Template weapons can still affect them if they go off nearby but they cannot be used to directly try to shoot the Hidden Warrior. In the same way enemy Warriors cannot Charge a Hidden Warrior.
Uncovering Hidden Warriors
If an enemy Warrior comes within their Initiative distance in inches then the Hidden Warrior is automatically discovered and is no longer Hidden. Additionally if an opponent moves so they can clearly see the Hidden Warrior then that Warrior loses their Hidden status.
Similarly a Warrior who is Hiding may not shoot. They can still shoot but in doing so will be exposed - Hide or shoot, not both!
Carrying objects
Under various circumstances Warriors may need to carry large objects on the battlefield. Usually these objects are Scrap Counters but some scenarios involve things like beer barrels or other cumbersome items that need to be secured.
Scrap Counters
Scenarios often feature Scrap Counters - tokens representing piles of tech, valuable materials, or other salvage. Small enough to be carried or dragged by all Warriors but large enough to be a hindrance.
Picking Up Scrap Counters
A Warrior standing next to a Scrap Counter at the end of the player’s Movement Phase picks it up. Under normal circumstances a Warrior may only carry one Scrap Counter at a time.
Moving Whilst Carrying Scrap Counters
Warriors carrying Scrap Counters halve their Movement characteristic unless otherwise stated. They may move as normal for all intents and purposes.
Shooting and Hand-to-Hand Combat
Warriors carrying Scrap Counters may shoot and fight in Hand-to-Hand Combat Phase as normal.
Dropping a Scrap Counter
If a Warrior carrying a Scrap Counter suffers a Down or Out of Action result on the Injury Table they immediately drop it. Place the token next to them.
Warriors that are Pinned retain their Scrap Counters.
Vehicles and Scrap Counters
As long as a Vehicle isn’t moving too quickly, Scrap Counters can be loaded onto them. If a Warrior carrying a Scrap Counter comes into contact with a friendly Vehicle they can load it on and regain their normal Movement characteristic. This is only possible if the Vehicle has so far moved 6” or less this turn. Once loaded the Vehicle may move further.
Vehicle Drivers can also pick up Scrap Counters but they must spend their entire Movement Phase next to the counter to do so. The Vehicle comes to a complete stop and the Driver temporarily disembarks to load the token. The Vehicle does not count as being Driverless, Crewless, or otherwise separated from the driving during this time but it is Stationary.
Scrap Counters as Terrain
Scrap Counters represent relatively small objects in the grand scheme of things - they count as Open Ground for Vehicles. This does mean that Vehicles can be parked on top of them, should you so wish!
Scrap Counters Falling Off Vehicles
Vehicles carrying scrap count as having Gubbinz for the purposes of Hit locations. Each Hit to the Gubbinz location knocks one Scrap Counter off (place the token next to the Vehicle). The Vehicle still takes Damage as normal (the Hit either affects an existing item of Gubbinz or is passed onto the next relevant location - usually the Engines).
Scrap Counters and Bottlin’ Out
If a player Bottles Out their Mob may drop the Scrap Counters it was carrying.
Each Warrior carrying a Scrap Counter must pass a Leadership Test to keep it.
For each Scrap Counter onboard a Vehicle roll a D6 - on a 2+ the Mob keeps it.
Scrap Counters and Income
Scrap Counters usually contribute to a Mob’s income (see the GCE Campaign Book for rules on post-game income). For each counter a Mob manages to keep add D6 teef to their income (unless otherwise stated).
Moving Boards (“Da Rollin’ Road”)
Whilst during most games the terrain on the board is static it’s also possible to have games where it moves! The general idea being to simulate a car chase - the Warrior and Vehicle models remain in place as the scenery wooshes by. Some scenarios call for these rules but you may wish to use them for ad hoc games too.
If possible a rectangular (rather than square board) should be used for games that use these rules. It should be at least 48” long, if not longer, and populated with terrain pieces that it would make sense to have a chase sequence through. It could be a canyon with rocky outcroppings, the streets of a settlement, or just a relatively open area.
To use these rules establish a direction of travel down the long side of the board. The terrain on the board will move in the opposite direction. This means players need to factor this into their Movement choices! You’ll see what that means shortly and there will also be a practical example.
After each game turn (not player turn) the following happens:
- Terrain moves down the board 6”
- Objectives, carriable objects (e.g. scrap counters), and Stationary Vehicles are moved down the board 6”
- Models that did not “keep up” are also moved down the board 6”
- Vehicles that are more than 45˚ off the direction of movement also move down the board 6”
Placing Terrain
As terrain moves down the board the leading edge will slowly start to empty out. Players should replenish it however they see fit. If unsure, each player can roll a D6 when a piece of terrain leaves the board and the highest scoring player can choose where the piece is placed on the leading edge.
Keeping Up
During the movement phase of player turns, model movement is effectively reduced by 6” overall. That is to say Warriors and Vehicles wanting to move forward do so against the movement of the board. The board’s contents are moving backwards at 6” per game turn and so to counteract that players must move at least 6” to not move back with it. Anything after that initial 6” works as normal (so a model wanting to move forward 2” would need to spend 8” of movement to do so).
For example:

On the left we have the state of play at the end of the final player turn. SkubGob driving a trukk, Baz on a bike, and Skiffa hiding behind some crates.
The trukk decided to simply keep up - using 6” of gas engine movement to do so.
The biker decides to pull ahead, spending 12” of movement. 6” are used to simply keep up and the rest allows forward movement.
Skiffa is off axis by more than 45˚ and so cannot keep up.
The game turn ends and the terrain moves down the board 6”. The Vehicles remain where they are, having kept up. Skiffa gets moved 6” along with the terrain!
Glossary
The terms below are reminders and should not be treated as the authoritative definition of the term. See the relevant sections earlier in this book for details.
Mob
The group of models controlled by a player.
Nob
The Ork word for leader of a Mob. Some rulesets use this interchangeably for “Mob leader”.
Model
Any miniature that’s been assembled to represent an inhabitant, equipment, or vehicle.
Player
You are the Player!
Opponent
The Player you are playing against and their models. Synonymous with Enemy.
Turn
Each Player Turn is broken into four Phases Movement, Shooting, Hand-To-Hand and Recovery. Synonymous with Phase.
Rounding Down
Always round down e.g. 2.6 = 2. Unless specifically told to do otherwise.
Roll(s)
Rolling the games dice to create a randomised outcome. Note care should be taken when rolling multiple dice because sequence and consequence can be important.
Reroll
Some situations allow a dice result to be rerolled. The second result stands even if worse than the first unless specifically stated.
Declare
Actions that require confirmation before rolls are made: Charges, Firing on Full Auto, Close Combat Weapon choice, Slow Speed Manoeuvres, Thrusting, Chasing, Rakes and Sideswipes, Skills, and the Fuel Injection Implant bionik, etc..
Obstacle
Many things on the battlefield can be considered obstacles. They range from pieces of terrain, such as barricades, to other models like Vehicles. The Terrain section(s) have more detail but in general, if it prevents you moving under normal conditions it is an obstacle.
Warrior
Models representing any non-Vehicle combatant.
Statline Test
A dice test which uses a statistic from a Warrior’s Characteristics Profile. Rolling equal to or under the stat to succeed. E.g. An Ork Boy with a Strength of 3; 1-3 will pass, 4-6 will fail.
Leadership Tests
Roll 2D6. Equal or less is a pass. A score of 12 is always a failure.
Wounds (Warriors)
A Warrior will lose a Wound Characteristic for each point of Damage a Weapon inflicts down to a minimum of 0.
Vehicles
A model representing a Vehicle from the various rosters e.g. Trukks, Traks, Bikes, Cuttas, and Big Luggas.
Leader
Synonymous with Nob.
Crew
All Warriors, friend or foe, onboard a Vehicle other than the Driver.
Gunner
The Warrior nominated to man a Vehicle’s Fixed Weapon.
Fixed Weapon
The Fixed Weapon is a Big Gun or Linked Weapon mounted onto a Vehicle operated by a Gunner.
Driver
The Warrior currently driving a Vehicle (or Riding a Bike).
Rider
The Warrior nominated to ride a Bike. Counts as Driver and Gunner.
Gubbinz
Extras and add-ons for a Vehicle. Faction-specific rules exist for how a player acquires them (see faction packs for details).
Wrecked
A Vehicle that is Immobilised and may not be used for the rest of the game, including any Fixed Weapons or Gubbins. Synonymous with Crippled. Note: Destroyed is not the same as Wrecked.
Immobilised
A Vehicle that is unable to move for the rest of the game. Treat as Stationary.
Stationary
A Vehicle that is Immobilised or did not make any move in its previous Movement Phase. E.g. A Driver collecting Scrap. No rolls are required to Board and it is treated as Difficult Terrain.
Unopposed
A situation where an Opponent is unable to prevent a Player from performing certain actions. Such as, attacking a Stationary Vehicle, attacking a Boarded Vehicle without any Defenders. Putting a Warrior who was Down automatically Out of Action in Close Combat. More commonly, it is a Warrior not in base contact with an enemy Warrior.
Armour Penetration
The Vehicle equivalent of a Wound. A weapon will Penetrate Vehicle Armour if the score matches the Armour Value of the Location Hit.
Extra Armour Plates
A common type of Gubbinz fitted on Vehicles. Allows a Saving Throw upon receiving an Armour Penetration.
Movement Phase Terms
Charge
A special type of Movement which allows a Warrior to move into base contact with another Model. Resolved in the Hand-To-Hand Phase.
Overwatch
A Warrior forgoing Running, Charging, Hiding, or Shooting in order to position themselves to take a shot at any time in the enemy’s Movement Phase.
Hiding
A Warrior forgoing Running, Charging, or Shooting in order to position themselves in a place where they cannot be Targeted by enemies.
Gas Engine
Primary means of locomotion for many Vehicles, usually 6”. Forward only.
Thrusters
Secondary means of locomotion for Vehicles. Forward only. Thrust test required unless otherwise stated. The distance to be travelled must be Declared before moving! Turning is allowed once the Vehicle has moved its full Declared amount. Leadership Test required. Further Thrusts followed by Turns are permitted until the test is failed.
Slow Speed Manoeuvres
Corrective procedure for Vehicles in difficult positions. Up to three 1” Movements may be made (forwards or backwards), turning after each one. Counts as Moving.
Tailing & Racing
Synonymous with Chasing.
Ramming
The Vehicle equivalent of a Charge. Head On, Shunt, T-Bone, Rakes and Side Swipes are all types of Ram. The Vehicle that Declared the Ram may continue moving after Damage and Crunch have been resolved, assuming they were not Immobilised.
Swerve
When a Driver ends up to the left or right of another Vehicle at a 45° angle.
Crunch!
After a successful Ram and assuming the Vehicles were not Immobilised, the Target Vehicle is pushed out of the path of the Ramming Vehicle as if it had successfully Swerved.
Collision
When two Vehicles hit each other as a result of a failed Ram attempt or other unintentional Movement or Swerve. After resolving Damage neither Vehicle is pushed out of the path as with Crunch and may not continue moving.
Crash
When a Vehicle unintentionally ends up in contact with Terrain. The Vehicle may not attempt to Swerve and may not continue moving.
Shooting Phase Terms
Target
Including Large and Small, is the intended Target of a Phase with the intent to score Hits.
Line of Sight
An imaginary line drawn from a Warrior’s head (eyes) to the Target’s body (bulk). This often involves leaning over the battlefield to gain a Warriors eye view and to reveal how much (if any) the Target is obscured by Cover.
Body
The whole physical structure of a Model, not including tips of guns, blades, and other peripheral parts.
Cover
Terrain which may provide a negative Modifier to a Warrior trying to Roll to Hit or Charge in Close Combat.
Modifier
A positive or negative effect on an outcome of a dice roll or other characteristic.
Hit
Represents a shot, strike or blow that has successfully Hit its Target. Proceeded by Rolls to Wound.
Full Hit
When using Template Weapon, any model completely covered by the Template is automatically hit.
Partial Hit
When using Template Weapon, any model not completely covered by the Template is hit on d6 roll of 4+.
Wounds (Weapons)
A shot, strike or similar blow that may deal Damage to a Warrior if they are unable to pass a Saving Throw.
Armour
Worn by Warriors to allow a Saving Throw upon receiving Wounds.
Saving Throw
A model’s attempts to negate Wounds (Weapons) just received.
Damage
After a failed Saving Throw, some Weapons may cause multiple Damage to Vehicles and Warriors. Each point of Damage will reduce the Warriors Wound Characteristic or require a Roll on a Vehicles Damage Table.
Stikkbombz (Throwing)
An Ork Grenade. Drivers and Riders can throw Stikkbombz one handed.
Hand-To-Hand Combat Phase Terms
Hand-to-Hand Weapon
Unless otherwise stated, these include any weapon on any purchase list for Hand-to-Hand weapons. These sometimes include ranged weapons like Sluggas. Synonymous with Close Combat Weapon.
Critical Blow
Close Combat score bonus for rolling two or more dice results of 6.
Stikkbombz (Close Combat)
An Ork grenade. Counts as a Club for Close Combat. If both Warriors roll 6s on their Attack Dice the grenade explodes and Hits both Warriors (only) with the Weapons profile as normal (see Stikkbomb rules in the armoury appendix of a relevant faction pack to get the full rules).
Follow Up
A special 2” Movement awarded to the Warrior who successfully defeats all his opponents regardless of whose turn it was. May engage others but Charge Modifier does not apply.
Recovery Phase Terms
Injuries
When a Warriors Wound characteristic reaches 0 Injury rolls are made. There are three outcomes, Flesh Wound, Down and Out of Action.
Pinned
If a Warrior susceptible to Pinning is Hit but not Wounded or receives a Flesh Wound they will be placed face up until their Recovery Phase. If they are within 2" of a friendly Warrior (who is not Pinned, Down, or engaged in Close Combat themselves) they will allow the Pinned Warrior to make an Initiative Test to recover sooner. Pinned Warriors recover immediately if engaged in Close Combat.
Flesh Wound
An Injury that reduces a Warriors WS and BS characteristic by -1. If WS and BS both reach 0 the Warrior goes Out of Action.
Down
An Injury that causes a Warrior to fall down to the floor. Place the model face down.
Out of Action
An Injury that causes the Warrior to be immediately removed from play.
Licence details and Credits
This document was written by Morgan Fox, Michael Haslam, Matthew Bester, Tom Inglis, Ben Middleton, Ben Saunders, Andrew Meijers, Andrew Little, Nicola Juno, Ben Kerby, and Chris Noto.
It is licenced under Creative Commons Attribution-NonCommercial-ShareAlike 4.0 International
https://creativecommons.org/licenses/by-nc-sa/4.0/
Unsure what any of that means?
Visit https://gorkamorka.co.uk/creative-commons for an explanation.
Cover art by Andrew Meijers (also licenced under Creative Commons Attribution-NonCommercial-ShareAlike 4.0 International).
Additional art and images provided by:
Andrew Meijers (Creative Commons Attribution-NonCommercial-ShareAlike 4.0 Unported license)
Andrew Trevorrow-Seymour (Creative Commons Attribution-NonCommercial-ShareAlike 4.0 Unported license)
Clayton Tait (Creative Commons Attribution-NonCommercial-ShareAlike 3.0 Unported license)
Darren Sampson (Creative Commons Attribution-ShareAlike 3.0 Unported license) David Cammack (Creative Commons Attribution-NonCommercial-ShareAlike 4.0 Unported license)
Matthew Bester (Creative Commons Attribution-NonCommercial-ShareAlike 4.0 Unported license)
Morgan Fox (Creative Commons Attribution-NonCommercial-ShareAlike 4.0 Unported license)
Nicola Juno (Creative Commons Attribution-NonCommercial-ShareAlike 4.0 Unported license) Steffan Mensikov (Creative Commons Attribution-NonCommercial-ShareAlike 4.0 Unported license)
Steve Byrne (Creative Commons Attribution-NonCommercial-ShareAlike 4.0 Unported license)
The layout was made by Morgan Fox using images created by Jenny Fox and is also licensed under a Creative Commons Attribution-NonCommercial-ShareAlike 3.0 Unported license.
GCE is in no way affiliated with Games Workshop.
Furthermore, Gorkamorka is a trade mark of Games Workshop Ltd. and is used without permission. No challenge to its status is intended.